# Help Center

Find answers to common questions, learn how to use UpNote’s features, and get troubleshooting support when you need it. Browse the articles below or use the search bar to quickly locate the help you’re looking for.

<table data-view="cards"><thead><tr><th></th><th></th><th data-hidden data-card-target data-type="content-ref"></th></tr></thead><tbody><tr><td><h4>🚀 Get Started</h4></td><td>Learn the basics of UpNote — download the app, create your first notes, and sync across your devices.</td><td><a href="/pages/sUOdA50hg5wRLo80SvFL">/pages/sUOdA50hg5wRLo80SvFL</a></td></tr><tr><td><h4>📝 Write &#x26; Edit</h4></td><td>Discover tools for writing beautifully, formatting text, and adding rich content to your notes.</td><td><a href="/pages/bP6LsyMmXU342b2mEom4">/pages/bP6LsyMmXU342b2mEom4</a></td></tr><tr><td><h4>📔 Organize &#x26; Manage Notes</h4></td><td>Keep your notes tidy with notebooks, tags, spaces, and tools to sort, find, and manage them.</td><td><a href="/pages/VEt4zTpYNRxb5lQcUw0v">/pages/VEt4zTpYNRxb5lQcUw0v</a></td></tr><tr><td><h4>🛡️ Safety &#x26; Control</h4></td><td>Protect your information with locked notebooks and editing controls to keep your content secure.</td><td><a href="/pages/geqGZBFHWQB5cA68fDrD">/pages/geqGZBFHWQB5cA68fDrD</a></td></tr><tr><td><h4>📥 Import &#x26; Export</h4></td><td>Move your notes between UpNote and other apps, back up your content, or share it externally.</td><td><a href="/pages/322byuqRaRYVdkRvWLBQ">/pages/322byuqRaRYVdkRvWLBQ</a></td></tr><tr><td><h4>💡Resources</h4></td><td>Find advanced tools, keyboard shortcuts, release notes, and help when you need support.</td><td><a href="/pages/zn440bXAw90xVD4efK2Y">/pages/zn440bXAw90xVD4efK2Y</a></td></tr></tbody></table>

### `🛠️` Troubleshooting

* [Can't sign in to account](/resources/troubleshoot-issues/cant-sign-in-to-account)
* [Sync not working](/resources/troubleshoot-issues/sync-not-working)
* [Restore missing notes](/resources/troubleshoot-issues/restore-missing-notes)
* [Images not displaying](/resources/troubleshoot-issues/images-not-displaying)
* [UpNote Premium](/resources/upnote-premium#i-have-purchased-premium-but-it-is-not-showing-up)
* [Duplicate charges](/resources/upnote-premium/troubleshooting/duplicate-charges)


# Installation

UpNote is free to download on iOS, Android, Mac, Windows and Linux.&#x20;

### iPhone and iPad

[Download on the App Store](https://itunes.apple.com/us/app/upnote-elegant-note-app/id1389634515)

*UpNote is compatible with iOS 15 and above.*

### Android

[Download on Google Play](https://play.google.com/store/apps/details?id=com.getupnote.android)

### MacOS

{% hint style="info" %}
UpNote is compatible with Mac OS 12 and above.
{% endhint %}

[Download on the Mac App Store](https://itunes.apple.com/us/app/upnote-an-elegant-note-app/id1398373917?ls=1\&mt=12)

### Windows

{% hint style="info" %}
UpNote is compatible with Windows 10/11.
{% endhint %}

[Download on Microsoft Store](https://www.microsoft.com/en-us/p/upnote/9mv7690m8f5n?activetab=pivot:overviewtab)

If you are not able to download UpNote from the Microsoft Store, you can [download the installer for Windows app here](https://download.getupnote.com/app/UpNote%20Setup.exe). \
\
*Please note that if your computer has already installed UpNote from the Microsoft Store, you shouldn't use the installer above.*

### Linux

#### Download .deb file <a href="#download-the-app-image" id="download-the-app-image"></a>

If you are using Ubuntu, Linux Mint, Pop!\_OS, and other Debian-based systems, you can [download the .deb file](https://download.getupnote.com/app/upnote_amd64.deb) for better compatibility.

After downloading the file, you can double-click it to install on your computer. If it doesn’t install, you may need to install **GDebi** first using the command:

```
sudo apt install gdebi
```

You can also install from the .deb file using command:

```
sudo apt install ./upnote_amd64.deb
```

#### Download .rpm file

If you are using Fedora, RHEL, CentOS, Rocky Linux, AlmaLinux, or another RPM-based system, you can [download the `.rpm` file](https://download.getupnote.com/app/upnote_x86_64.rpm) for better compatibility.

After downloading the file, double-click it to install UpNote. You can also install it from the terminal using:

```
sudo dnf install ./upnote_x86_64.rpm
```

On openSUSE, use:

```
sudo zypper install ./upnote_x86_64.rpm
```

These commands follow the official [Fedora DNF](https://docs.fedoraproject.org/nn/packaging-guidelines/) and [openSUSE Zypper](https://doc.opensuse.org/documentation/tumbleweed/alternative_procurement/) guidance.

#### Download the AppImage <a href="#download-the-app-image" id="download-the-app-image"></a>

* Download [UpNote.AppImage file](https://download.getupnote.com/app/UpNote.AppImage).
* AppImages require FUSE version 2 to run. [Filesystem in Userspace (FUSE)](https://en.wikipedia.org/wiki/Filesystem_in_Userspace) is a system that lets non-root users mount filesystems. Many Linux distributions have a working FUSE setup out-of-the-box. However if it is not working for you, you may need to [install and configure FUSE manually](https://github.com/AppImage/AppImageKit/wiki/FUSE).&#x20;
* If you have installed [AppImageLauncher](https://github.com/TheAssassin/AppImageLauncher), simply double click on the UpNote.AppImage file. AppImageLauncher will automatically change the AppImage file to executable, move it to the Applications folder and show the app icon correctly.
* If you like to install AppImageLauncher to make it easier to work with AppImage, please see this link for [how to setup AppImageLauncher](https://github.com/TheAssassin/AppImageLauncher/wiki).
* If you haven't installed AppImage launcher, you need to make the UpNote.AppImage file executable and then run it. Please see this article for more instruction: <https://docs.appimage.org/introduction/quickstart.html>
* UpNote.AppImage automatically checks for new update and notifies you when the new version is available. Please restart the app to install the update.

#### Download from Ubuntu Snap Store <a href="#download-the-app-image" id="download-the-app-image"></a>

* The Snap version of UpNote is available at <https://snapcraft.io/upnote>

{% hint style="warning" %}
If you’re having trouble detecting a printer when printing from UpNote, please try installing the **Deb/AppImage** version of UpNote instead of the Snap.
{% endhint %}

***

The first time you launch UpNote, you will be presented with the Welcome screen.

<figure><img src="/files/wZtuw3AdQ3cAs3QmK1II" alt="" width="563"><figcaption></figcaption></figure>

You can sign in or create a new account with UpNote to sync your notes across all your devices. We recommend that you [create an account](/get-started/manage-your-account/create-upnote-account) so that you can retrieve your notes in case there is something wrong with your device or you need to reinstall the app.

If you do not want to use UpNote with an account and keep your data in your local device, you can click the link **Continue without an account** to proceed.


# Create a note

Creating your note in UpNote is quick and intuitive. You can start writing right away, and everything saves automatically as you type — no extra steps required. Follow the simple instructions below for your device to begin capturing your thoughts instantly.

#### On desktops

* Click the **`New Note`** button in the upper right corner of your UpNote window.
* You can also use the keyboard shortcut **`Cmd/Ctrl`** + **`N`** to create a new note.

![](/files/oww5MxbyhoMMN06jVmLH)

* **Create a note with a global shortcut:**
  * You can create a new note instantly — even when UpNote is not in focus.
    * **macOS:** use the shortcut  **`Cmd` + `Option` + `N`**
    * **Windows & Linux:** **`Ctrl` + `Alt` + `N`**
  * This opens a new note in a separate window so you can jot things down quickly and keep your workflow uninterrupted.

#### On mobile

* Tap the round blue button at the bottom center of your note list screen.

![](/files/CykFgFfNxrtwQd3INtMc)

***

#### Note title

* In UpNote, the first line of the note becomes the title and will be displayed in the notes list.
* You can edit this anytime just like normal text.

You can also choose how new note titles are styled by default:

* Go to: **Settings** > **Editor** > **New note starts with** → Choose the heading style (**H1, H2, H3, H4**), or **Normal**

***

**→** [Format your text](/write-and-edit/format-your-text)

**→** [Add content to your notes](/write-and-edit/add-content-to-your-notes)

**→** [Organize notes with notebooks](/organize-and-manage-notes/organize-with-notebooks)


# Sync notes across devices

Sign in with the same UpNote account everywhere to keep notes updated automatically.

### Sign in to your UpNote account

UpNote supports automatic syncing across unlimited devices. You need to sign in to your UpNote account on your devices to sync your notes (make sure you sign in to the same account on your devices).

* On desktop, go to **Settings** > **My Account**
* On mobile, go to **Settings** > **Sign in to sync notes**

If you haven’t created an account yet, choose [Create Account](/get-started/manage-your-account/create-upnote-account) and follow the steps to get started.

**→** [Can't sign in to UpNote](/resources/troubleshoot-issues/cant-sign-in-to-account)

***

### Check unsynced notes

To check if any of your notes are unsynced, go to [Unsynced filter](/organize-and-manage-notes/find-and-view-notes/filter-notes) (located under "All Notes" in the sidebar). Your notes will appear there if their content (including images, attachments...) is not fully synced to the server.

<div align="left"><figure><img src="/files/pOjv25RTTjpKBHqNXffe" alt="" width="210"><figcaption></figcaption></figure></div>

If you don't see the Unsynced filter, follow the step below to view it.

* On **desktop**, hover on the "All Notes" label and select **`Filter All Notes`** > **`Unsynced`**\
  ![](/files/KvdSeDSnZrJKDQZvj5sS)
* On **mobile**, tap the **`...`** icon in the bottom right corner of the **All Notes** screen and select **Filter All Notes** then add the **`Unsynced`** filter. The filter will appear under your **All Notes** section in the sidebar menu.
* To see the note count of the filter, go to **Settings** > **General** > **Show number of notes in each notebook**

***

### Tips for smooth syncing

* Keep the UpNote app updated to the latest version
* Confirm the same account is signed in everywhere
* Ensure a stable internet connection when syncing. Sometimes due to spotty internet connection, your images/files are not completely uploaded yet. You can try forcing syncing on both devices:
  * On iOS/Android app, pull down from the note list (you will see the syncing icon when pulling down).&#x20;
  * On Mac/Windows/Linux app, click the sync button <img src="https://help.getupnote.com/~gitbook/image?url=https%3A%2F%2F3053791484-files.gitbook.io%2F%7E%2Ffiles%2Fv0%2Fb%2Fgitbook-x-prod.appspot.com%2Fo%2Fspaces%252FFt4LISrSRa6fHrbSIdcE%252Fuploads%252FDZreYguVEM1Y1m7mvnGP%252Fimage.png%3Falt%3Dmedia%26token%3Dcf0c2ce4-04df-4475-8a0a-535ab0b6b061&#x26;width=41&#x26;dpr=4&#x26;quality=100&#x26;sign=cb764179&#x26;sv=2" alt="" data-size="line">located in front of the search box.
* To sync attachment edits, please return to UpNote app after editing your attachment on the device

**→** [Sync not working](/resources/troubleshoot-issues/sync-not-working)


# Manage your account


# Create UpNote account

We recommend creating an UpNote account so your notes are safely stored on our server. This ensures you can retrieve them if your device is lost or damaged. An account also allows you to sync your notes and premium access across all your devices.

You can create an account when first launching UpNote, or follow the steps below if you’re currently using UpNote without one.

### On desktop

1. Click the **`Settings`** button in the upper right corner of your UpNote window.
2. Go to **`My Account`**
3. Click **`Don't have an account?`**

<div align="left"><figure><img src="/files/bAr549gnU2i2WAY4db18" alt="" width="286"><figcaption></figcaption></figure></div>

* You can select any of these methods to create your account:
  * Sign in with Google
  * Sign in with Apple&#x20;
  * Sign up with your email and password
* If you create an account with your email, a verification message will be sent to your inbox. Please click the link to verify your email address. Verifying your email helps secure your account, prevents others from registering with your address, and allows you to recover your account if you forget your password.

### On mobile

1. Tap the **`...`** button in the lower right corner of your note list screen and select **`Sync notes`**
2. Tap the **`Don't have an account?`** button
3. Enter your email and password to create account
4. You can select any of these methods to create your account:
   * Sign in with Google
   * Sign in with Apple&#x20;
   * Sign up with your email and password
5. If you create an account with your email, a verification message will be sent to your inbox. Please click the link to verify your email address. Verifying your email helps secure your account, prevents others from registering with your address, and allows you to recover your account if you forget your password.


# Sign in and sign out

### Sign in

When you first open UpNote, you’ll be prompted to **sign in** to your account. If you initially chose to **continue without an account**, you can still sign in later by following the steps below.

#### On desktop&#x20;

1. Click the <img src="/files/njMWinRc2LEGiDLkc52i" alt="" data-size="line"> icon in the top right corner of the UpNote window&#x20;
2. Go to **My Account > Sign in with Google/Apple** or with **email** and **password.**
3. Click **Sign In** to access your notes.

#### On mobile

1. Tap the **`...`** icon at the bottom right corner of your notes list screen > select **Sign in to sync notes**.
2. **Sign in with Google/Apple** or with **email** and **password.**
3. Tap **Sign In**.

**→**[Can't sign in to account](/resources/troubleshoot-issues/cant-sign-in-to-account)

**→**[Manage sign-in methods](/get-started/manage-your-account/manage-sign-in-methods)

### Sign out

* Go to **Settings > My Account > Sign out**
* When signing out, UpNote will ask whether you want to keep or delete the backup data and version history on your device:
  * **Delete backup data:** Choose this if you are using a shared or public device.
  * **Keep backup data:** Choose this if you are on your personal device and want to retain your backup data and notes' version history locally.

***

**FAQ: Can I sign out remotely on another device?**

Currently, UpNote does not support remote sign-out. However, you can change your account password on your current device, which will log you out of other devices. Please note that it may take some time for the change to take effect.

We are considering adding a remote sign-out feature in a future update.


# Sign in with 2FA

If you want to use **two-factor authentication** (**2FA**) for your UpNote account, we highly recommend using “**Sign in with Google**” or “**Sign in with Apple**”.&#x20;

* Security is already built in to Sign in with Apple with [two-factor authentication](https://support.apple.com/kb/HT204915). If you use an Apple device, you can sign in and re-authenticate with Face ID or Touch ID anytime.&#x20;
* If you use "Sign in with Google", you may already have enabled 2FA for your Google account or you can set up the 2-step verification following [this guide](https://support.google.com/accounts/answer/185839?hl=en\&co=GENIE.Platform%3DAndroid).

If you are currently signed in with email and password, you can add the “**Sign in with Google**” or “**Sign in with Apple**” method from **Settings > My Account > Manage Sign-in Methods**

**→**[Manage sign-in methods](/get-started/manage-your-account/manage-sign-in-methods#add-a-sign-in-method)

**→**[Manage sign-in methods](/get-started/manage-your-account/manage-sign-in-methods#remove-a-sign-in-method)


# Manage sign-in methods

You can access your UpNote account using any of these sign-in methods:

1. Email and password
2. [Sign in with Google](/get-started/manage-your-account/sign-in-with-2fa)
3. [Sign in with Apple](/get-started/manage-your-account/sign-in-with-2fa)

At any time, you can add or change your sign-in methods and they will be applied on all your devices.&#x20;

### Add a sign-in method

* Go to **`Settings`** > **`My Account`** > **`Manage Sign-in Methods`**
* To add the option to sign in with Google/Apple, click **`Connect`** and enter your current password to proceed.

  <figure><img src="/files/T2pWEaDUfYtDR75bYfgs" alt=""><figcaption></figcaption></figure>
* To add the option to sign in email and password, click **`Connect`** .If you already have a lock password, please enter it to proceed. Then, enter your new email and password to set up this sign-in method for your account.

### Remove a sign-in method

* Go to **`Settings`** > **`My Account`** > **`Manage Sign-in Methods`**
* Click  **`Disconnect`** to remove a sign-in method. You need to have at least 2 sign-in methods in order to remove one.&#x20;


# Reset password

If you forget your login password, follow the steps below to reset your password:

1. Sign out from UpNote (if you are still logged in)
2. Click/Tap the **`Sign in to sync notes`** button\
   ![](/files/G0eRwHxuwJIUuq0ADiwU)<br>
3. Click **`Forgot your password`** button\
   ![](/files/XqvdNjR4dO1diQdJPXjO)<br>
4. Enter your email (the one you created with UpNote) and click the **`Reset`** button.\
   ![](/files/N0yrCjAGi3FVZvw7to0U)<br>
5. You will receive a password reset link sent to your email. Click/tap the password reset link.<br>
6. Enter your new password. \
   ![](/files/Exzf4DMk7BfomBFESdFp)
7. Now you will be able to use this new password to log in to your UpNote account.
8. After you have reset your password, you will be signed out on other devices. You will need to sign in again on other devices to sync your notes.  <br>

***

#### If you are unable to reset password:

Update your app to the latest version and try again. Please also check your spam folder to find the password reset email.

Go to **Settings > Help > Check for updates** to update the app, or follow the links below:

* [Windows - Microsoft Store](https://www.microsoft.com/en-us/p/upnote/9mv7690m8f5n?activetab=pivot:overviewtab)&#x20;
* [Windows - installer](https://download.getupnote.com/app/UpNote%20Setup.exe)
* [Mac](https://itunes.apple.com/us/app/upnote-an-elegant-note-app/id1398373917?ls=1\&mt=12)

***

**FAQs:**

<details>

<summary>I forgot my password but no longer have access to my email address. Can I receive the password reset link at my new email?</summary>

For security reasons, password reset links can only be sent to the **original email address** associated with your UpNote account. If you no longer have access to that email, we’re unfortunately unable to reset your password or transfer your account to a new address. This ensures that only the rightful account owner can access the data.

</details>


# Change email and password

Follow the steps below to change your email and password:

#### On desktop

1. Go to **`Settings`** > **`My Account`**
2. Click the  dropdown arrow next to your email address and select the option to change email or password.

#### On mobile

1. Go to **`Settings`** > **`My Account`** > **`Email`**
2. Select the option to change email or password

***

If you see the error message “**This email is already registered**” when trying to change your email address, it means that the new email is already associated with an existing UpNote account. This can happen if you previously signed up using that email.

Follow these steps to resolve the issue:

1. Sign in to the account using the new email address
   * If you don’t remember the password, follow the [password reset guide](/get-started/manage-your-account/reset-password) to regain access.
2. Review your notes in that account
   * Check if there are any important notes you would like to keep.
3. Delete the account (if no longer needed)
   * If there are no important notes, you can delete the account by going to:

     Settings → My Account → Delete Account
4. Sign back in to your original account
5. Change your email address again
   * You should now be able to update your email to the new address successfully.


# Delete account

Follow the steps below to delete your account:&#x20;

1. Sign in to UpNote app on any platform
2. Go to **`Settings`** > **`My Account`** > **`Delete Account`**
3. Enter your email and password&#x20;
4. Tap/click the **`Delete Account`** button. This action will delete your account and all associated data immediately from the server and your local device.

***

#### FAQ: Can I restore my data after deleting my account?

When you delete your account, we show a warning that this will permanently delete your account and its associated data, and this action cannot be undone.

However, if you still have the backup file on your desktop, you can sign up for the new account (using your previous email address) and restore your backup from **Settings > General > Backup > Restore backup.**


# Change app language

UpNote supports multiple languages on desktop and mobile devices. You can change the app language in the Settings menu.

### On Windows, Mac and Linux

1. Open UpNote.
2. Click your **Settings** icon in the top-right corner.
3. Find the Language option at the bottom-left area.\
   ![](/files/Q5RRHtg8WWOKEfBLh2TE)
4. Select your preferred language from the list.

### On iPhone and iPad

1. Go to **Settings** > **General** > scroll down to find the **Language** section
2. Choose your preferred language.

### On Android

UpNote follows your device language settings by default.

On Android 13 and later, you can change the language for UpNote only:

1. Go to **Settings** > **General** > scroll down to find the **Language** section
2. Choose your preferred language.

On older Android versions, please change the system language of your device.

### Notes

* If you find any translation issues, please contact us at <support@getupnote.com>.


# Format your text

UpNote provides powerful formatting tools to help you structure your notes and make them visually clear. You can format text using the **toolbar**, **Markdown shortcuts**, or **keyboard commands** depending on your device.

***

#### On Desktop&#x20;

* Click the icon **`Aa`** at the bottom of the editor to open the formatting toolbar.

  <figure><img src="/files/U2j7zllRD1QX2yzxW6Cs" alt=""><figcaption></figcaption></figure>
* You can highlight text and use toolbar buttons to apply **bold**, *italic*, ~~strikethrough~~, **headings**, or <mark style="background-color:$warning;">highlight</mark>.
* Right-click selected text for a quick formatting menu.
* [Keyboard shortcuts](/resources/keyboard-shortcuts) are supported (e.g. **Ctrl/Cmd + B** for bold, **Ctrl/Cmd + I** for italics).
* You can also use [**Markdown**](/write-and-edit/format-your-text/write-with-markdown) as you type — UpNote automatically renders it into rich text.

***

#### On Mobile (iOS & Android)

* The **formatting bar** appears above your keyboard while editing.\
  ![](/files/Si2jI4c8bdws7qEKmsTU)
* Swipe the bar horizontally to reveal more options such as bold, indent, lists, or quotes.
* Tap the **“More (…)”** button to access additional formatting tools like code blocks, dividers, or highlight color.
* Markdown input also works — for example, typing `#` followed by a space creates a heading.

***

#### Formatting Options

**Basic Text Styles**

* Bold, Italic, Strikethrough, Highlight, and Inline Code

**Headings**

* Choose from H1–H6 via toolbar or Markdown (`#` symbols)

**Lists and Checklists**

* Bullet list, Numbered list, or Checklist

**Quotes and Code Blocks**

* Add clarity to notes containing references or technical content

**Dividers**

* Separate sections in long notes with a horizontal line

***

#### Tip

You can customize your text style and appearance in:\
**Settings → Editor → Typography**\
Adjust font size, line spacing, and the starting heading style for new notes.

***

### Rearrange formatting icons

You can rearrange the editor format bar so your most-used formatting icons appear first. The customized order syncs between the desktop and mobile app.

* **On mobile:** Swipe to the end of the formatting bar and tap **Edit** at the bottom.
* **On desktop:** Click the **More (...)** button at the end of the formatting bar, scroll to the bottom, and select **Edit**.

Then, drag the **☰ (hamburger icon)** beside each tool to change its position.

![](/files/c17bIs1DiMj8N6XESkXU)


# Write with Markdown

Markdown has become popular nowadays, especially among developers. It helps you format the note easily without having to write bloated HTML code. If you already know Markdown syntax, you will feel at home.

### Headings <a href="#f3b2" id="f3b2"></a>

To create a heading, add number signs **`#`** in front of a word or phrase, followed by a space. The number of number signs you use should correspond to the heading level.

| Markdown              | Output                   |
| --------------------- | ------------------------ |
| `# Heading level 1`   | <h2>Heading level 1</h2> |
| `## Heading level 2`  | <h3>Heading level 2</h3> |
| `### Heading level 3` | <h4>Heading level 3</h4> |

### Bold <a href="#id-9235" id="id-9235"></a>

To bold text, add two asterisks **`**`** or underscores **`__`** before and after a word or phrase.

| Markdown        | Output        |
| --------------- | ------------- |
| `**bold text**` | **bold text** |
| `__bold text__` | **bold text** |

### Italic

To italicize text, add one asterisk **`*`** or underscore **`_`** before and after a word or phrase.

| Markdown            | Output            |
| ------------------- | ----------------- |
| `*italicized text*` | *italicized text* |
| `_italicized text_` | *italicized text* |

### Bold and Italic <a href="#cd61" id="cd61"></a>

To emphasize text with bold and italics at the same time, add three asterisks or underscores before and after a word or phrase.&#x20;

| Markdown                     | Output                     |
| ---------------------------- | -------------------------- |
| `***bold and italic text***` | ***bold and italic text*** |
| `___bold and italic text___` | ***bold and italic text*** |

### Block quotes <a href="#cd61" id="cd61"></a>

To create a blockquote, add a **`>`** in front of a paragraph, followed by a space.

| Markdown                  | Output                           |
| ------------------------- | -------------------------------- |
| `> This is a blockquote.` | ![](/files/INpG7KhNwVo0KrSOdufS) |

### List <a href="#id-39a2" id="id-39a2"></a>

To create an ordered list, add line items with numbers followed by periods.

| Markdown                                                                                        | Output                                                         |
| ----------------------------------------------------------------------------------------------- | -------------------------------------------------------------- |
| <p><code>1. Item one</code></p><p><code>2. Item two</code></p><p><code>3. Item three</code></p> | <ol><li>Item one</li><li>Item two</li><li>Item three</li></ol> |

To create an unordered list, add dashes **`-`**, asterisk **`*`**, or plus sign **`+`** in front of line items. Indent one or more items to create a nested list.

| Markdown                                                                                     | Output                                                         |
| -------------------------------------------------------------------------------------------- | -------------------------------------------------------------- |
| <p><code>- Item one</code></p><p><code>- Item two</code></p><p><code>- Item three</code></p> | <ul><li>Item one</li><li>Item two</li><li>Item three</li></ul> |

### Code <a href="#id-6bb4" id="id-6bb4"></a>

To create a code block, use 3 backticks **` ``` `** .

To denote a word or phrase as code, enclose it in backticks **`` ` ``**.

| Markdown         | Output                           |
| ---------------- | -------------------------------- |
| \`in-line code\` | `in-line code`                   |
| \`\`\`code block | ![](/files/AhEu4J41m73ZO0on8PNi) |

### Divider <a href="#f82d" id="f82d"></a>

To create a divider, use three asterisks **`***`**, dashes **`---`**, or underscores **`___`** on a line by themselves and hit **`Enter`**.

| Markdown | Output                           |
| -------- | -------------------------------- |
| ---      | ![](/files/fKWFcki3cbU4OJAkSWuJ) |

### Checkbox <a href="#id-25af" id="id-25af"></a>

To add a todo item, use **`[]`** followed by a space.

To add a done item, use **`[x]`** followed by a space.

| Markdown        | Output                                                                                |
| --------------- | ------------------------------------------------------------------------------------- |
| `[] todo item`  | <ul class="contains-task-list"><li>todo item</li></ul>                                |
| `[x] done item` | <ul class="contains-task-list"><li><input type="checkbox" checked>done item</li></ul> |

### Copy as Markdown <a href="#id-3b9e" id="id-3b9e"></a>

To copy content from UpNote as markdown, right click and select **`Copy as Markdown`**

You may also use the shortcut **`Cmd` + `Option` + `C`** (on Mac) and **`Ctrl` + `Alt` + `C`** (on Windows)

### Paste from Markdown <a href="#id-3b9e" id="id-3b9e"></a>

If you want to paste from a Markdown source, right click on your editor and select **`Paste from Markdown`***.* Your content will be automatically converted to proper format.

You may also use the shortcut **`Cmd` + `Option` + `V`** (on Mac) and **`Ctrl` + `Alt` + `V`** (on Windows)

On iOS, long tap on the editor and select  **`Paste from Markdown`** in the pop up.\
![](/files/1ZvzUJybpm02E4c6fo8v)

On Android, tap the **`+`** icon in the formatting bar and select  **`Paste from Markdown`**\
![](/files/poLfMOuVcre8dFgTy3od)


# Editor typography

UpNote lets you customize the typography of your notes so you can create a comfortable and focused writing environment. You can adjust the font, text size, line spacing, and paragraph style to match your preferences.

![](/files/toIhGqPgDj9k9c52M7aW)

***

#### How to Access Typography Settings

Go to **Settings →** **Editor**&#x20;

***

#### Available Options

* **Font:** Choose from several clean and readable fonts designed for note-taking.
* **Font Size:** Adjust the overall font size for better readability.
* **Line Spacing:** Control the spacing between lines for a comfortable reading or writing experience.
* **Paragraph Spacing:** Adjust the spacing between paragraphs for better visual separation.
* [**Line Length**](/write-and-edit/format-your-text/line-length)**:** Control how wide your text appears on the screen for optimal readability.
* **Completed To-Do Items** – Choose whether completed checklist items remain visible or are dimmed or strikethrough for a clearer look.
* **New Note Starts With:** Choose the default text style (Normal, H1, H2, H3, or H4) for new notes.


# Line length

The **Line Length** setting in UpNote controls how wide your text appears in the editor. Adjusting this setting helps improve readability and comfort, allowing you to choose a text width that best fits your screen and writing style.

**On Desktop**

1. Open **Settings**.
2. Go to **Editor → Typography**.
3. Under **Line Length**, drag the slider to set your preferred text width.

<figure><img src="/files/ULvRcX0aRtbo8dSty5lL" alt=""><figcaption></figcaption></figure>

### Focus Mode

If you’re using **Focus Mode**, click the **More (⋯)** button in the upper corner of the UpNote window, then select **Line Length** to adjust your preferred text width.

<figure><img src="/files/7rGR8Erhh3GTmq1sNkiv" alt=""><figcaption></figcaption></figure>


# Text direction

By default, the text direction in UpNote is Left to Right.

Follow the steps below if you want to change the text direction to **`Right to Left`**

{% hint style="info" %}
The text direction will be changed for all your notes.
{% endhint %}

### On desktop

1. Click the **`...`** icon in the top bar of your note&#x20;
2. Select **`Text direction`**
3. Select  **`Right to left`**

<div align="left"><figure><img src="/files/lMc19x1Xo1LokqWnvPUy" alt="" width="375"><figcaption></figcaption></figure></div>

If you want to change the entire UI of UpNote to "Right-to-left" direction, go to **`Settings`** > **`General`** > **`Text direction`** > **`Right to left`**

<figure><img src="/files/PsBj2n77zgrgh1exH2zz" alt=""><figcaption></figcaption></figure>

### On mobile

Go to **`Settings`** > **`General`** > **`Text direction`** > **`Right to left`**


# Add content to your notes


# Images

### Insert images

#### On desktop

1. Click the insert button <img src="/files/Xifa42HGUcp2xshFYnVh" alt="" data-size="line">  in the [formatting bar](/write-and-edit/format-your-text) at the bottom the note editor and select **`Insert Image`** or use the shortcut **`Cmd/Ctrl`** + **`Shift` + `O`**<br>

   <figure><img src="/files/s3v4zutqUA0XZ1z60yOZ" alt=""><figcaption></figcaption></figure>
2. Select the image(s) you want to add from the pop up window

You can also use the shortcut **`Cmd/Ctrl`** + **`C`** and **`Cmd/Ctrl`** + **`V`** to copy and paste the image directly in your note.

#### On mobile

1. Tap the image icon <img src="/files/7onQeFUBNbfZqwl38x0z" alt="" data-size="line"> in the formatting bar
2. Select the image(s) you want to paste from your phone

***

### Image Size

* To set the default image size when inserting to UpNote, go to **Settings > Editor > Default image size**.
* To adjust the size of an individual image, tap/click the image and choose **Small**, **Medium**, or **Large**.

  <div align="left"><figure><img src="/files/JB4DvbpToZmqYJwswmfN" alt="" width="532"><figcaption></figcaption></figure></div>

  * You can also resize manually by dragging the arrow at the bottom right corner of the image.
* If you want to align images horizontally or vertically, we recommend using a table and placing one image in each cell. Set the image size to "**Large**" so it fills the cell. This makes it easier to align and resize images by adjusting the cell widths/heights.<br>

  <figure><img src="/files/dVI2gYL5SRen1a16OlAo" alt=""><figcaption></figcaption></figure>

***

### Image Compression

UpNote automatically compresses images to keep syncing fast and reduce storage demand. Images under 1MB remain unchanged. For larger files, UpNote resizes the image so its shortest side is 1000px, then applies 90% quality compression.

***

### Editing and Annotating Images in UpNote

UpNote does not currently support in-app image editing or annotation tools. However, you can still edit and annotate images using your device’s built-in image editor on iOS, Mac, and Windows.

#### On Mac

1. Go to Settings → Editor → Attachments → uncheck the option “Open attachment in preview mode”.
2. Double-click the image in your note.\
   The image will open in your computer’s default image viewer/editor.
3. Edit or annotate the image as needed.
4. Save the image using **Cmd + S.**

Once saved, the updated image will automatically appear in UpNote.

#### On Windows

1. Double-click the image in your note to open it in the image viewer.
2. Click the **Edit** icon in the top toolbar.
3. Annotate or edit the image.
4. After finishing, click **Save** from the dropdown menu.

The edited image will be updated automatically in UpNote.

#### On iOS

1. Tap the image in your note.
2. Tap “**View**” in the center of the image.
3. Tap “**Edit**” in the bottom-left corner.
4. Tap the **Markup** icon in the bottom-right corner.\
   (You may need to tap the image again to make the toolbar appear.)
5. Add your annotations or edits.
6. Tap “**Done**” in the top-right corner to save your changes.

The edited image will then be updated in your note automatically.


# Attachments

UpNote Premium allows you to insert files of any type into your notes, including PDFs, Word documents, text files, videos, and more (PDF, DOC, DOCX, TXT, MP4, etc.).

**UpNote limits each file upload to less than 20MB.**&#x20;

***

### How to insert attachments

#### On Desktop (Mac, Windows, Linux)

1. Open your note.
2. Click the **Insert** button in the formatting bar at the bottom of the editor.
3. Select **Insert File**.
   * Or use the shortcut **Cmd + O** (Mac) / **Ctrl + O** (Windows & Linux).
4. Choose the file you want to attach from Finder/Explorer.

<figure><img src="/files/U90Yr9KtCqVtGi3BrCud" alt=""><figcaption></figcaption></figure>

Your file will appear in the note as an attachment and will sync across your devices.

#### On Mobile (iOS & Android)

1. Open your note.
2. Tap the **Insert** (＋) button in the formatting bar.
3. Select **Attachments**.
4. Choose the file you want to insert.

<div align="left"><figure><img src="/files/4LX3s7COWr8yijfEtmp2" alt="" width="249"><figcaption></figcaption></figure></div>

***

### How to Edit an Attachment

#### **On Desktop**

1. Click the attachment inside your note.
2. It will open in your system’s default viewer or editor (e.g., Preview, Word, Acrobat).
3. Make your edits.
4. Save the document (**Cmd + S** on Mac / **Ctrl + S** on Windows or Linux).
5. Return to UpNote — your changes will be detected and synced.

#### **On Mobile**

1. Tap the attachment to open it in your device’s viewer or editor.
2. Make your edits using the in-built app tools.
3. Tap **Done** (or your app’s save option).
4. Return to UpNote — the updated file will sync automatically.

***

### Tips

* If you need to store large files, we recommend uploading them to a cloud service such as Google Drive or Dropbox and inserting the link into UpNote. On desktop, you can also [link to local files](/write-and-edit/add-content-to-your-notes/link-to-internal-files-and-folders) stored on your device if you prefer not to upload them.
* When inserting a PDF on desktop, you can view it [inline](/write-and-edit/add-content-to-your-notes/preview-pdf-files) within the editor for quick reading.

***

### FAQs

<details>

<summary>Why is each file capped at 20MB?</summary>

To keep syncing fast and to manage server costs efficiently, each attachment is limited to **20 MB**. This helps us maintain an affordable Premium plan while continuing to support unlimited attachments. We will continue evaluating whether this limit can be increased in the future.

</details>

<details>

<summary>Is there a limit on the total number of attachments?</summary>

There is currently no limit on the number of attachments you can add across your notes.\
However, we will continue monitoring server usage and may adjust limits if necessary.

</details>

<details>

<summary>Can I view attachments offline?</summary>

Attachments are downloaded on demand to save storage and bandwidth (especially on mobile).

* If you have opened the attachment before, it remains available offline.
* If you have never opened the attachment, you will need an internet connection to download it the first time.

**Download all attachments for offline use (Desktop only)**

If you want full offline access to your attachments:

1. Go to **Settings → Backup**.
2. Enable **Backup attachments**.
3. Click **Backup now**.

This downloads all attachments to your device as part of your backup data.
</details>


# Link to internal files and folders

UpNote allows you to insert links that open files or folders stored locally on your desktop device. This helps you access supporting materials—such as documents, project folders, or reference files—directly from your notes.

### On Mac

1. Open the **Finder** app
2. Right click on a file/folder/app and hold the **Option** key
3. Select **Copy "file\_name" as Pathname** (or select a file/folder and use the shortcut **Cmd + Option + C** to copy the pathname)
4. Open a note editor in UpNote
5. Use the shortcut **Cmd** + **K** to add a link.&#x20;
6. Type the link title and paste the link in the **Link** field (or use the shortcut **Cmd** + **V**)

### On Windows

1. Open the **Explorer** app
2. Hold **Shift** and right click on a file/folder/app and select **Copy as path**
3. Open a note editor in UpNote
4. Use the shortcut **Ctrl** + **K** to add a link.&#x20;
5. Type the link title and paste the link in the **Link** field (or use the shortcut **Ctrl** + **V**)


# Embed videos

UpNote supports many popular video services such as YouTube, Vimeo or Daily Motion. You can easily embed a video in your note editor and play it directly in your note on all your devices.

To embed a video, click or tap the `Embed Video` icon <img src="/files/PuUL3LyPFYpPeGSx0jLc" alt="" data-size="line"> in the formatting bar and enter the video link in the input box.

You will see the preview of the video in the bottom area. On desktop apps, you can use the shortcut **`Cmd/Ctrl`** + **`Shift`** + **`Y`** to show the video embedding modal.

<figure><img src="/files/eJrYaOFoOksdazvcqlQW" alt=""><figcaption></figcaption></figure>


# Preview PDF files

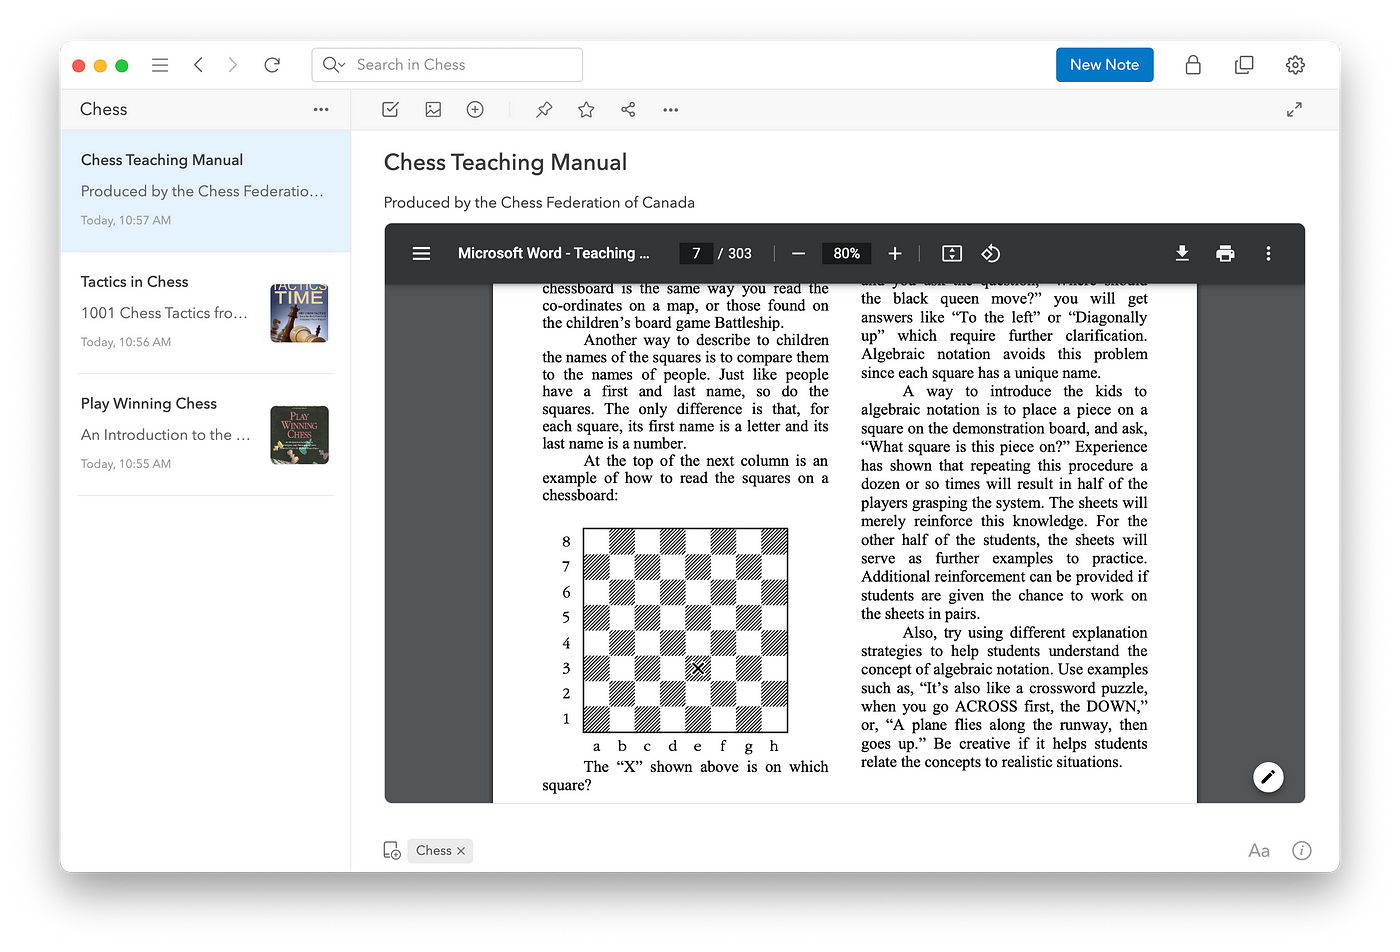
The embedded PDF viewer allows you to quickly scan through your PDF documents, go to a specific location, download or pint the file directly from your note. This feature is supported on Mac, Windows and Linux apps.

<figure><img src="https://miro.medium.com/v2/resize:fit:1400/1*HRCxQK5SLlP4LN9gNCxn8g.png" alt="" height="476" width="700"><figcaption></figcaption></figure>

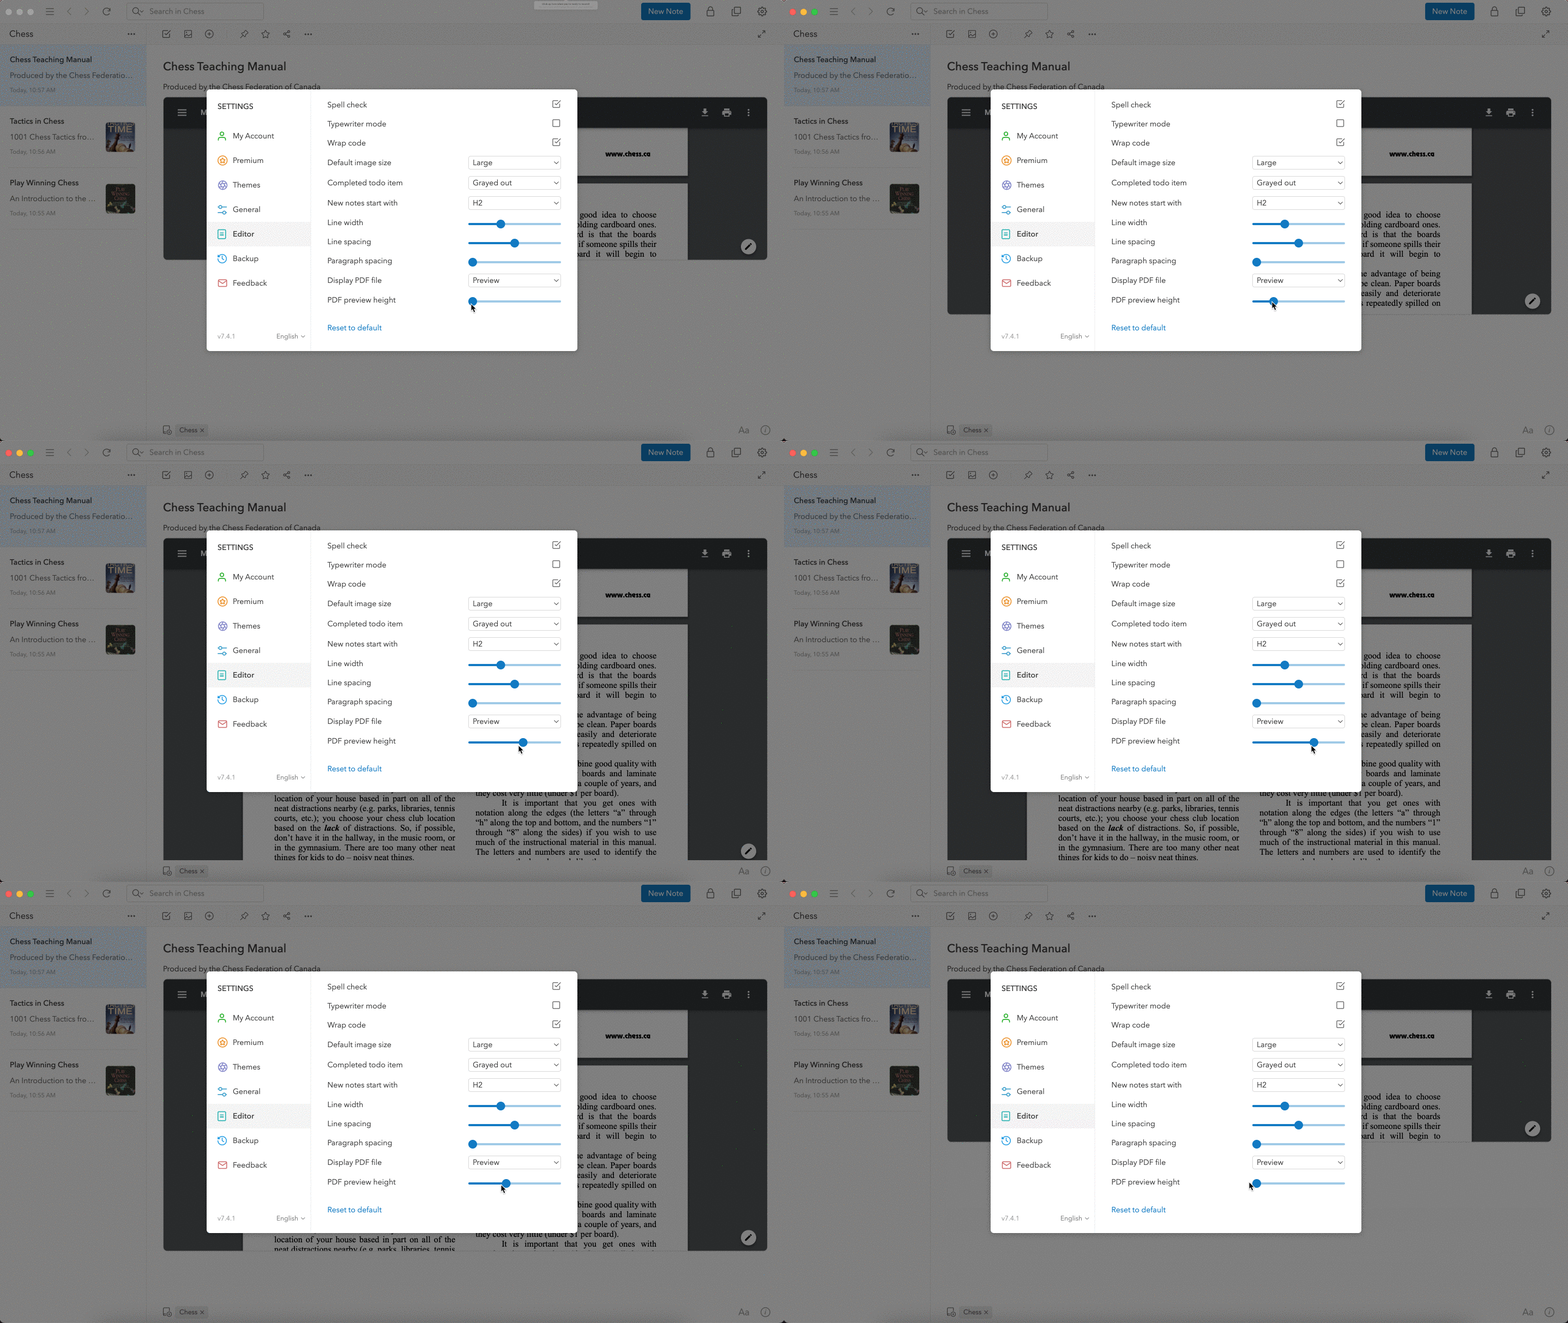
### Adjust the height of the PDF preview

To adjust the height of the PDF preview, go to **`Settings`** > **`Editor`** > **`PDF preview height`** and move the handle :

<figure><img src="https://miro.medium.com/v2/resize:fit:1400/1*59fiiFkOG-rdel14wOOh_g.gif" alt="" height="394" width="700"><figcaption></figcaption></figure>

### Display PDF files as Preview and Title

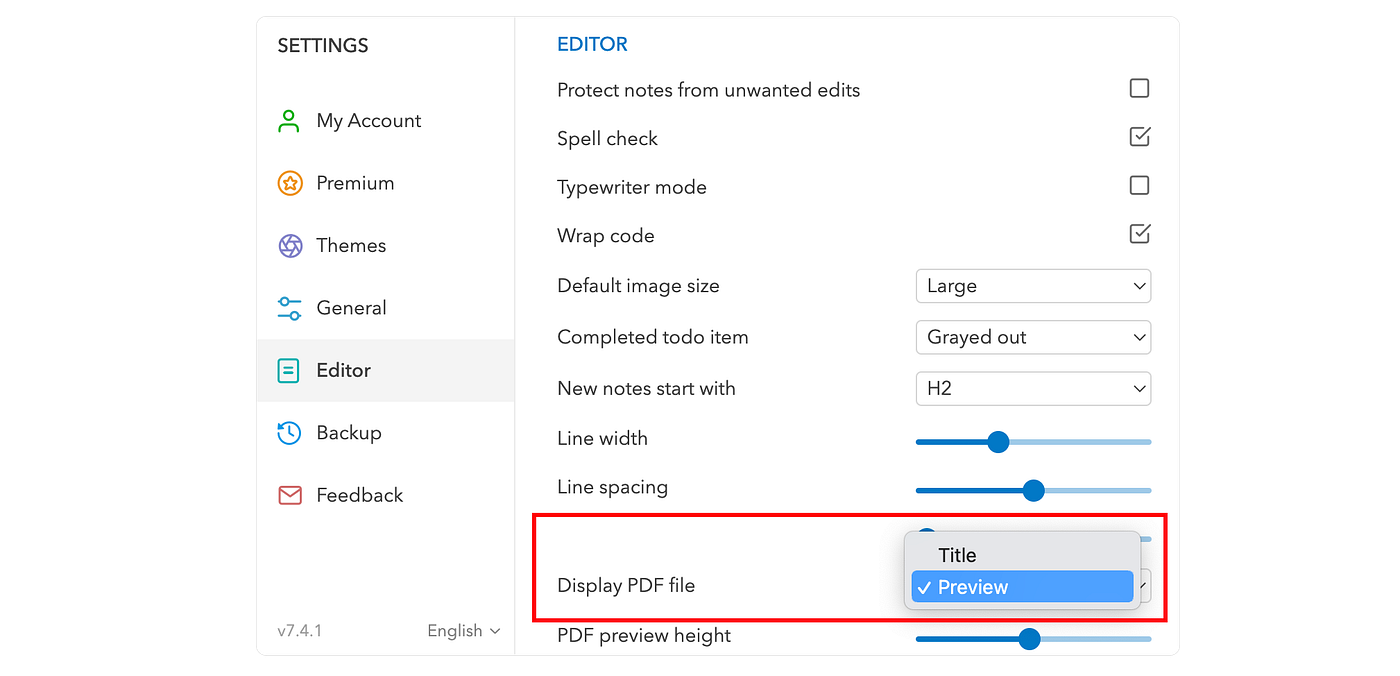
By default, PDF preview mode is turned on. You may display all PDF files as links by going to **`Settings`** > **`Editor`** > **`Display PDF File`** and select **`Title`.**

<figure><img src="https://miro.medium.com/v2/resize:fit:1400/1*X9i2W2i8XoU0nrrOL4fOQg.png" alt="" height="338" width="700"><figcaption></figcaption></figure>

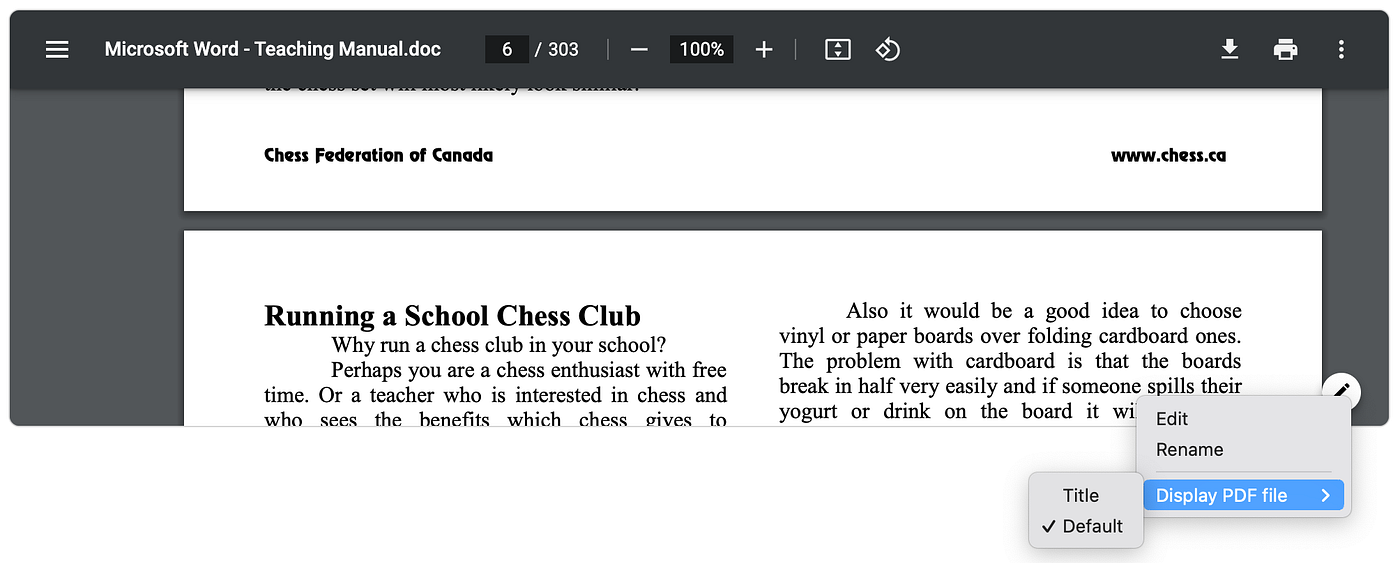
If you want to change the PDF display for each file, you may click the edit button in the bottom right corner of the PDF preview and select **`Display PDF file`** as below.

<figure><img src="https://miro.medium.com/v2/resize:fit:1400/1*m9ceD_UaW8KbC-rsHKEySg.png" alt="" height="282" width="700"><figcaption></figcaption></figure>

Similarly, if your default PDF display is title and you want to change that for an individual file, you can right click on the file name and select **`Display PDF file`** as below:

<figure><img src="https://miro.medium.com/v2/resize:fit:1400/1*0iEs2TdmaMY-nCVlAnnoxA.png" alt="" height="137" width="700"><figcaption></figcaption></figure>


# Scan documents

Follow the steps below to scan documents on mobile apps.

1. Tap the **`+`** button in the formatting bar and select **`Scan Document`** \
   ![](/files/HDAk1Cni6uAlHuuJEyFc)
2. Allow UpNote to access the camera
3. Take a photo of your document
4. Edit the scan by dragging the four corners if needed
5. Tap **`Next`** in the upper right corner of the document screen to review
6. Tap **`Done`** to insert the scanned document


# Drawing & handwriting

You can insert drawing and handwriting on iPhone and iPad apps.

### On iPhone

* Tap the **`+`** button in the formatting bar and select **`Drawing`** \
  ![](/files/Sy5kqBeAly4tvTB2kQtB)
* Start drawing or writing in the drawing screen with your finger
* Tap the **`Done`** button in the upper right corner of the drawing screen to insert the drawing

### On iPad

* Tap <img src="/files/ols5y2UonRXACXs8yv1R" alt="" data-size="line">in the upper right corner of the note editor to insert drawing
* Start drawing or writing in the drawing screen with Apple Pencil or with your finger
* Tap the **`Done`** button in the upper right corner of the drawing screen to insert the drawing

  ###


# Checklists

Checklists help you create your to-do items and check them off when completed.&#x20;

#### Create checklists

Simply tap/click the checklist icon <img src="/files/yimdXw8Ee9eWz88fNqk3" alt="" data-size="line"> in the [formatting bar](broken://pages/HW5x1P4soOaSshDTmAup) to insert a checklist item.

You can also type **`[]`** with a space to or use the shortcut **`Cmd/Ctrl`** + **`9`** to make a checklist on desktop.

<img src="/files/vLZtn9ynMA8MqVndv0yv" alt="" data-size="original">

#### Complete a checklist item

When completed, simply tick the box to mark it as done.&#x20;

Your text in the checklist item will be grayed out. You may change the style of text for completed to-do items from **`Settings`** > **`Editor`** > **`Completed todo items`**

<figure><img src="/files/wlXQvEEAYGxO6WLZo73E" alt=""><figcaption></figcaption></figure>

On desktop, you may also use the shortcut **`Cmd/Ctrl`** + **`Shift`** + **`9`** to toggle the state of your todo items. If you want to add a completed todo item, you can type **`[x]`** with a space.

Your notes which contain incomplete todo items will appear in the Todo filter in the sidebar.&#x20;

#### Reorder checklist items

* On desktop, use the shortcut **`Cmd/Ctrl` + `Option` + `up/down arrow`** to move the checklist item up/down
* On mobile, tap the move list up/down icon in the formatting bar

#### Automatically move checked items to the bottom of the list

To enable this feature, go to: **Settings** → **Editor** → **Move completed to-do items to the bottom**


# Lists

UpNote supports several types of lists to help you structure your notes clearly and efficiently. You can create bulleted lists and numbered lists and easily switch between them as you organize your ideas.

***

### Creating Lists on Desktop

#### **Using the Format Bar**

1. Place your cursor in the editor.
2. Select the bulleted list or numbered list icon <img src="/files/S9RwqDmc4eMWwO4G4BOn" alt="" data-size="line">in the format bar.

#### **Keyboard Shortcuts**

* **Bulleted List:** `Cmd/Ctrl + Shift +7`&#x20;
* **Numbered List:** `Cmd/Ctrl + Shift +8`&#x20;

#### **Indenting / Outdenting**

* Select the indent/outdent icon <img src="/files/MFtUi4CciqYsavjqbbUK" alt="" data-size="line"> in the format bar.
* Use shortcut:&#x20;
  * **Indent:** `Tab`
  * **Outdent:** `Shift + Tab`

***

### Creating Lists on Mobile

1. Tap inside your note.
2. Select the bulleted list or numbered list icon <img src="/files/S9RwqDmc4eMWwO4G4BOn" alt="" data-size="line">in the format bar.&#x20;
3. Use the indent/outdent icon <img src="/files/1aR6F9XqLLgLadAIzYVA" alt="" data-size="line"> in the format bar to indent/outdent the list item.

**Note**: You may need to scroll to the right of your format bar to see more options.

***

### Reorder List Items

You can easily move list items up or down:

* **On Desktop:** Use the shortcut **`Cmd/Ctrl + Option + Up/Down Arrow`** to move the current list item up or down.
* **On Mobile:** Tap the corresponding **move up/down** icons in the format bar to reorder the item.\
  ![](/files/rDlZLGgK76ZiEe8lFnFz)

***

### Continue a numbered list

If you want the numbered list to continue from the list above instead of restarting from "1.", follow the steps below:

* **On desktop:** right-click the list item and select: **Numbering → Continue from the list above**.\
  ![](/files/1LHgaskRKx4fRLWvlQBX)
* **On mobile**: tap the numbered list icon and select: **Continue from the list above**\
  ![](/files/ZJLCQ1fxvN7OY1gb38j8)


# Links

UpNote allows you to add links to websites, email addresses, files, and even other notes within UpNote. Links help you connect information, reference external sources, and navigate quickly between related notes.

***

### 🔗 Types of Links You Can Add

#### **1. Web Links**

Paste any URL into the editor, and UpNote will automatically convert it into a clickable hyperlink.

#### **2. Email Links**

Type or paste an email address (for example: `example@email.com`) and it becomes a clickable link that opens your default email app.

#### **3. File Links (Desktop Only)**

On desktop, you can [link to files](/write-and-edit/add-content-to-your-notes/link-to-internal-files-and-folders) stored locally on your device.

#### **4. Note-to-Note Links (Internal Links)**

You can [link to another note](/write-and-edit/links-between-notes) in UpNote. When clicked, the link opens the referenced note—useful for creating wikis, handbooks, or connected documentation.

***

### 🖥 Add Links on Desktop

#### **Add a Web or Email Link**

1. Paste the URL or email address directly into your note.
2. UpNote will auto-detect and convert it into a link.

You can also insert a link manually:

1. Highlight text.
2. Press **Cmd/Ctrl + K**, or right-click and select **Add a Link**.
3. Enter the URL or email address.

#### **Add an Internal Link to Another Note**

1. Right-click the note you want to link to in the note list.
2. Select **Copy Link to Note**.
3. Paste the link into any note.

Alternatively:

* Open a note → click the **⋯** button → choose **Copy Note Link**.

***

### 📱 Add Links on Mobile

#### **Add a Web or Email Link**

1. Paste the link into your note.
2. UpNote automatically detects and formats it.

Or manually:

1. Highlight the text.
2. Tap the **Link** button in the formatting bar.
3. Enter the URL or email.

#### **Add an Internal Link to Another Note**

1. Open the note you want to link to.
2. Tap the **⋯** menu → select **Copy Note Link**.
3. Paste the link into any other note.

***

### 🔄 Edit or Remove a Link

#### **On Desktop**

* Right-click the link → **Edit Link** or **Remove Link**.
* Or place the cursor on the link and use **Cmd/Ctrl + K** to update it.
* If you want to remove multiple links at once:
  * Select the entire text containing links
  * Right-click and select **Format** → **Remove all links**.

#### **On Mobile**

* Tap the link → choose **Edit Link** or **Remove Link** from the menu.


# Date and Time

Follow the steps below to insert date and time in your note:

### On desktop

* Click the insert button <img src="/files/Xifa42HGUcp2xshFYnVh" alt="" data-size="line">  in the [formatting bar](broken://pages/HW5x1P4soOaSshDTmAup) at the bottom the note editor and select **`Insert Date`** or use the shortcut **`Cmd/Ctrl`** + **`D`** <br>

  <figure><img src="/files/gTiZNgCkNRHi9i3vfB0r" alt=""><figcaption></figcaption></figure>
* You can use other shortcuts for more date/time options:
  * **`Cmd/Ctrl`** + **`Shift`** + **`D`:** insert **date only**
  * **`Cmd/Ctrl`** + **`Shift`** + **`Option`** + **`D`:** insert **time only**
* Or type **`/date`** and select the date format you want to insert.\
  ![](/files/9Qwl82X5jT2EQaVM0Cxn)

### On mobile

1. Tap the calendar icon <img src="/files/Lz81nkECwW05uo91HwGm" alt="" data-size="line">in the formatting bar. You may scroll to the right to see more options. If you often need to insert date to your note, you may [reorder](https://help.getupnote.com/write-and-edit/format-your-text#on-mobile) the calendar icon to the front of the formatting bar.&#x20;
2. Select the date/time format you want to insert.


# Tables

UpNote Premium allows you to create tables to organize your note content. You can insert various content into tables: text, image, attachments, quotes, checkboxes, code blocks, checklists, dividers...

***

### Create a table

#### On **desktop**

1. Click the <img src="/files/Xifa42HGUcp2xshFYnVh" alt="" data-size="line"> button in the [formatting bar](broken://pages/HW5x1P4soOaSshDTmAup) at the bottom of the note editor and select **`Insert Table`,** or use the shortcut **`Cmd/Ctrl`** + **`T`** <br>

   <figure><img src="/files/vGMNlBWqHlJsQnVkfStI" alt=""><figcaption></figcaption></figure>
2. Select the number of rows and columns

You can also use the slash menu to quickly insert the table in your note:\
![](/files/StKhk4D9EzcTxbq8HkFn)

#### On **mobile**

1. Tap the <img src="/files/IEn8EzaWJ6Hz8unwXIfH" alt="" data-size="line">button in the formatting bar
2. Select **`Insert Table`**\
   \
   ![](/files/UgKtut6i4rEqnwWjeNpy)

***

### Insert/delete rows or columns

#### On **desktop**

1. Select a cell and click the the <img src="/files/EDcVV5gYgLfn1RCrM2Yp" alt="" data-size="line"> button at its right side.&#x20;
2. Select an option to insert/delete columns or row\
   ![](/files/rJBZcL3qEvN3mooEHprQ)
3. **Tip**: If you want to insert/delete **multiple** rows/columns at once, you can highlight multiple rows or columns before selecting the options\
   ![](/files/O6sOIaEpsh7VrpXEQ8Vi)
4. You can also use the shortcuts below to quickly insert rows/columns:
   * Insert row above: **`Cmd/Ctrl`** + **`Shift`** + **`Enter`**
   * Insert row below:  **`Cmd/Ctrl`** + **`Enter`**
   * Insert column (to the left): **`Cmd/Ctrl`** + **`Shift`** + **`Alt`** + **`Enter`**
   * Insert column (to the right): **`Cmd/Ctrl`** + **`Alt`** + **`Enter`**

#### On mobile

1. Tap the table option <img src="/files/ZjLEshjb8xR4XWPHterF" alt="" data-size="line">button in the formatting bar
2. Select the option to insert/delete rows or columns\
   ![](/files/7rYPHVztC3rytIVxijU5)

If you want to resize the column width of the table, long tap the column divider and drag it to resize.&#x20;

***

### Copy/delete tables

#### On **desktop**

1. Select a cell and click the the <img src="/files/EDcVV5gYgLfn1RCrM2Yp" alt="" data-size="line"> button at its right side.&#x20;
2. Select an option to copy/delete table\
   ![](/files/3YPj67TNjfdr2g9xk3QD)<br>

#### On **mobile**

1. Tap the table option <img src="/files/ZjLEshjb8xR4XWPHterF" alt="" data-size="line">button in the formatting bar
2. Select the option to copy/delete table. \
   \
   ![](/files/d33tb1hyt6gZSOtxoCAO)

***

### **Set background color**

#### On **desktop**

1. Select a cell and click the the <img src="/files/EDcVV5gYgLfn1RCrM2Yp" alt="" data-size="line"> button at its right side.&#x20;
2. Select **`Cell Background`** and set a desired color

#### On **mobile**

1. Tap the table option <img src="/files/ZjLEshjb8xR4XWPHterF" alt="" data-size="line">button in the formatting bar
2. Select **`Cell Background`** and set a desired color&#x20;

***

### **Merge cells**

This feature is only available on **desktop** app. Follow the steps below to merge cells:

1. Highlight adjacent cells you want to merge
2. Select a cell and click the the <img src="/files/EDcVV5gYgLfn1RCrM2Yp" alt="" data-size="line"> button at its right side.&#x20;
3. Select **`Merge Cells`**\
   ![](/files/wrUzh4xJsJq8lCEmdkeD)

***

### Tips

You can use a table to align images and text in your notes. To make images fit better inside table cells, please set the default image size to **Large** in **Settings > Editor > Default Image Size**.

<figure><img src="/files/G6pDxj9wizlP8MOgrD1P" alt=""><figcaption></figcaption></figure>


# Collapsible section

Collapsible section is a powerful writing component in UpNote. As the name suggests, you can choose to hide some note content and expand them when needed in the collapsible section. This is particularly useful when you want to organize content in a long note. Students who want to review the questions for exams may also find it handy to nest the answers in the collapsible sections.

### On desktops

To insert a collapsible section, use the keyboard shortcut **`Cmd/Ctrl`**  + **`.`** or click the collapsible section icon <img src="/files/1r2d9zJzteN5gtuN6QE8" alt="" data-size="line">in the formatting bar.

Now you can enter the title and content in the section.

<figure><img src="/files/lBPo9RJnjgULRB74b85r" alt=""><figcaption></figcaption></figure>

To collapse/expand the section content, click the arrow in front of the section title or use the shortcut **`Cmd/Ctrl`** + `.` to toggle the state.

If you want to collapse all sections in your note, use the shortcut **`Cmd/Ctrl`** + **`Shift`**+ `,`

To expand all, use the shortcut **`Cmd/Ctrl`** + **`Shift`**+ `.`

### On mobile

To insert a collapsible section, tap the collapsible section icon <img src="/files/1r2d9zJzteN5gtuN6QE8" alt="" data-size="line">in the formatting bar. You may need to scroll to the right of the formatting bar to see more options.

### Convert existing paragraph into collapsible section <a href="#id-5034" id="id-5034"></a>

If you already have an existing text or paragraph that you want to turn into a collapsible section, simply select the paragraph and tap/click the collapsible icon or use the keyboard shortcut **`Cmd/Ctrl`** + **`.`** on desktop. The paragraph will appear as the content inside the collapsible section. If the first line of the text is formatted as heading, it will be displayed as the section title.

### Handle a collapsible section

If you want to copy or cut a collapsible section and paste it elsewhere, click the <img src="/files/sR4XdRgz1A3Ldv06TFEN" alt="" data-size="line">button in the upper right corner of the section and select the options there.

<figure><img src="/files/SlEBlXmBG0siERz8dQTz" alt=""><figcaption></figcaption></figure>

You may also set a background color for collapsible sections.

<figure><img src="/files/i9mlvSRKgmQ5sElGD1PB" alt=""><figcaption></figcaption></figure>

If you want to insert a gap/line break above your collapsible section, move the cursor to the start of the section title and hit **`Enter`**

<figure><img src="/files/giorpWnSyV1rQoFg8GhJ" alt=""><figcaption></figcaption></figure>


# Quotes

To insert or format text into a block quote, use the keyboard shortcut **`Cmd/Ctrl`**  + **`Shift`** + **`U`** or click the quote icon <img src="/files/9oJx3KZZ6FTATrOurpam" alt="" data-size="line"> in the formatting bar.

You can also type **`/quote`** to insert the quote in the note editor.

You can change the background color of the block quote by clicking/tapping the <img src="/files/wP0l4MB5wzZ5e9Yyn1nD" alt="" data-size="line"> icon in the top right corner of the block quote and seleting the background color option.

<figure><img src="/files/jQhxxJLIyXSmUsftCo4Y" alt=""><figcaption></figcaption></figure>


# Code blocks

You can use UpNote to keep your library of code snippets or share them with others.&#x20;

<figure><img src="/files/av8NLlFNxktzWZvfO2Jz" alt=""><figcaption></figcaption></figure>

### On desktop

To insert a code block on Mac or Windows, simply type 3 backticks **` ``` `** or click the code block icon in the [formatting bar.](broken://pages/HW5x1P4soOaSshDTmAup)

![](/files/qehncZiY5IXhGkrOwB1S)

Syntax highlighting is supported for a number of programming languages. To change the display language of your code:

* Right click on code block > Select **`Language`**
* Select a programming language in the list

To wrap your code, go to **`Settings`** > **`Editor`** > enable **`Wrap code`**

### On mobile

To insert a code block on iOS or Android, tap the **`+`** button in the formatting bar and select **`Code Block`**

![](/files/ONbGxubLqMKFI4gvetSs)

To wrap your code, go to **`Settings`** > **`General`** > enable **`Wrap code`**

***

**FAQ:**

<details>

<summary>How to prevent the double dashes (--) to be turned into long dashes (—) in the code block on iOS?</summary>

This behavior is due to the default iOS “Smart Punctuation” feature, which automatically converts double dashes into long dashes. To prevent this, you can disable Smart Punctuation in your keyboard settings:

1. Open the Settings app on your iPhone or iPad.
2. Tap General.
3. Scroll down and select Keyboard.
4. In the “All Keyboards” section, find Smart Punctuation.
5. Turn it off (the switch will turn gray).

Once disabled, double dashes will remain unchanged in your code blocks.

</details>


# LaTeX formulas

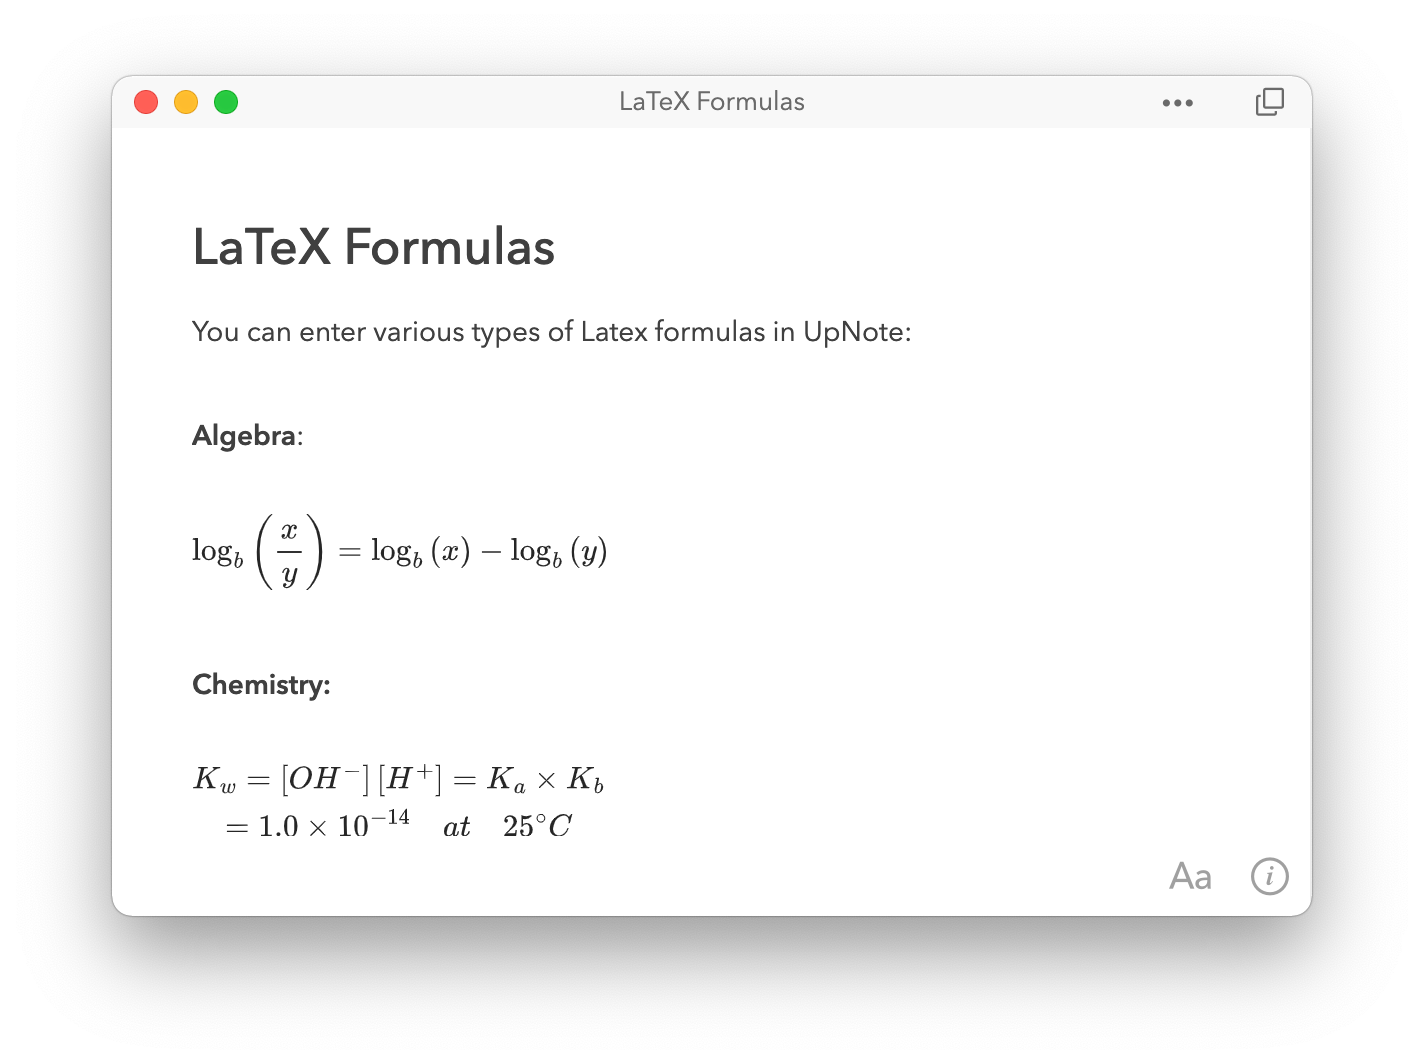
LaTeX formulas are popular for writing math, physics and chemistry equations.

<figure><img src="https://cdn-images-1.medium.com/max/1600/1*jnpR0oCV5P76wsXjig-Duw.png" alt=""><figcaption></figcaption></figure>

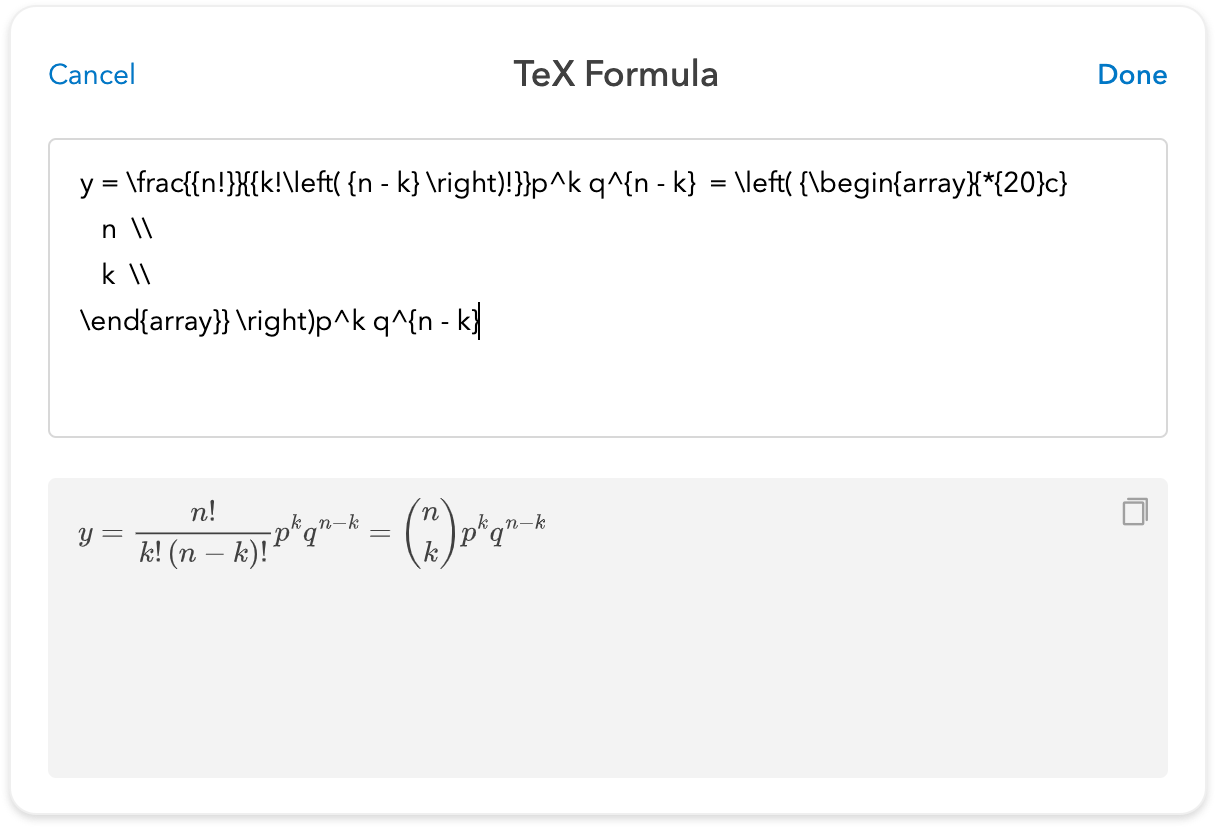
To insert LaTeX formulas, you can click or tap the **TeX formula** icon in the formatting bar or use the shortcut **`Ctrl/Cmd`** + **`Shift`** + **`M`** on your desktop app.

<figure><img src="https://cdn-images-1.medium.com/max/1600/1*vXrp5vgWks3JQ3KqDvsgzg.png" alt=""><figcaption></figcaption></figure>

When you type the formula, UpNote automatically display the preview in the bottom box. It can also help you check for syntax error so you can correct the formula when needed.

<figure><img src="https://cdn-images-1.medium.com/max/1600/1*NgDNLBcR5lGKlPA4eSUcvA.png" alt=""><figcaption></figcaption></figure>

You may insert an in-line formula or quickly convert a text to equation when enclosing the text in `$$` delimiters.

<figure><img src="https://cdn-images-1.medium.com/max/1600/1*wmhwZg-ZF9FPH04saVET4A.gif" alt=""><figcaption></figcaption></figure>

It’s easy to edit the formula by simply clicking on the formula and editing it in the input box.

There are a few resources to help you quickly master LaTex formulas, for example [Overleaf](https://www.overleaf.com/learn/latex/Mathematical_expressions) or [Wikibooks](https://en.wikibooks.org/wiki/LaTeX/Mathematics).

On a technical note, the LaTeX formulas are rendered with [MathJax](https://www.mathjax.org/) library. A huge thanks to MathJax team for the excellent library. MathJax supports most mathematical notation in LaTeX. You might view their [documentation](https://docs.mathjax.org/en/latest/input/tex/macros/index.html#tex-commands) for the full list.


# Slash menu

This feature allows you to easily insert a variety of items, such as images, attachments, tables, dates, and quotes, into your notes with just a few keystrokes.

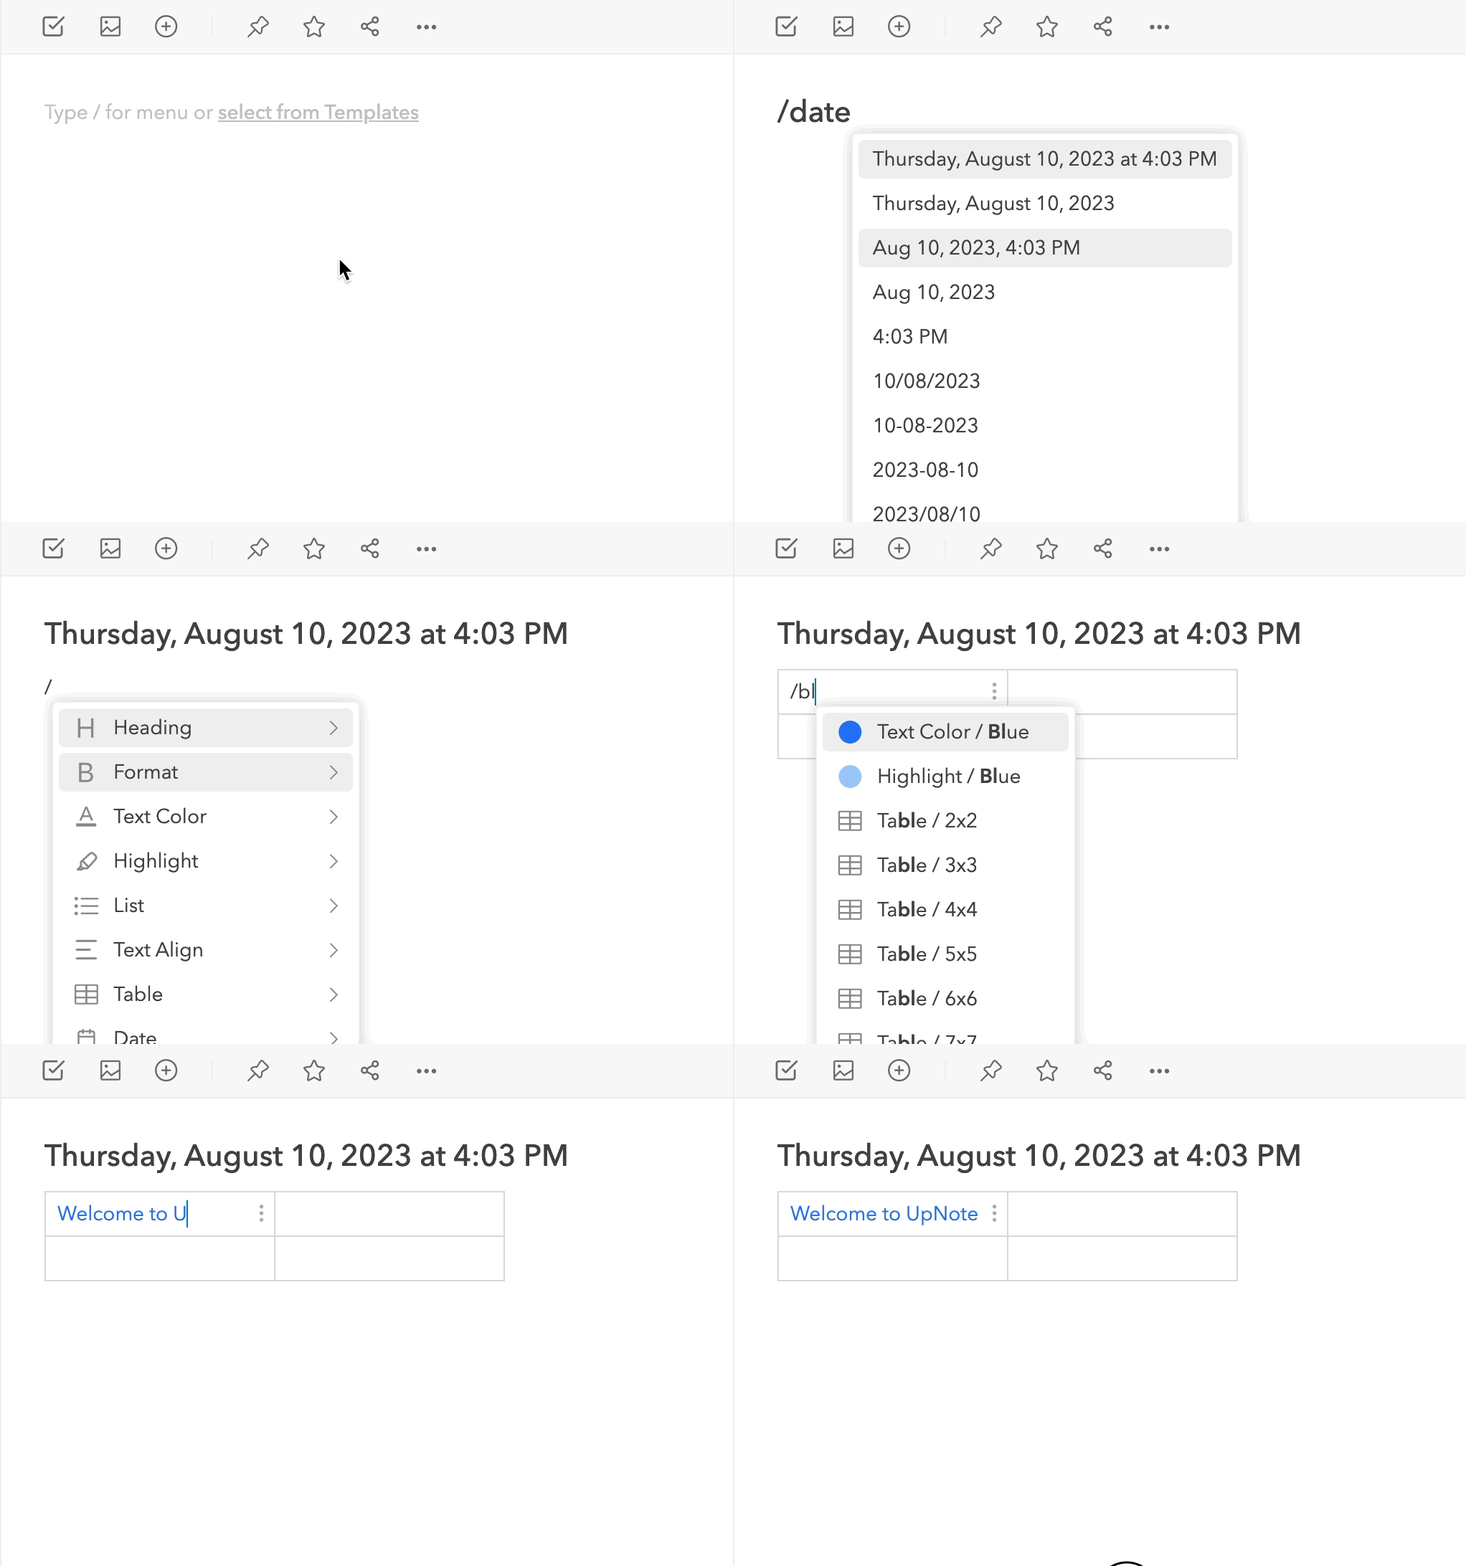
All you have to do is type the forward slash symbol, followed by the first few characters of the content you want to insert or the formatting you want to apply. For example, if you want to insert a date, simply type `/date` and you will see a list of date and time options that you can choose from. Typing `/table` will display options for inserting table, while typing `/blue` will format your text in blue.

<figure><img src="https://miro.medium.com/v2/resize:fit:1400/1*SCN_Dls_P5PDB_oXYCBLNw.gif" alt="" height="499" width="700"><figcaption></figcaption></figure>

If you don’t want to use the slash menu feature while writing, you can turn this off from **`Settings`** > **`Editor`** > **`Type / to show menu`** .


# Search in a note

UpNote allows you to quickly find specific words or phrases **within a note**, so you can navigate long documents with ease. The in-note search highlights all matching results and lets you move between them efficiently.

#### On desktop

1. Open the note you want to search.
2. Click the **`...`** button in the top bar of your note editor, then select **`Search this note`**.&#x20;

   * You can also use the shortcut **`Cmd/Ctrl`** + **`F`** to activate this search.

   \
   ![](/files/syLFtVIRANxxU5aoJvUE)<br>
3. Type the word or phrase you want to find. \
   ![](/files/yLHydY3KvLPUcAL7PDiO)
4. Press **`Enter`** to go to the next instance, and  **`Shift`** + **`Enter`** to go to the previous instance. You can also use the **↑ / ↓** arrows beside the search box to move between matches.

#### On mobile

1. Tap the **`...`** button in the upper right corner of your note editor
2. Select **`Search this note`**
3. Enter the word or phrase you want to find in the note. \
   ![](/files/2iTw8rEPMOTbJV49Z4Ho)
4. Tap the left and right arrow in front of the search box to navigate between matched instances.&#x20;

#### Find and Replace Text (currently available on desktop)

1. Click the search dropdown button <img src="/files/aE8QXUTd5QDoPcEbAdMk" alt="" data-size="line">and select **`Replace`** \
   ![](/files/VkNDLcKFKZjPiaLcDjUV)
2. Enter the word or phrase you want to locate in the **`Search`** box
3. Enter your new text in the **Replace** box\
   ![](/files/gfPF9WgTrQM1FJBbGdsY)
4. Click the **`Replace`** button to update the matched instance. To update all instances at once, choose **`All`**.


# Links between notes

Your notes in UpNote can be linked together, so you can easily have a cross reference between notes, or make your notes like a personal wiki.

### Link to a note

To refer to another note, type **`[[`** and you can select the note you want to refer to. You may start typing a few letters of the note title and the list will filter the relevant note result for you to choose from. Find the note you want and hit **`Enter`** to insert the note link.

![](https://miro.medium.com/max/1400/1*PWuElvzcJ1j2SRYGg7mJSQ.gif)

If you want to refer to a note which doesn’t exist yet, simply type the note title and UpNote will create a new note with that title for you.

![](https://miro.medium.com/max/1400/1*_Ig3SvQXCqPsB-Z4ZWQZFw.png)

On mobile, you can type **`[[`** like above to link to another note, or tap the note link icon <img src="/files/MQkSIAv5l9sUNhNUQ4Lr" alt="" data-size="line"> in the formatting bar.

### Copy link to note

You may also manually copy a note link from the note editor. Click/tap the **`...`** button in the upper bar of your note editor and select **`Copy link to note`**.

![](/files/m15yFOSPYxK6ADf0SJ2z)

You will then be able to paste this link in another note or in another app to open this note.

### **Backlinks**

Backlinks are automatically added in the note you link. To view backlinks, click the **`info`** button at the lower right corner of your note to display the information panel, or use the shortcut **`Cmd/Ctrl`** + **`Shift`** + **`I`**

![](https://miro.medium.com/max/1400/1*6Lq9Unq6G7V5aWT-74hUCg.png)

On mobile, tap the info button <img src="/files/Li3Xwr1rQQ5NKjbIMrPT" alt="" data-size="line"> in the upper right corner of the note editor and expand the **`Links to this note`** section if needed. If there is no backlink, this section won't appear.&#x20;

### L**ink to a section in a note**

To get the section link, first you need to create a header (H1 — H6) for that section. Then right-click on the header and select **`Copy link to here`** . The link to that section is now copied to the clipboard and you can paste them wherever you want.

![](/files/DCiMFrCgtN2FZCvIh37m)

On mobile, follow the steps below to get the link to a header:

1. Put the cursor at the heading line&#x20;
2. Tap on the Heading icon **`H`**&#x20;
3. Select the link icon <img src="/files/QIoTWqDBmAAcUguQ6qjl" alt="" data-size="line">to copy the link to that section

### Open a note link&#x20;

On desktop, you can click the note link directly to go to that note. However, if you just want to preview that note without leaving the current note, you may open the note link in a new window by holding the Cmd/Ctrl key while clicking the note link. That way, you can close the note window when you are done with previewing without shifting the focus out from the current note.&#x20;


# Typewriter mode

**Typewriter Mode** in UpNote helps you focus while writing by keeping the active line of text centered in the middle of your screen. This is useful when you write or edit a long note and prefer to keep your eye at the middle of the screen, instead of the bottom.

![](/files/iQr4bIpuhOagRT10i2FN)

Typewriter mode is available on **desktop** app. To turn this mode on/off, click the icon <img src="/files/N4sxGEFrdwmYDlKhojKw" alt="" data-size="line"> at the lower-right corner of the note editor.

<figure><img src="/files/2IM8EDziqQG1xsR6IUri" alt="" width="375"><figcaption></figcaption></figure>


# Templates

**Templates** in UpNote help you save time by reusing note structures you use often — such as meeting notes, journals, checklists, or project outlines. You can create a new note from a ready-made template or turn any existing note into one.

### Create your own template <a href="#id-246c" id="id-246c"></a>

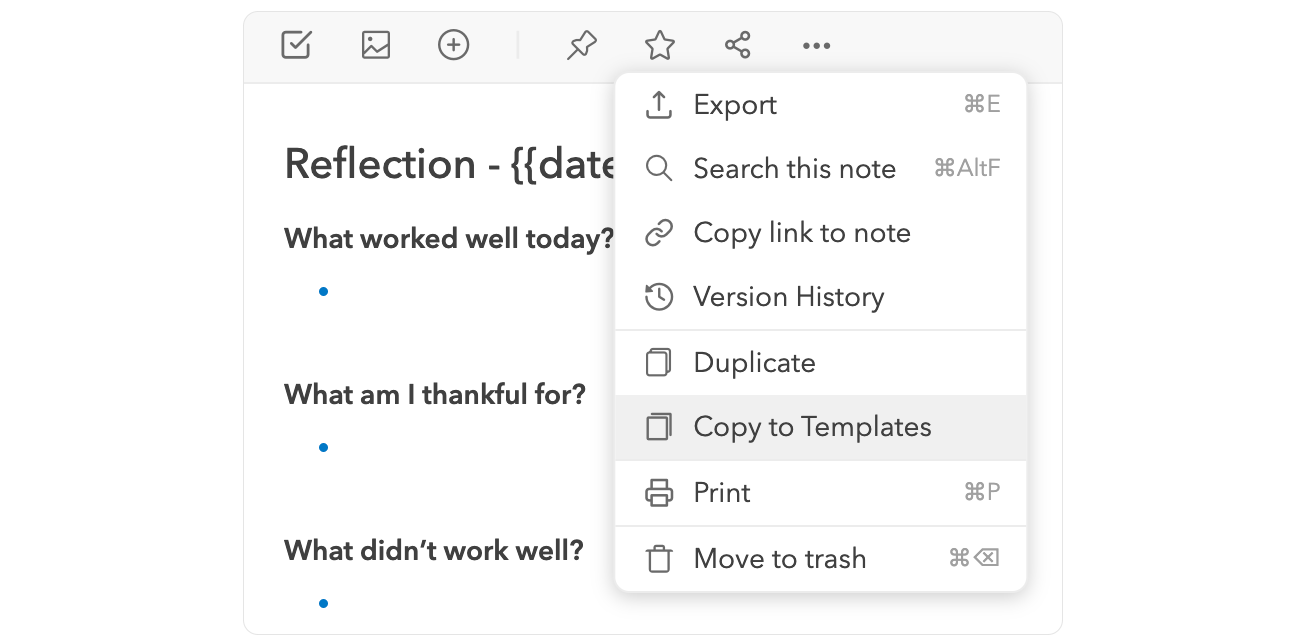
To create a template from an existing note, click/tap the **`…`** button in the upper bar of your note editor and select **`Copy to Templates`**

<figure><img src="https://miro.medium.com/max/1400/1*Z27JUtFVtdit1pdDLy2mDg.png" alt=""><figcaption></figcaption></figure>

### View/edit templates <a href="#id-9250" id="id-9250"></a>

You can see all your templates from the Templates section in the sidebar.

<figure><img src="https://miro.medium.com/max/1400/1*2TYxEAWobtkR2exEIjpovQ.png" alt=""><figcaption></figcaption></figure>

You can edit or delete your templates right from the Templates section or quickly create a new template by clicking the **`New Template`** button in the upper right corner of your UpNote window.

*Note: To keep the interface clean, the template section is not displayed if you haven’t created any templates.*

To quickly create a new note from the template, click the **`New note from this template`** button in the top bar of the template editor.

<figure><img src="https://miro.medium.com/max/1400/1*RZpGRnAJ-lUDexLx2N9FiA.png" alt=""><figcaption></figcaption></figure>

### Create templates with custom date and time

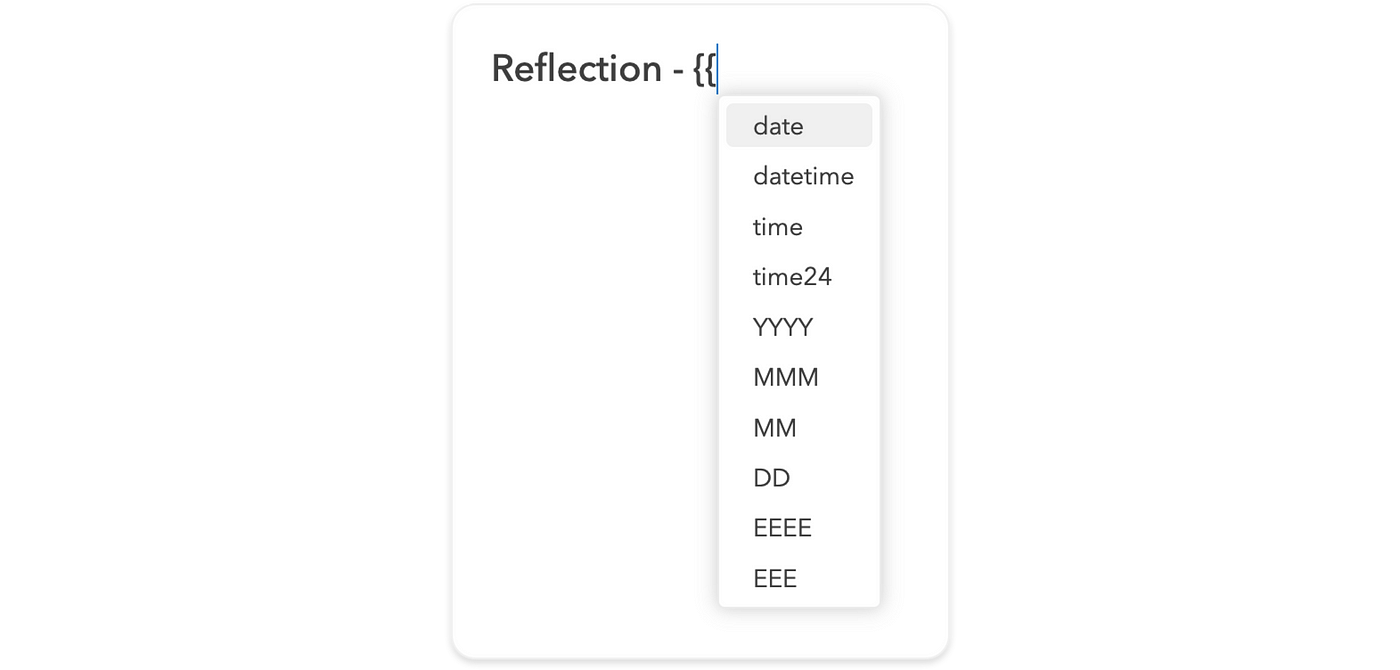
For meeting notes or daily journals, it’s common to insert a date into your note. Simply type **`{{date}}`**, **`{{time}}`**, **`{{datetime}}`** … in the template, and when a template is selected, UpNote will automatically replace the date and time with the current time.

You can customize your date/time formats in your template with date and time tags.

If you want the date format to be like "Monday - Jan 02 2023", you can type **`{{EEEE}} - {{MM}}{{DD}} {{YYYY}}`**

<figure><img src="https://miro.medium.com/max/1400/1*MPwg7YKWWvA0vjzc5skVTg.png" alt=""><figcaption></figcaption></figure>

Check out [this table](https://day.js.org/docs/en/parse/string-format#list-of-all-available-parsing-tokens) for all available date and time formats.&#x20;

### Write from a template <a href="#id-0222" id="id-0222"></a>

When you create a new note, you can choose to write from the saved templates. After a template is selected, the editor will populate the template content and you can start writing right away.

Tap/click **`select from Templates`** in the new note prompt:

<figure><img src="https://miro.medium.com/max/1400/1*LsOamS0jqVRmSQILuqTxgA.png" alt=""><figcaption></figcaption></figure>

Or  type **`/temp`** to insert the template anywhere in your note.

<figure><img src="/files/aaruqbR3XD1cDhvVfs0M" alt="" width="254"><figcaption></figcaption></figure>


# Info Panel

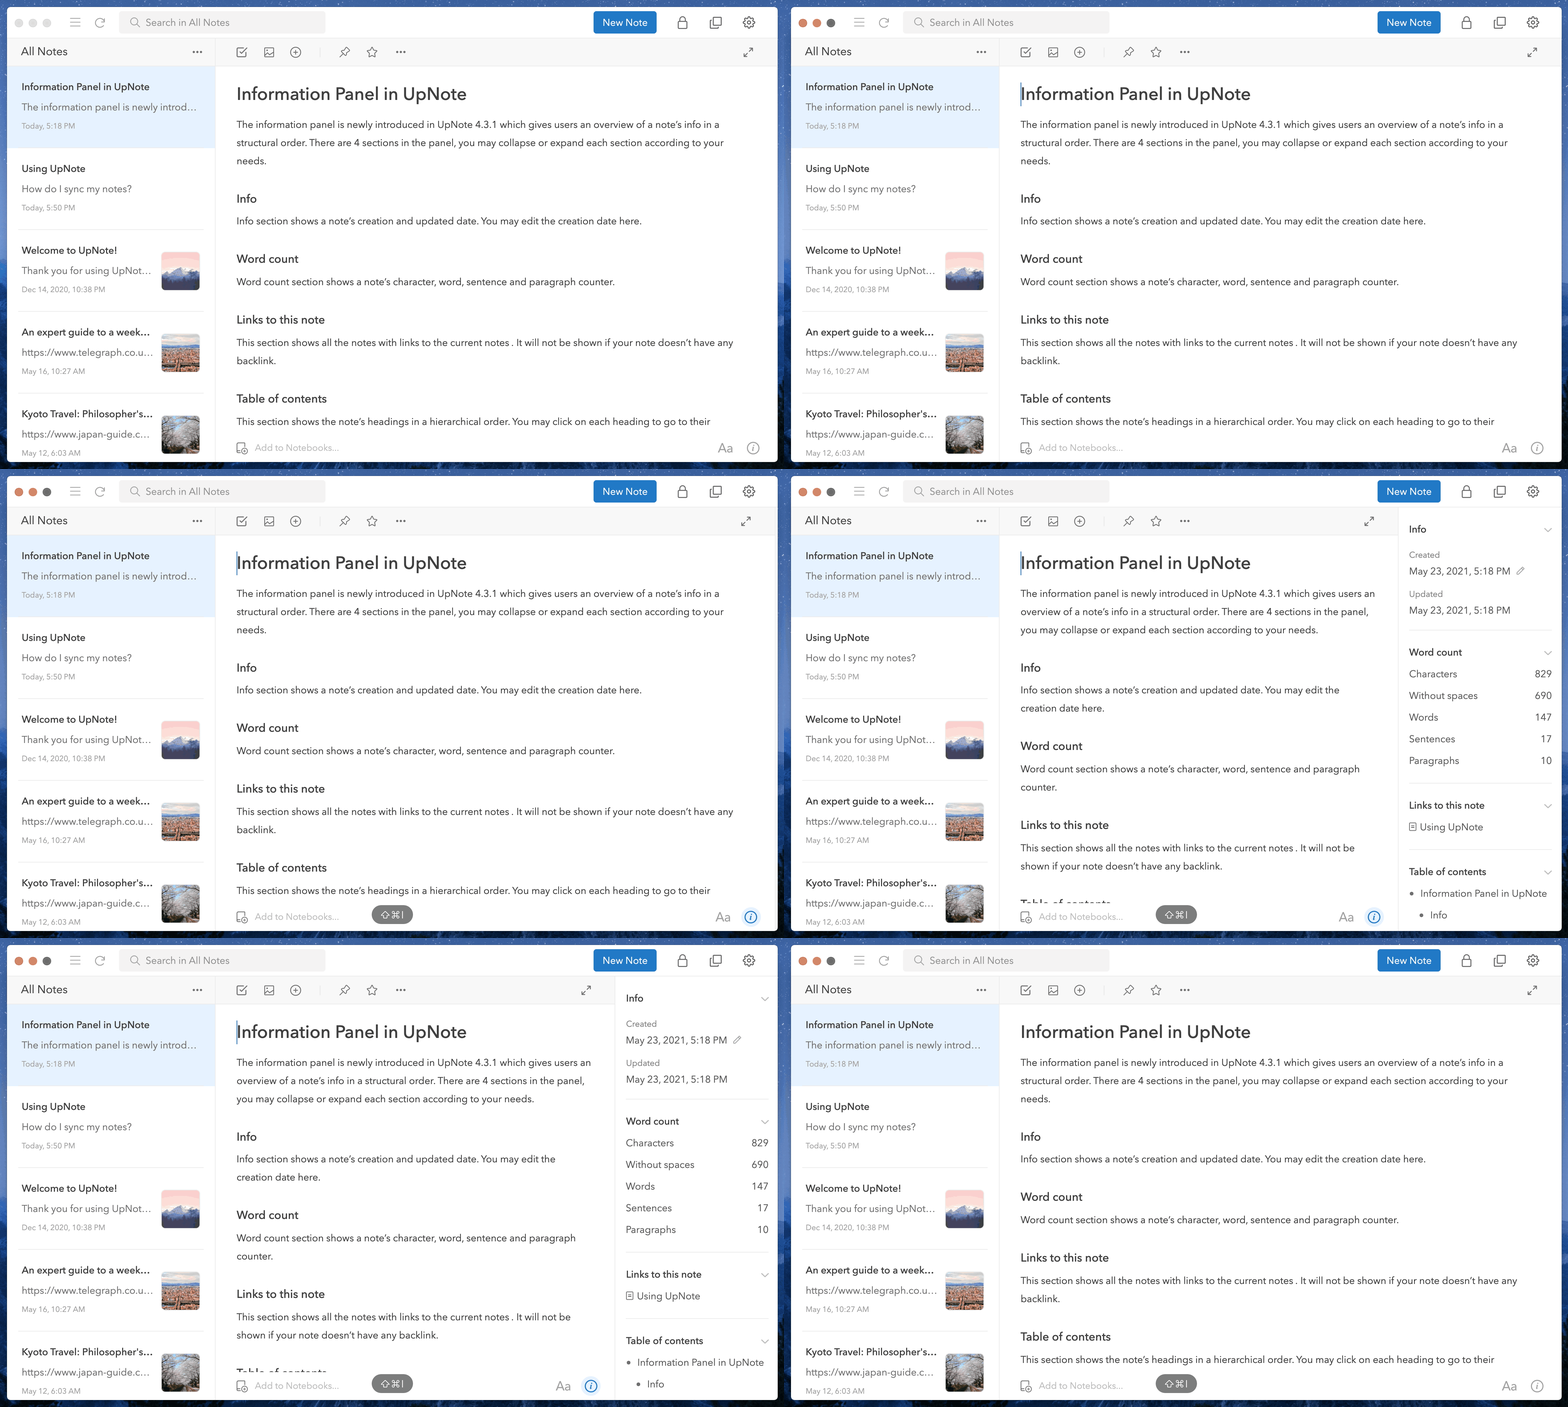
The **Information Panel** provides a structured overview of a note’s details and navigation tools. It includes four sections, each of which can be expanded or collapsed as needed:

* **Info:** Displays the note’s creation and last updated dates. You can also edit these dates directly here.
* [**Word Count**](/write-and-edit/info-panel/word-count)**:** Shows statistics for characters, words, sentences, and paragraphs.
* **Links to This Note:** Lists all notes that link to the current one. This section appears only if backlinks exist. [Learn more](/write-and-edit/links-between-notes) about bi-directional linking in UpNote.
* [**Table of Contents**](/write-and-edit/info-panel/table-of-contents)**:** Displays the note’s headings in a hierarchical view. Click a heading to jump to that section. This section appears only if the note contains headings.

<figure><img src="/files/zVuofLuDU9H0vQchd0y8" alt=""><figcaption></figcaption></figure>

### On desktop

To show or hide the information panel, click on the **`info`** icon at the bottom right corner of your note’s window or use the shortcut **`Ctrl/Cmd + Shift + I`**

<figure><img src="https://miro.medium.com/v2/resize:fit:1400/1*XEf2nscmdA5-2sj-1Kh5VQ.gif" alt="" height="420" width="700"><figcaption></figcaption></figure>

### On mobile

Tap the <img src="/files/PctTjV9auKqXsBEGPyqo" alt="" data-size="line">icon in the top right corner of the note editor to show the info panel.


# Word count

The **Word Count** feature in UpNote helps you track your writing progress by showing detailed statistics for your note. It’s especially useful for long-form writing, reports, or journaling when you want to monitor your length and structure.

The Word Count section in the Information Panel displays:

* Characters
* Words
* Sentences
* Paragraphs

You can open the Information Panel anytime to view these details while writing.

#### On desktop

1. Open your note.
2. Click the Info <img src="/files/UfuXuK18ajYn9YlTt1cQ" alt="" data-size="line"> icon in the lower-right corner of the note editor to open the Info Panel (or use the shortcut **`Cmd/Ctrl + Shift + I`** to toggle the panel).
3. Find **Word count** in the panel.\
   ![](/files/Wx4telGYHSzu3qeWOsy2)

#### On mobile

* Open your note.
* Tap the Info <img src="/files/WQqBy9yyELXNwonPRgLV" alt="" data-size="line">icon at the upper right corner of your note editor to open the **Info Panel** .
* Find **Word count** in the panel


# Table of contents

The **Table of Contents** in UpNote provides a quick way to navigate long notes by listing all the headings inside your note. It helps you see the structure of your content at a glance and jump directly to any section with a single click.

The Table of Contents appears in the **Info Panel** on the right side of the editor. If your note includes one or more headings (H1–H4), the Table of Contents will automatically generate and display them in a hierarchical list.

> **Note:** If your note doesn’t contain any headings, the Table of Contents section won’t appear.

#### On desktop

1. Open your note.
2. Click the Info <img src="/files/4b9V78IBDSoy18JLSmdq" alt="" data-size="line"> icon in the lower-right corner to open the **Info Panel**.
3. Scroll to the **Table of Contents** section.
4. Click any heading to jump to that section in your note.\
   ![](/files/p8Ac2g2DT41u0j6qXMnx)

#### On mobile

1. Open your note.
2. Tap the Info <img src="/files/WQqBy9yyELXNwonPRgLV" alt="" data-size="line">icon at the upper right corner of your note editor to open the **Info Panel** .
3. Find **Table of Contents** in the panel
4. Tap a heading from the Table of Contents to go to that section.


# Find and view notes


# Pin notes to the top

You can **pin important notes** to the top of your notebook or tag view in UpNote, making them easier to find and access quickly. Pinned notes stay above all other notes in that view until you unpin them.

<figure><img src="/files/wN1k3E9wKIeW7Sh8BlaH" alt=""><figcaption></figcaption></figure>

### 🖥 On Desktop (Windows, Linux & macOS)

There are two ways to pin or unpin a note:

#### **1. From the note editor**

* Click the **pin icon** <img src="/files/g1p7wFgM0Tuhm1A0pfHF" alt="" data-size="line"> in the top bar of the note editor to pin or unpin the note.

#### **2. Using a shortcut**

* Press **Cmd + Shift + P** (Mac) or **Ctrl + Shift + P** (Windows/Linux) to toggle pinning instantly.

***

### 📱 On Mobile (iOS & Android)

#### **iOS**

* In the note list, **swipe right** on a note and tap the **pin button** to pin or unpin it.\
  ![](/files/CXbJEDfJHiWmvItOpdmF)

#### **Android**

* In the note list, **long tap** a note and select **Pin notes to top** from the pop-up menu.\
  ![](/files/qaPcAYlZXA7AGEwSqgmk)

#### **From inside the note editor (iOS & Android)**

1. Open the note.
2. Tap the **More (⋯)** button in the upper-right corner.
3. Tap the **pin icon** in the dropdown menu to pin or unpin the note.\
   ![](/files/G2rvhxn8SDt0p93DN8wZ)

***

#### 💡 Tips

* You can pin multiple notes; they remain in the order they were pinned.
* You can expand or collapse the **Pinned** section in the note list by clicking or tapping the **arrow** in the section header. This helps you keep your view tidy while still keeping important notes accessible.
* Combine pinned notes with [Quick Access](/organize-and-manage-notes/find-and-view-notes/add-notes-to-quick-access) for even faster retrieval of important content.


# Add notes to Quick Access

**Quick Access** helps you reach your most important notes instantly from anywhere in UpNote. When you add a note to Quick Access, it appears in the **Quick Access section** of your sidebar, so you can open it without searching or navigating through notebooks.

{% hint style="success" %}
Combine **Quick Access** with **Pin to Top** to keep your notes both visible in context and always one click away.
{% endhint %}

***

### 🖥 On Desktop (Windows, Linux & macOS)

#### **From the note editor**

* Click the **star icon** <img src="/files/6RQf66Ivqqpeuejp4Tko" alt="" data-size="line"> in the top bar of the note editor to add or remove the note from Quick Access.

#### **Using a shortcut**

* Press **Cmd + Shift + S** (Mac) or **Ctrl + Shift + S** (Windows/Linux) to toggle Quick Access for the current note.

***

### 📱 On Mobile (iOS & Android)

#### **iOS**

* In the note list, **swipe right** on a note and tap the **star button** to pin or unpin it.\
  ![](/files/CXbJEDfJHiWmvItOpdmF)

#### **Android**

* In the note list, **long tap** a note and select **Add to Quick Access** from the pop-up menu.<br>

#### **From inside the note editor (iOS & Android)**

1. Open the note.
2. Tap the **More (⋯)** button in the upper-right corner.
3. Tap the **Quick Access** icon in the dropdown menu to add or remove the note from Quick Access.\
   ![](/files/G2rvhxn8SDt0p93DN8wZ)


# Search for notes

UpNote’s powerful search helps you quickly find notes, notebooks, and tags — even across large collections. You can search by keywords, phrases, or tags to instantly locate what you need.

### On desktop

* Type the phrase you want to find into the **search box** at the top of the UpNote window.
* Alternatively, you can press **Cmd+G (Mac)** or **Ctrl+G (Windows)** to quickly open the search box.

<figure><img src="/files/PRY5GUNcHylPCJWCzKAQ" alt=""><figcaption></figcaption></figure>

* You can toggle between searching in All Notes or only in the current notebook.

{% hint style="success" %}
💡 Tip: If you are using another app, press **Cmd+Option+G** (Mac) **/ Ctrl+Alt+G** (Windows) to open UpNote’s search from anywhere.
{% endhint %}

### On mobile

* Tap the search icon <img src="/files/xd14cmIkQK9tcXiEwp2S" alt="" data-size="line">in the upper right corner of your notes list screen.&#x20;
* Type the phrase you want to search in the search box
* You can select if you want to search in the current notebook/folder/tag or in All Notes

### Save a search (Desktop)

* After performing a search, click the **save button** in the search results.
* The saved search will appear in the **sidebar under the “All Notes” section** for quick access later.\
  ![](/files/wYmSzPZ5SrTo2126JM7D)

### Search for the exact phrase

* To find notes containing an **exact phrase**, wrap the phrase in **double quotation marks**.
* Example: `"UpNote features"` will return only notes containing that exact phrase.

### Search for tags

* Type `#` followed by the tag name to search notes with that tag.
* **Search multiple tags**: Type multiple `#tags` in the search box; UpNote will show notes containing all specified tags. You can also [save this search](#save-a-search-desktop) to stick it in the sidebar for quick access later.

![](/files/nOCyJoESvpeV2iKpQv3j)

### Search in title only

* By default, UpNote searches through both **note titles and content**.
* To limit results to **titles only**:
  1. Open the **Search options/settings** in the search bar.
  2. Select **“Search in title only.”**

<figure><img src="/files/ruf8snkux6yTD6Xk7mRl" alt=""><figcaption></figcaption></figure>

### Search for notes in locked notebooks

* By default, UpNote **does not include notes from locked notebooks** in search results to protect your privacy.
* To include them:
  1. Click the **Search option/settings** in the search bar.
  2. Select **“Search in locked notes.”**
  3. Enter your **lock password/passcode** when prompted to enable the option.<br>

     <figure><img src="/files/WmXKwJqBvkKDtUEKNgcN" alt=""><figcaption></figcaption></figure>

### Match Word

* By default, UpNote search will return results containing partial matches of your keyword.
* If you want to find results that match the **whole word exactly**, enable the **“Match word”** option in the **Search settings**.
* Example: searching for `note` with **Match word** on will return only “note,” not “notebook.”

<figure><img src="/files/E7onDfZ2K7ZKzWoUWf3K" alt=""><figcaption></figcaption></figure>

### Search in notebooks

To search within a notebook, first select the notebook, then use the search box and choose the notebook option below the search field. This will limit the search to that notebook only.

<figure><img src="/files/rG6B9m1YJgIAJl0nKqcJ" alt="" width="279"><figcaption></figcaption></figure>

If you'd like search results to include notes from all sub-notebooks, you can enable Show notes from sub-notebooks in main notebook in **Settings → General**. Once this option is enabled, the parent notebook will display notes from its sub-notebooks, and searching within the parent notebook will include those notes as well.


# Filter notes

When you open UpNote, you’ll find three default filters — **To-Do**, **Uncategorized**, and **Unsynced** — located under the **All Notes** section in the sidebar.

You can click the **arrow (▾)** next to the **All Notes** label to expand or collapse these filters as needed. These options help you quickly view:

* **To-Do:** Notes containing checklists or unfinished tasks.
* **Uncategorized:** Notes that haven’t been added to any notebook.
* **Unsynced:** Notes that haven’t been saved to the server and synced to your account yet. You can use this filter to check if any notes are pending sync.

<figure><img src="/files/8cZwr4Aigv1ZDq2Po9mk" alt=""><figcaption></figcaption></figure>

***

### Add a New Filter

#### 🖥 On Desktop (Windows, Linux & macOS)

1. Click the **More (⋯)** button next to the **All Notes** label in the sidebar.
2. Select **Filter All Notes**.\
   ![](/files/cdYmM9IwldYRiUb7J5Gp)

#### 📱 On Mobile / Tablets (iOS & Android)

1. Go to the **All Notes** screen.
2. Tap the **More (⋯)** button in the bottom-right corner of the note list.
3. Select **Filter All Notes**.\
   ![](/files/E10zq6I8hGgbxbfN1tDu)

You can now choose the filter you want to add.

***

### Available Filters

* **Todo** — View notes containing incomplete to-do items.
* **Today** — View notes that were updated today.
* **Uncategorized** — Show notes not assigned to any notebook.
* **Untagged** — Show notes without any hashtags.
* **Shared notes** — Show notes currently shared via a web link.
* **Unsynced** — Show notes that haven’t fully synced to the server.
* **Notes containing words** — Filter notes by keywords you enter.

Once selected, the filter will appear under **All Notes** in the sidebar.

***

### Filter Notes Containing Multiple Tags

You can use filters to quickly find notes that contain **multiple hashtags** at the same time.

#### To create a multi-tag filter:

1. Add a new filter and select **Notes containing words**.
2. Enter the hashtags you want to include, for example: `#UpNote #Feature`&#x20;
3. Click **Create Filter**.<br>

   <div align="left"><figure><img src="/files/CLL23UUpJi9rhU34HRgD" alt="" width="375"><figcaption></figcaption></figure></div>

Your new filter will now appear in the sidebar, showing all notes that contain **all** the specified hashtags.

<figure><img src="/files/dc85es7ndb3GJih4Zsnu" alt=""><figcaption></figcaption></figure>


# Sort notes

UpNote allows you to **sort your notes** in different ways so you can view them in the order that works best for you. You can sort notes by **title** or **date**, or set a **custom order** to keep your notes organized your way.

By default, notes are sorted by **Last Updated (newest first)**. You can change the sorting order globally or set different sorting preferences for each notebook and tag — UpNote remembers your choice separately for each view.

***

#### On Desktop (Windows, Linux & macOS)

1. Click the **More (⋯)** button in the upper-right corner of the note list.
2. Select **Sort Notes**.
3. You can also right-click a **notebook** or **tag** in the sidebar and choose **Sort Notes** from the menu.<br>

   <figure><img src="/files/Xf38pyE6ITngO0Z6oRdk" alt=""><figcaption></figcaption></figure>

#### On Mobile (iOS & Android)

1. Tap the **More (⋯)** button in the lower-right corner of the note list.
2. Select **Sort Notes**.
3. Choose the sorting order you prefer.

Once selected, you can set or change the **default sorting order** for that notebook or tag.

<div align="left"><figure><img src="/files/yMPKQBGnBggqna7fgWOb" alt="" width="375"><figcaption></figcaption></figure></div>

***

#### Syncing Behavior

* The **sort order of each notebook, tag, or filter** is synced across all your devices.
* The **default sort order** of your notes list is *not* synced and is specific to each device.

***

#### Sort Notes in Custom Order

Custom sorting lets you manually reorder notes in the note list.

**On Desktop**

1. Set the sorting order to **Custom**.
2. Click the **Rearrange icon** at the top of the notes list.\
   ![](/files/huyUJn2a52WYv20p77G3)
3. Drag notes **up or down** to reorder their position.

**On Mobile**

1. Set the sorting order to **Custom** (following the steps above).
2. Drag notes **up or down** in the list to place them in the order you want.


# Multi-note actions


# Select multiple notes

If you want to perform an action for a large number of notes (such as moving notes to another notebooks, exporting, deleting notes...), you can do that quickly by selecting multiple notes in the notes list. Follow the steps below to select multiple notes on each platform:

***

#### 🖥 On Desktop (Windows, Linux & macOS)

You can select multiple notes using your keyboard:

**Select notes one by one**

* Hold **Cmd** (Mac) or **Ctrl** (Windows/Linux), then click each note you want to select.

**Select a range of notes**

* Click the first note in the list.
* Hold **Shift**, then click the last note in the range.
* All notes in between will be selected.

**Select all notes in the note list**&#x20;

* Click any note in the note list.
* Press **Cmd + A** (Mac) or **Ctrl + A** (Windows/Linux).

Once multiple notes are selected, you can:

* Drag and drop the selected notes into a notebook, a tag, Quick Access, Templates or Trash in the sidebar.&#x20;
* Use the actions available in the **right pane**, including: Pin to top, Export, Merge into a new note, add/remove tags...

<figure><img src="/files/Xw0HsF6DTcxQ7GuysPp7" alt=""><figcaption></figcaption></figure>

***

#### 📱 On Mobile (iOS & Android)

**Enter multi-select mode**

1. In the note list, tap the **More (⋯)** button in the lower-right corner.
2. Select **Select Notes.**&#x20;
3. Tap each note you want to include in the selection.
4. If you want to select all notes, tap the **More (⋯)** button again and select **Select All**&#x20;

**Perform bulk actions**

After selecting notes, you can:

* Move them to a notebook or space
* Delete them
* Add them to Quick Access
* Apply other available actions\
  ![](/files/2MNX7CWRmUXUj2QDodUs)


# Merge notes

You can merge multiple notes into a single, combined note. This is useful when consolidating related ideas, organizing project materials, or cleaning up your workspace. UpNote allows you to preview and reorder notes before completing the merge.

***

### 🖥 On Desktop (Windows, Linux & macOS)

1. [Select multiple notes](/organize-and-manage-notes/multi-note-actions/select-multiple-notes) in the note list.
2. In the **right pane**, click **Merge notes**.<br>

   <div align="left"><figure><img src="/files/jgFRzJlDvVIOp3oy9TJg" alt="" width="563"><figcaption></figcaption></figure></div>
3. A preview window will appear showing the combined note.

   * Drag notes up or down to **rearrange** their order before merging.

   <div align="left"><figure><img src="/files/4Qn6LFtbHUvEGsTpybgk" alt="" width="563"><figcaption></figcaption></figure></div>
4. Click **Merge** to create the final combined note.

The merged result will appear as a new note containing the full content of the selected notes.

***

### 📱 On Mobile (iOS & Android)

#### **iOS**

1. Tap the **More (⋯)** button in the lower-right corner of the note list.
2. Tap **Select Notes**.
3. Tap the **circle** next to each note you want to merge.
4. Tap **More (⋯)** again.
5. Select **Merge into a new note**.\
   ![](/files/HW4G3ZXjetrDtqlpUtjD)

#### **Android**

1. Long tap a note in the note list to enter selection mode.
2. Tap the **circle** next to each additional note you want to include.
3. Tap **More (⋯)** in the bottom-right corner.
4. Select **Merge into a new note**.

***

#### 💡 Tips

* The original notes will be **moved to trash** after merging to keep your notes list clean.
* Arrange the order carefully in the preview window on desktop to ensure your merged content reads smoothly.
* This feature is especially helpful for combining meeting notes, research fragments, or related journal entries.


# Duplicate notes

Duplicating a note allows you to create an exact copy of an existing note. This is useful when you want to reuse a structure, create variations, or make edits without affecting the original content.

***

### 🖥 On Desktop (Windows & macOS)

1. Open the note you want to duplicate.
2. Click the **More (⋯)** button in the upper-right corner of the note editor.
3. Select **Duplicate Note**.

<div align="left"><figure><img src="/files/HYkc83mvTR8A9v2ct7qS" alt="" width="375"><figcaption></figcaption></figure></div>

A new copy of the note will appear in the same notebook or tag view.

You can also duplicate a note from the note list:

1. Right-click the note.
2. Choose **Duplicate** from the context menu.

***

### 📱 On Mobile (iOS & Android)

1. Open the note you want to duplicate.
2. Tap the **More (⋯)** button in the upper-right corner.
3. Select **Duplicate Note** from the menu.

![](/files/X3KGL5USz8YHjazgeyPy)


# View control


# Focus mode

**Focus Mode** in UpNote helps you write without distractions by hiding the sidebar, note list, and other interface elements — leaving only your note in view. It’s perfect for deep writing sessions, journaling, or editing long notes in a calm, minimal environment.

***

### On Mac, Windows, and Linux

#### **Toggle Focus Mode**

* Press **Cmd + Shift + F** (Mac) or **Ctrl + Shift + F** (Windows/Linux).
* Or click the **Expand button** in the upper-right corner of the note editor.

<figure><img src="/files/f8w8hVZXYNjc2vF69j92" alt=""><figcaption></figcaption></figure>

#### **Line Length in Focus Mode**

You can adjust the line width while in Focus Mode:

1. Click the **More (⋯)** button in the upper-right corner of your UpNote window.
2. Select **Line length** to choose your preferred width.

<figure><img src="/files/O5I54eIlMmIfmglKMadr" alt=""><figcaption></figcaption></figure>

#### **Always Create New Notes in Focus Mode**

If you prefer starting every note in a distraction-free environment:

1. Go to **Settings → General**.
2. Enable **Create new note in focus mode**.

***

### On iPad

You can enter Focus Mode by tapping the **Expand button** in the upper-left corner of the note editor, giving you a clean, full-screen writing view.


# Open note in a new window

UpNote allows you to **open a note in a separate window**, making it easy to reference one note while working on another. This feature is especially useful for multitasking, comparing content, or keeping key information visible while writing elsewhere.

***

#### On Mac, Windows, Linux

You can open a note in a separate window in several ways:

**Double-click**

* **Double-click** a note in the note list to open it in a new window.

**Right-click**

1. Right-click a note in the note list.
2. Select **Open in New Window**.\
   ![](/files/fhscOkO2qCqfMuoGS9vq)

**From the note editor**

* Click the **pop-out icon** at the top bar of the note editor to open that note in its own window.\
  ![](/files/uHbN10E1I3kdOTwNXZNo)

You can open **multiple notes** this way and arrange the windows however works best for your workflow.

***

#### Create a New Note in a New Window

If you want to start writing in a separate window immediately:

1. Hold **Cmd** (Mac) or **Ctrl** (Windows/Linux).
2. Click the **New Note** button.

A brand-new note will open directly in a floating window.


# Keep window on top

The **Keep Window on Top** feature allows you to keep a note window visible above all other apps on your screen. It’s especially useful when you want to reference notes while studying, attending an online class, or participating in a video conference.

* To keep your note window visible above all other apps, click the **Keep Window on Top** icon in the upper-right corner of the note window.
* You can also use the shortcut **Cmd + Shift + K** (Mac) or **Ctrl + Shift + K** (Windows/Linux) to toggle the mode quickly.

<div align="center"><figure><img src="/files/yn4h8Pry7BZX5h3UZzED" alt="" width="423"><figcaption></figcaption></figure></div>

<figure><img src="/files/TqPk74NfpuOmzXb4LJsS" alt=""><figcaption></figcaption></figure>


# Delete notes

If you no longer need a note, you can easily delete it from UpNote. Deleted notes are moved to the **Trash**, where they can be restored or permanently removed later.

### Move a Note to Trash

* Open the note you want to delete.
* Click the **More Options (...)** menu or right-click on the note in the list.
* Select **Move to Trash**.
* The note will be removed from your notebooks and stored in the **Trash**.

### Restore Notes from Trash

If you accidentally delete a note, you can recover it:

* Open the **Trash** from the sidebar.
* Find the note you want to restore.
* Right-click (or use the **More Options (...)** menu) on the note.
* Select **Restore**.
* The note will return to "All Notes" section.

### Permanently Delete Notes from Trash

To permanently remove a note:

* Open the **Trash** from the sidebar.
* Right-click (or use the **More Options (...)** menu) on the note.
* Select **Delete Permanently**.
* ⚠️ Once deleted permanently, the note cannot be recovered.


# Organize with notebooks

Notebooks help you group related notes so you can keep everything organized and easy to find. Whether you’re planning a trip, collecting work documents, or managing daily tasks, notebooks give your ideas a clear home. You can create as many notebooks as you need and arrange them in a way that fits your workflow.

[Create a notebook](/organize-and-manage-notes/organize-with-notebooks/create-a-notebook)

[Sub-notebooks](/organize-and-manage-notes/organize-with-notebooks/sub-notebooks)

[Move notes across notebooks](/organize-and-manage-notes/organize-with-notebooks/move-notes-across-notebooks)

[Arrange notebooks in the sidebar](/organize-and-manage-notes/organize-with-notebooks/arrange-notebooks-in-the-sidebar)


# Create a notebook

Notebooks in UpNote help you organize your notes into clear categories, making it easier to manage your ideas, projects, and tasks. You can create as many notebooks as you need and arrange them to fit your workflow.

***

### On **desktop**

1. Click the **`+`** button next to the **`NOTEBOOKS`** label in the sidebar.\
   ![](/files/5NUV2X5u8FuCzL1uaIzk)
2. Enter notebook name in the text box.
3. Select the parent notebook if you want.
4. Choose to lock the notebook if you want.
5. Select or add a notebook cover.
   * To add your own cover, click the <img src="/files/UvquRiNn8zdk9pTwEgcq" alt="" data-size="line">button in the cover section.
   * Select the image you want to set as cover.
   * UpNote will crop your image to fit the size of the cover. If you would like to create a cover image of the exact size, please use a ratio of 110 x 135 pixels.
6. Press **`Enter`** or click the **`Create`** button to create the notebook\
   \
   ![](/files/1OqAyhR2DFVmSe5QSS4Z)

### On mobile

If you are in the "All Notes" screen, you can tap the **`...`** icon the bottom right corner and select  **`+ New Notebook`**\
![](/files/jRTnZAf2gDSvSW99Oto3)

You can also add a new notebook by tapping  the **`+`** button next to the **`NOTEBOOKS`** label in the sidebar (To open the sidebar, swipe right from the left edge of the note lists screen)\
![](/files/eIiKchg5vcgnrIe836Qy)

Then, fill up the details of the notebook:\
\
![](/files/L3CTTbF9ZZ6WHXADyz9A)

1. Enter notebook name in the text box
2. Select the parent notebook if you want
3. Choose to lock the notebook if you want
4. Select or add a notebook cover
   * To add your own cover, tap the **`Add`** button in the cover section
   * Select the image you want to set as cover
5. Tap **`Done`** in the upper right of the screen to create the notebook


# Edit a notebook

You can easily edit your notebooks in UpNote to keep your workspace organized. This includes **renaming**, **moving**, or **deleting** notebooks, as well as adjusting their order in the sidebar.

***

### On **desktop**

* Right click on the notebook in the side bar and select **`Edit`** .\
  ![](/files/Ns6YfYhscCfAcM6vUAeB)
* You will then be able to edit the notebook's name, cover, lock function and its parent notebook.\
  ![](/files/ezAjmeOkPc1vKzMmRw5d)

### On mobile

* If you are already inside a notebook, tap the **`...`** button at the bottom right corner of the note list screen and select Edit Notebook.\
  ![](/files/QTsz3uP50tUtTL0zpzas)<br>
* You can also go to the sidebar and swipe to the right of the notebook row and select the edit button.\
  ![](/files/hU7iGWi8TGLNJAJml5XN)


# Sub-notebooks

UpNote allows you to organize your workspace with sub-notebooks, creating a clear hierarchy for structuring projects, journals, research topics, or any large collection of notes. You can create new sub-notebooks or move existing notebooks under a parent notebook.

***

### On Desktop (Mac, Windows, Linux)

#### **Create a Sub-notebook**

You can create a sub-notebook in two ways:

**Method 1: From the Sidebar**

1. Right-click the notebook you want to use as the **parent**.
2. Select **New Sub-notebook**.\
   ![](/files/TXvGCoDM9ChVygVxYwBG)
3. Fill in the details for the new sub-notebook.

**Method 2: From the Notebook Creator**

1. Click the **＋** icon next to the **Notebooks** label in the sidebar.
2. Enter the notebook details.
3. Choose a parent notebook from the **Parent Notebook** dropdown.\
   ![](/files/RC9Qg62QtbByu96C1PyT)

***

### On Mobile (iOS & Android)

#### **Create a Sub-notebook**

You can create sub-notebooks in two ways:

**Method 1: From the Parent Notebook**

1. Open the parent notebook's note list.
2. Tap the **More (⋯)** button in the lower-right corner.
3. Select **＋ New Notebook**.\
   ![](/files/1ljx2CXGwthbteNDPHXc)
4. Fill in the details for the sub-notebook.

**Method 2: From the Notebook Creator**

1. Tap the **＋** icon next to the **NOTEBOOKS** label in the sidebar.
2. Enter the notebook details.
3. Tap the **Add to notebook** section.
4. Select a parent notebook.

***

### Change a notebook’s parent notebook

You can move an existing notebook under another notebook, change its parent notebook, or remove it from a parent notebook at any time.

#### On Desktop (Mac, Windows, Linux)

**Change the Parent Notebook**

1. Right-click the notebook you want to edit.
2. Select **Edit Notebook**.
3. Choose a new parent notebook from the **Parent Notebook** dropdown.\
   ![](/files/FFMCbW5OFQyXrER1KoD8)

**Remove a Notebook from Its Parent**

1. Edit the notebook.
2. In the **Parent Notebook** dropdown, select **Notebooks** (the top-level group).
3. The notebook will return to the main notebook list.

***

#### On Mobile (iOS & Android)

**Change the Parent Notebook**

1. Open the notebook you want to edit.
2. Tap **Edit** (or the **⋯** menu).
3. Select the new parent notebook.

**Remove a Notebook from Its Parent**

1. Edit the notebook.
2. In the **Parent Notebook** dropdown, select **Notebooks** (the top-level group).
3. The notebook will be moved back to the main notebook list.

***

### Expand/collapse all sub-notebooks in the sidebar

On desktop, you can expand or collapse all sub-notebooks in the sidebar. Simply right-click on the Notebooks section title and select “Expand sub-notebooks” or “Collapse sub-notebooks.”

<div align="left"><figure><img src="/files/9ImUXk2cDCGVdyLa0pmc" alt="" width="260"><figcaption></figcaption></figure></div>

***

### Arrange sub-notebooks in the sidebar

1. Open the **parent notebook** to view its nested notebooks in the notes list panel.
   * If nested notebooks don’t appear, go to **Settings → General** and enable **Show nested notebooks in the notes list**.
2. Drag the nested notebooks **up or down** in the notes list panel to reorder them.\
   \
   ![](/files/OvssqxI5k8YnnV2AeI7P)
3. The new order will automatically be reflected in the sidebar.


# Move notes across notebooks

UpNote makes it easy to **move notes between notebooks**, helping you keep your content organized as your projects or ideas evolve. You can move one note at a time or multiple notes at once.

***

### On desktop <a href="#id-7540" id="id-7540"></a>

There are several ways to add or move notes between notebooks in UpNote, giving you flexibility to organize your notes quickly and efficiently.

#### 🖱️Drag and Drop

You can easily **drag and drop** notes from the note list into notebooks in the sidebar.

* By default, dragging a note to a notebook will **add** it to that notebook.
* If you prefer to **move** the note (instead of adding it to multiple notebooks), go to:\
  **Settings → General → Others → Drag notes to notebook → Move to notebook.**

#### 📘 Use the Notebook Icon

Another way to add or move a note is from the note editor:

1. Click the **Notebook icon** at the bottom-left corner of the note editor.
2. Select one or more notebooks to add your note to.
3. You can also open this pop-up using the shortcut **Cmd/Ctrl + Shift + B**.

To remove a note from a notebook:

* Untick the current notebook from the list in the pop-up, or
* Click the **×** button on the notebook label directly in the note.

<figure><img src="/files/no1EbtOf8HsF9sQQ9HWS" alt=""><figcaption></figcaption></figure>

{% hint style="success" %}
**Tip**: In the Add to Notebooks pop-up, you can type the first few letters of a notebook name in the search box to find it faster.

* Use the Up/Down arrow keys to navigate between notebooks.
* Press Return/Enter to select or unselect a notebook.
  {% endhint %}

#### Move multiple notes at once

You can move or add multiple notes to notebooks at once to reorganize your workspace more efficiently.

* In the note list, hold the **Shift** or **Cmd/Ctrl** key to select multiple notes.
* Once selected, you can:
  * Drag and drop the notes into a notebook in the sidebar, **or**
  * Use the options in the right panel:
    * **Move to another notebook** – Moves all selected notes to the chosen notebook.
    * **Add to notebooks** – Adds the selected notes to additional notebooks, allowing you to organize them in more than one place.

<figure><img src="/files/O3da1EcT6PEnDwbeBiGW" alt="" width="375"><figcaption></figcaption></figure>

### On mobile <a href="#c382" id="c382"></a>

You can perform the same actions on mobile by tapping the **Notebooks icon** at the bottom of the note editor to add or move a note to different notebooks.

![](https://miro.medium.com/max/1094/1*OgQbhHRKZXG8NyU1ked2zQ.png)

To move **multiple notes** at once:

1. Go to the **note list** screen.
2. Tap the **More (⋯)** button to enter multi-select mode.
3. Select the notes you want to move.
4. Tap the **Notebook** button and choose the destination notebooks.

![](/files/iIyDiQvtoRyXeAmXD1lw)


# Delete a notebook

You can delete any notebook in UpNote if you no longer need it. When deleting a notebook, you can choose whether to **move the notes inside to Trash** or **keep them in your library**.

***

### 🖥 On Desktop (Mac, Windows, Linux)

1. Right-click the notebook you want to delete in the sidebar.
2. Select **Delete**.
3. In the confirmation dialog, choose whether to:
   * **Keep notes** (notes will remain in All Notes), or
   * **Move notes to Trash**.
4. Confirm the deletion.

<div align="left"><figure><img src="/files/wvVaSKQPfViR6QDpNYOK" alt="" width="375"><figcaption></figcaption></figure></div>

***

### 📱 On Mobile (iOS & Android)

1. Select the notebook from the sidebar.
2. Tap the **⋯** icon in the lower-right corner of the note list.
3. Select **Delete notebook**.
4. Confirm the deletion.

***

### ⚠️ Important

* **Deleting a notebook cannot be undone.**
* If you chose to move its notes to Trash, you can restore the notes individually from the Trash.
* Restoring deleted notes will **not** automatically recreate the original notebook structure—you will need to reorganize them manually if needed.


# Hide and show notebooks

UpNote allows you to **hide notebooks** in the sidebar when they’re not in use, helping you keep your workspace clean and focused. You can easily show them again anytime.

<details>

<summary>Desktop</summary>

**To hide a notebook:**

1. Hover over a notebook in the sidebar.
2. Click the **More (⋯)** button or right-click the notebook.
3. Select **Hide from Sidebar**.\
   ![](/files/vBxqz11liDUP57wTw53G)

**To show hidden notebooks:**

1. Click the **Notebooks** section label in the sidebar to open the full notebook view.\
   ![](/files/BnHtrym5oZrVTRxIGf7d)
2. Locate the notebook you want from the list.
   * If it’s a **nested notebook**, click the **folder icon** on its cover to reveal the notebooks inside.\ <img src="/files/XTCAS5JjJO9ZNdRdOtjg" alt="" data-size="original">
3. **Double-click** the notebook to open it and make it visible again in the sidebar.

</details>

<details>

<summary>iOS</summary>

**To hide a notebook from the sidebar:**

1. Swipe **left** on a notebook in the sidebar.
2. Tap **Hide** button\
   ![](/files/l2Yczb0TeHeeRiibF0hO)

**To access a hidden notebook:**

1. Tap the **Notebooks** section label to view all notebooks.\
   ![](/files/S34epWgURwFRl14WHkDs)
2. Locate the notebook you want to unhide.
   * If it’s **nested** inside another notebook, tap the **folder icon** on the parent notebook cover to reveal its contents.\
     ![](/files/zdFxauTYL4pEW9uUXRrB)
3. Select the notebook to show it again in the sidebar.

</details>

<details>

<summary>Android</summary>

**To hide a notebook from the sidebar:**

1. Long tap on a notebook in the sidebar.
2. Tap **Hide from Sidebar**.

**To access a hidden notebook:**

1. Tap the **NOTEBOOKS** section label to view all notebooks.\
   ![](/files/eO2e3cbSad9AxCjd7111)
2. Find the notebook you want to restore.
   * If it’s **nested**, tap the **folder icon** on the parent notebook cover to view its nested notebooks.\
     ![](/files/d4rBQZ76brAtW8M9NT9B)
3. Select the notebook to display it again in the sidebar

</details>


# Arrange notebooks in the sidebar

You can organize how your notebooks appear in the sidebar by sorting them alphabetically or arranging them manually in a custom order.

***

#### Sort by Title

1. Open **Settings → General → Sort items in the sidebar**.
2. Select **Title (A → Z)** or **Title (Z → A)** to sort notebooks alphabetically.

***

#### Custom Sorting of Main Notebooks

1. Open **Settings → General → Sort items in the sidebar** and select **Custom**.
2. Rearrange notebooks manually:
   * **On Mac, Windows, and Linux:** Drag a notebook up or down in the sidebar.
   * **On iOS:** Tap and hold a notebook in the sidebar, then drag it up or down to change its order.
   * **On Android:**
     1. Tap and hold a notebook in the sidebar and select **Rearrange** in the pop-up menu.
     2. Drag the handle on the right side of each notebook row to adjust the order.

***

#### Custom Sorting of Sub-notebooks

1. Open the **parent notebook** to view its nested notebooks in the notes list panel.
   * If nested notebooks don’t appear, go to **Settings → General** and enable **Show nested notebooks in the notes list**.
2. Drag the nested notebooks **up or down** in the notes list panel to reorder them.\
   ![](/files/6YQG7kPRo0Tgw1q59Qst)
3. The new order will automatically be reflected in the sidebar.

***

#### Note

If you’re unable to drag notebooks to rearrange them, make sure **Custom sorting** is enabled under **Settings → General → Sort items in the sidebar**.\
![](/files/zcD3CMbILCx2j8TLueoL)


# Search for notebooks

To search for notebooks, you can simply type the notebook name in the search box. The matched notebook name will appear first in the search result.

<figure><img src="/files/WBmDuSSrdqwaZwUunrWY" alt="" width="291"><figcaption></figcaption></figure>

Alternatively, you can search for notebooks directly from the Notebooks screen. First, select Notebooks in the sidebar to view all your notebooks, then enter the notebook name in the search box on that screen.

<figure><img src="/files/s3zwOzFMsjJeLzMGAocU" alt=""><figcaption></figcaption></figure>

If you want to search for both notebooks and sub-notebooks, please switch to the List view in the Notebooks screen before searching.

<figure><img src="/files/2qI06djOGyeODhriGFAj" alt=""><figcaption></figcaption></figure>


# Organize with tags

Tags in UpNote are created directly within your notes using **inline hashtags**. Simply type a `#` followed by your keyword to tag a note instantly. This makes it easy to group related notes across different notebooks, filter by topics, and quickly jump to connected content. Whether you're organizing projects, journaling themes, or tracking ideas, inline hashtags help you stay flexible and find information faster — without moving notes from their original locations.

[Create a tag (hashtag)](/organize-and-manage-notes/organize-with-tags/create-a-tag-hashtag)

[Rename and delete tags](/organize-and-manage-notes/organize-with-tags/rename-and-delete-tags)

[Add or remove tags from multiple notes](/organize-and-manage-notes/organize-with-tags/add-or-remove-tags-from-multiple-notes)

[Hide and show tags in the sidebar](/organize-and-manage-notes/organize-with-tags/hide-and-show-tags-in-the-sidebar)

[Sort tags in the sidebar](/organize-and-manage-notes/organize-with-tags/sort-tags-in-the-sidebar)


# Create a tag (hashtag)

Tags in UpNote help you organize and connect related notes across different notebooks. You can create tags instantly by typing **inline hashtags** directly in your notes.

#### Create a tag

To create a tag, type the **#** symbol followed by your keyword. Press **Enter** to confirm creating a new tag.

<figure><img src="/files/he7PncgA88vSdNKb2JM8" alt="" width="351"><figcaption></figcaption></figure>

Once you type a hashtag, UpNote automatically recognizes it as a tag. You can add multiple tags to the same note to make it easier to find later.

On **mobile,** you can also tap the **# icon** from the **format bar** above the keyboard to insert a tag easily.

<figure><img src="/files/NPjURcmiAtjfx1lxNlDi" alt="" width="371"><figcaption></figcaption></figure>

***

#### View Tagged Notes

* To view all notes with a specific tag, click or tap the **tag name**.
* You can also browse all your tags in the **Tags section** of the sidebar.
* Selecting a tag will display all notes containing that tag.

***

#### Convert a word into a tag (desktop only)

* **Right-click** the word and select **Create new tag**.

![](/files/Qc93L6l67ijB9YU46sBZ)

* Once the tag is created, it will automatically appear in both the **Tags section** of the sidebar and the note’s [Info Panel](/write-and-edit/info-panel).

<figure><img src="/files/6njsD2VR6K1T5d5cQz5o" alt=""><figcaption></figcaption></figure>

***

#### 💡 Tips

* Use short, memorable tags for consistent organization.
* Tags can include letters and numbers but not spaces (use `#meetingNotes`  or `#meeting-notes` instead of `#meeting notes`).
* Combine tags with [notebooks](/organize-and-manage-notes/organize-with-notebooks) for powerful multi-layer organization — notebooks for structure, tags for flexibility.


# Rename and delete tags

You can easily rename or delete tags in UpNote to keep your tagging system organized. When you rename or delete a tag, the change will apply to **all notes** that use that tag.

***

### On Desktop&#x20;

#### To rename or delete a single tag:

* **Right-click** a tag in your note and choose **Rename** or **Delete** from the context menu.
* Alternatively, click the **More (⋯)** button next to a tag in the sidebar, then select **Rename** or **Delete**.

{% hint style="warning" %}
The tag will be renamed or deleted across **all notes** that contain it.
{% endhint %}

***

#### To delete multiple tags at once:

1. Click the **Tags** label in the sidebar to open the tags view.
2. Select multiple tags.
3. Click the **Delete** button in the top bar.<br>

   <figure><img src="/files/NiReuPmZ26wV44ActV8E" alt=""><figcaption></figcaption></figure>

***

### On Mobile

#### On iOS:

* Swipe **left** on a tag in the sidebar and tap **Edit** to rename it.

#### **On Android:**

* Long tap on a tag in the sidebar and select **Edit** to rename it.

***

#### 💡 Tips

* Renaming a tag updates it everywhere instantly — you don’t need to edit individual notes.
* Deleting a tag only removes the tag itself; your notes will remain intact.


# Add or remove tags from multiple notes

Follow the steps below to add or remove tags from multiple notes in UpNote on **desktop:**

1. [Select multiple notes](/organize-and-manage-notes/multi-note-actions/select-multiple-notes) in the note list.
2. In the **right panel menu**, select **Add tags**.
3. In the tag list that appears, **check** tags to add them or **uncheck** tags to remove them from your selected notes.

The newly added tags will appear at the bottom of each selected note.


# Hide and show tags in the sidebar

UpNote allows you to **hide tags** from the sidebar to reduce clutter and keep your workspace focused. You can easily show them again whenever you need access.

***

#### 🖥 On Desktop (macOS, Windows & Linux)

**To hide a tag:**

1. Hover over a tag in the sidebar.
2. Click the **More (⋯)** button or **right-click** the tag.
3. Select **Hide from Sidebar**.

**To show hidden tags:**

1. Tap the **Tags** section label in the sidebar.
2. Select the tag you want to show again.

***

#### 📱 On Mobile (iOS & Android)

**On iOS**

* Swipe **left** on a tag in the sidebar and tap the **Hide** button.

**On Android**

* Long tap on a tag in the sidebar and select **Hide from Sidebar**.

**To show hidden tags (iOS & Android)**

1. Tap the **Tags** section label in the sidebar.
2. Select a tag to make it visible again in the sidebar.


# Sort tags in the sidebar

Tags in UpNote can be arranged in the sidebar in the order that works best for you. By default, newly created tags appear **at the top** of the tag list. You can manually reorder them or sort them alphabetically.

***

#### Custom Sorting

1. Open **Settings → General → Sort items** in the sidebar and select **Custom**.
2. Rearrange tags manually:
   * **On Mac, Windows, and Linux:** Drag a tag up or down in the sidebar.
   * **On iOS:** Tap and hold a tag in the sidebar, then drag it up or down to change its order.
   * **On Android:**
     1. Tap and hold a tag in the sidebar and select **Rearrange** in the pop-up menu.
     2. Drag the handle on the right side of each tag row to adjust the order.

***

#### Sort by Title

1. Open **Settings → General → Sort items in the sidebar**.
2. Select **Title (A → Z)** or **Title (Z → A)** to alphabetize your tags.


# Organize with spaces

**Spaces** in UpNote help you group notes and notebooks into broader categories, giving you a clean and organized sidebar. They’re especially useful if you manage many notebooks or want to separate areas of your life — such as Work, Personal, Projects, or Study.

Spaces let you:

* Group related notebooks together
* Create dedicated areas for different workflows

#### 💡 Tip

* You can create a dedicated **Archive** space to store notes and notebooks you no longer use regularly. This keeps your main workspace clean while still giving you easy access to older content whenever you need it.
* Check out [these tips](https://medium.com/upnote/tips-for-organizing-notes-with-spaces-a64b252b2291) for using spaces.

***

[Create a space](/organize-and-manage-notes/organize-with-spaces/create-a-space)

[Switch between spaces](/organize-and-manage-notes/organize-with-spaces/switch-between-spaces)

[Edit a space](/organize-and-manage-notes/organize-with-spaces/edit-a-space)

[Move content across spaces](/organize-and-manage-notes/organize-with-spaces/move-content-across-spaces)


# Create a space

Spaces help you organize notebooks into larger categories. By default, all your existing notes and notebooks belong to a built-in space called **General**. You can rename this default space, but it **cannot be deleted**.

***

#### 🖥 On Desktop (Windows, Linux & macOS)

To create a new space:

1. Go to **Settings → Spaces**.
2. Select **+ New space**.

   <div align="left"><figure><img src="/files/lPjMp0BysxRi00wmzS2R" alt="" width="375"><figcaption></figcaption></figure></div>
3. Enter a name for your space.
4. (Optional, Premium only) Turn on **Lock** if you want the space to be protected.\
   ![](/files/0VA1pgFFImzRpquBIjCv)\
   \
   Your new space will appear in the sidebar, ready for you to add notebooks to it.

***

#### 📱 On Mobile (iOS & Android)

1. Open **Settings → Spaces**.
2. Tap the **+** button in the top-right corner.\
   ![](/files/Z5XjjkNIqvAWtYxdIfRW)
3. Enter your space name and save.

***

#### 💡 Tip

Consider creating a space specifically for archiving notebooks you no longer use frequently. This helps keep your main workspace clean while still allowing easy access to older content.


# Switch between spaces

If you use multiple spaces in UpNote, you can easily switch between them to move from one workspace to another — for example, from *Work* to *Personal* or *Archive*. Spaces help keep your notes and notebooks organized into clear, separate areas.

***

#### 🖥 On Desktop (Windows, Linux & macOS)

There are two ways to switch spaces:

1. **From the sidebar:**
   * Click the **current space name** in the top row of the sidebar.
   * Select the space you want to switch to.\
     ![](/files/JrAW00wala9TRPqxI04K)
2. **Using a shortcut:**
   * Press **Cmd + J** (Mac) or **Ctrl + J** (Windows/Linux) to open the space selection menu instantly.
   * Choose the space you want to jump to.\
     ![](/files/T6kBKFWiKdTPzHLNE5U0)

***

#### 📱 On Mobile (iOS & Android)

You can switch spaces from either the sidebar or the note list menu:

1. **From the sidebar:**
   * Tap the **space name** at the top of the sidebar.
   * Choose the space you want to switch to.
2. **From the note list screen:**
   * Tap the **More (⋯)** button in the bottom-right corner.\
     ![](/files/VGFHceRntI1MwCsqf0GO)
   * Select **Switch space**, then choose your desired space.

***

#### 💡 Tip

Spaces are great for separating different areas of your life. For example, you can switch between Work, Personal, Study, or Archive spaces depending on what you need to focus on.


# Edit a space

You can edit a space in UpNote to update its name, delete it, or lock it for additional privacy (Premium). You can access space editing from the **Settings** screen or directly from your current workspace.

***

#### 🖥 On Desktop (Windows, Linux & macOS)

There are two ways to edit a space:

**1. From Settings**

1. Go to **Settings → Spaces**.
2. Click the space you want to edit.
3. Select **Edit** to rename the space or adjust its settings (such as enabling Lock).<br>

   <div align="left"><figure><img src="/files/dtncSJ9OVYRlpuKx87lu" alt="" width="563"><figcaption></figcaption></figure></div>

**2. From the Sidebar**

1. In the sidebar, click the **space name** at the top.
2. Select **Edit** to open the space settings.\
   ![](/files/aoXNunnYlt8ZOjuDjbMd)

***

#### 📱 On Mobile (iOS & Android)

You can also edit spaces from both Settings and the sidebar:

**1. From Settings**

1. Go to **Settings → Spaces**.
2. Tap the space you want to edit.
3. Tap **Edit** to rename or configure the space.

**2. From the Sidebar**

1. Tap the **space name** at the top of the sidebar.
2. Select **Edit** to update the current space.\
   ![](/files/NouXIIqgZNEMvowDsqdz)

***

#### 💡 Tip

The **General** space (default space) can be renamed but cannot be deleted.


# Move content across spaces

You can move your **notes**, **notebooks**, and **tags** between spaces to reorganize your workspace in UpNote. When you move a notebook or tag to another space, **all notes inside that notebook or tagged with that tag will also move** to the new space automatically.

***

### 🖥 On Desktop (Windows, Linux & macOS)

#### **Move Notes to Another Space**

1. Right-click a note in the note list.
2. Select **Move to other space**.
3. Choose the destination space.

You can also select **multiple notes** (using Shift or Cmd/Ctrl) and move them all at once.

#### **Move Notebooks or Tags to Another Space**

1. Right-click the **notebook** or **tag** in the sidebar.
2. Select **Move to other space**.\
   ![](/files/CFk6w2IUKXdIb6ecWVFG)
3. Pick the space where you want to move it.

Moving a notebook or tag transfers **all associated notes** to the selected space.

***

### 📱 On Mobile (iOS & Android)

#### **Move Notebooks or Tags**

1. Select a notebook or tag in the sidebar.
2. Tap the **More (⋯)** button in the bottom-right corner of the note list screen.
3. Tap **Move to other space** and choose the new space.\
   ![](/files/759SFdDWdbv4GpCWoe6h)

#### **Move Notes**

1. Open the note.
2. Tap the **More (⋯)** button in the top-right corner.
3. Select **Move to other space**.\
   ![](/files/qFK25zRn6EADzTZpa3wy)

You can also [select multiple notes](/organize-and-manage-notes/multi-note-actions/select-multiple-notes) in the note list and move them all together.

***

### 💡 Tips

* Spaces help separate major areas of your work or life; moving content between spaces keeps things organized as projects evolve.
* You cannot move the default **General** space, but notebooks, tags, and notes inside it can be moved freely.


# Import notes to spaces

If you’re using multiple UpNote accounts and would like to merge them into spaces under a single account, please follow these steps on your **desktop** app:

1. [Export all notes](/import-and-export/export-notes) from the account you want to merge by exporting to HTML. This will create an export folder.
2. Sign in to your main account, create a new space, and [import the HTML folder](/import-and-export/import-content-to-upnote) into that space.
3. If you have multiple notebooks, you may need to reorganize them—such as setting notebook covers, applying locks, and adjusting the notebook structure after the import.


# Protect notes from unwanted edits

UpNote allows you to protect your notes from accidental or unwanted changes by enabling **Edit Protection**. When this feature is turned on, your note becomes read-only until you manually toggle the edit mode in the note editor. This is useful for important references, finished documents or any content you don’t want to alter by mistake.

* To enable this mode, go to **Settings** > **Editor** > enable **Protect notes from unwanted edits**.
* To toggle edit mode in a note, click or tap the edit <img src="/files/LZMRJlWIrMfqLe69t32G" alt="" data-size="line"> button in the upper right corner of your note editor.

***

#### 💡 Tips

* Edit Protection **does not sync** across devices. You’ll need to enable or disable it separately on each device where you want the note protected.
* Edit Protection is different from **locking** a note. Locking hides the content and requires authentication; Edit Protection only prevents accidental editing.


# Lock


# Lock password

UpNote allows you to lock notebooks or the entire app for extra privacy. The lock password works differently on desktop and mobile to give you convenient and secure access on each device.

> **Note:** UpNote does **not** support locking individual notes.\
> To protect a specific note, place it inside a **locked notebook**.

***

### 🖥 On Desktop (Windows & macOS)

#### **Default Lock Password**

* Your **account login password** is used as the default lock password on desktop.

#### **Change the Lock Password**

If you'd like to use a different lock password—or match it to your mobile passcode—you can change it here:

1. Go to **Settings → General → Lock → Change lock password**.
2. Set a new lock password.
3. You can still unlock using your **account password** if needed.

#### **If You Forget the Lock Password**

If you cannot remember your lock password:

1. Click **Sign out** on the lock screen.
2. Sign back in with your **account password**.
3. The lock password will reset to your account password.
4. You may change it again in **Settings** if needed.

***

### 📱 On Mobile (iOS & Android)

#### **Set a Passcode (First-Time Setup)**

When you first enable a lock for a notebook or for the entire app, UpNote will prompt you to set a **6-digit passcode**.

#### **Change Your Mobile Passcode**

You can update your passcode anytime:

* Go to **Settings → Passcode Lock → Change Passcode**.

#### **Enable Biometrics (Touch ID / Face ID)**

For quick access:

* Go to **Settings → Passcode Lock → Enable Touch ID / Face ID**.

#### **If You Forget Your Passcode**

If you forget your mobile passcode:

1. Sign out of UpNote on your device.
2. Sign back in with your **account login password**.
3. When you open a locked notebook again, UpNote will prompt you to **reset your passcode**.

***

#### 💡 Tips

* Locking applies to **notebooks**, not individual notes. Place sensitive notes inside a locked notebook for protection.
* Desktop and mobile app lock settings are managed separately for flexibility.
* Locking a notebook protects all notes and nested notebooks inside it.


# Lock a notebook

This is a Premium feature.

Locking a notebook adds an extra layer of privacy to your notes. This feature is available for **Premium** users and allows you to protect sensitive information with a password or passcode.

> **Note:** UpNote does not support locking individual notes.\
> To protect a specific note, place it inside a locked notebook.

***

### 🖥 On Desktop (Windows & macOS)

#### **Enable Lock When Creating a Notebook**

When creating a new notebook, you can turn on the **Lock** option directly in the New Notebook popup.

<div align="left"><figure><img src="/files/HbjDzgNdbpdkg7JCzTQQ" alt="" width="375"><figcaption></figcaption></figure></div>

#### **Lock an Existing Notebook**

If you already have a notebook:

1. Click the **More (⋯)** button next to the notebook title in the note list.
2. Select **Lock**.

<div align="left"><figure><img src="/files/31kWcOyVeagsHfFKWmHU" alt="" width="266"><figcaption></figcaption></figure></div>

#### **Recommended: Sign In Before Using Lock**

We recommend signing in to your UpNote account before enabling lock.\
This ensures that if you forget your lock password, you can sign out and reset it safely.

#### **Enter and Manage Your Lock Password**

When accessing a locked notebook, you’ll be asked to enter your lock password.

* By default, this is your **account login password**.
* You can change it via **Settings → General → Lock → Change lock password**.

#### **Navigate Between Locked Notebooks**

By default, UpNote requires you to enter your lock password every time you access a locked notebook.

If you prefer to keep the unlocked session active:

1. Go to **Settings → General → Require re-enter password**
2. Or adjust this setting directly from the lock screen.

<div align="left"><figure><img src="/files/dtSNcoAzTVoR9r7kpB27" alt="" width="375"><figcaption></figcaption></figure></div>

***

### 📱 On Mobile (iOS & Android)

#### **Enable Lock on a Notebook**

You can turn on lock in either:

* **New Notebook** screen
* **Edit Notebook** screen

Just toggle **Lock** to enable protection.

<div align="left"><figure><img src="/files/eBNcb1TSevMBLK74Xyox" alt="" width="375"><figcaption></figcaption></figure></div>

#### **Passcode Lock (Mobile Only)**

The first time you lock a notebook, UpNote will prompt you to set a **6-digit passcode** for faster access on your phone.

You can change it anytime under:

* **Settings → Passcode Lock → Change Passcode**

#### **Enable Biometrics**

For quicker unlocking, enable:

* **Touch ID / Face ID**
* Go to **Settings → Passcode Lock → Enable Touch/Face ID**

#### **If You Forget Your Passcode**

If you forget your passcode lock:

1. Sign out of UpNote.
2. Sign back in with your **account login password**.
3. When you open a locked notebook, UpNote will prompt you to **reset your passcode**.


# Lock the whole app

This is a Premium feature.

Locking the entire UpNote app keeps all your notes protected, ensuring that no one can access your content without entering the lock password or passcode. This is useful when sharing your device or when you want an additional layer of privacy beyond individual notebook locks.

***

### 🖥 On Desktop (Windows & macOS)

#### **Lock UpNote Manually**

You can lock the app anytime:

* Press **Cmd + L** (Mac) or **Ctrl + L** (Windows/Linux),\
  **or**
* Click the **lock icon** in the upper-right corner of the app window.\
  ![](/files/UMeC2NxHFn2ZHd15oaa8)

#### **Recommended: Sign In First**

We recommend signing in to your UpNote account before using the lock function.\
If you forget your lock password, being signed in allows you to safely sign out and reset it using your account login.

***

#### **Lock Password**

* By default, your **UpNote login password** is used as the lock password.
* To change it to a shorter or numeric password, go to:\
  **Settings → General → Change lock password**

#### **If You Forget the Lock Password**

If you cannot remember your lock password:

1. Click **Sign out** on the lock screen.
2. Sign back in using your **account login password**.
3. Your lock password will reset to your account password.
4. You may change it again in **Settings**.

***

#### **Lock When App Is Closed**

You can set UpNote to lock automatically whenever the app is closed:

* Go to **Settings → General → Lock when app is closed**

This ensures the app always requires your lock password when reopened.

***

#### **Auto Lock**

To prevent unauthorized access when UpNote is left open:

* Go to **Settings → General → Auto lock**
* Choose a time interval for UpNote to lock automatically after inactivity.

***

### 📱 On Mobile (iOS & Android)

#### **Require Passcode When the App Launches**

To lock the entire app on mobile:

1. Go to **Settings → Passcode Lock**
2. Enable **Require passcode when app launches**

You will be asked to enter your passcode each time you open UpNote.

#### **Enable Biometrics**

For faster unlocking:

* Go to **Settings → Passcode Lock → Enable Touch ID / Face ID**

#### **Change Passcode**

You can update your 6-digit passcode anytime:

* **Settings → Passcode Lock → Change passcode**

#### **If You Forget Your Passcode**

If you forget your mobile passcode:

1. Sign out of UpNote.
2. Sign back in with your **account login password**.
3. When you open a locked notebook afterward, UpNote will prompt you to **reset your passcode**.


# Forget lock password

If you forget your lock password or passcode, you can regain access by signing out and signing back in with your UpNote account password. The steps differ slightly between desktop and mobile.

***

### 🖥 On Desktop (Windows & macOS)

On desktop, the default lock password is your **UpNote account login password**.

If you forget your lock password:

1. Sign in with your UpNote account login password.
2. If you forget your login password:
   * Click **Sign out** on the lock screen.
   * Reset your login password by following the instructions in the [Reset Password](/get-started/manage-your-account/reset-password) article.\
     ![](/files/s1RgYfWZjAfqt5RckHGM)
3. After signing in, your **lock password will reset** to your account password.
4. You can then unlock your notebooks or change the lock password again via:\
   **Settings → General → Change lock password**

***

### 📱 On Mobile (iOS & Android)

If you forget your mobile passcode:

1. **Sign out** of UpNote on your device.
2. Sign back in using your **UpNote account password**.
   * If you don’t remember your account password, follow the steps in the [Reset Password](/get-started/manage-your-account/reset-password) guide.
3. When you access a locked notebook again, UpNote will prompt you to **create a new passcode**.


# Restore a note version

UpNote automatically saves **previous versions** of your notes whenever you make edits. This allows you to review past changes and restore an earlier version if needed — helpful for long notes, detailed writing, or recovering accidental edits.

**Note:** Version history is **saved locally on each device** and is **not synced** across devices.\
Each device keeps its own independent set of versions.

***

### 🖥 On Desktop (Windows & macOS)

#### **View Version History**

1. Open the note.
2. Click the **Version History** button in the top bar of the note editor.\
   ![](/files/iJ5VW9MvTcTRvdkR7cjn)

All saved versions on *this device* will appear in a pop-up window.

<div align="left"><figure><img src="/files/LcweO4IilvPVOwvpJc54" alt=""><figcaption></figcaption></figure></div>

#### **Preview and Restore**

1. Click any **date and time** entry to preview that version.
2. Click **Restore** to replace your current note with the selected version.

***

### 📱 On Mobile (iOS & Android)

#### **View Version History**

1. Open the note.
2. Tap the **More (⋯)** button in the top bar.
3. Select **Version History**.\
   ![](/files/zGWKmoxOeCDlJQxru54j)

You will see the list of versions saved **on this device**.

#### **Preview and Restore**

1. Tap a version to preview it.
2. Tap **Restore** to apply it to your note.

***

### Version History Settings

By default, UpNote keeps up to **50 versions** per note *per device*.

You can adjust this limit:

* **Desktop:**\
  **Settings → Backup → Maximum number of versions**
* **Mobile:**\
  **Settings → General → Maximum number of version history**

<figure><img src="/files/wje2OCN7gYiXo7MvEQON" alt=""><figcaption></figcaption></figure>

***

### Delete Version History (Per Device)

To delete the version history stored on your current device:

1. **Sign out** of UpNote.
2. When prompted, choose **Delete backup data**.

This removes all local version history for your notes on that specific device.


# Automatic notes backup

UpNote supports **automatic notes backup** to ensure your data is always safe. Backups are stored **locally on your device**, giving you full control even without cloud dependency. This feature is available on **Mac, Windows, and Linux**.

If you primarily use UpNote on mobile, you can also sign in to UpNote on a desktop device and keep it connected to the internet so your notes sync and get backed up automatically on your computer.

***

### Backup Settings

By default, UpNote automatically backs up your notes **once per day**, keeping **up to 50 days** of backups. Backup files are compressed to save storage space.

You can customize these settings:

* Backup frequency
* Maximum number of backups
* Backup attachments
* Export backups to Markdown

Go to **Settings → Backup** to adjust your preferences.

<div align="left"><figure><img src="/files/7A4pjUrax5HDK2zFX9C3" alt="" width="563"><figcaption></figcaption></figure></div>

***

### Change Your Backup Location

You can choose where your backup files are stored. If you want your backups to sync with cloud services like **Dropbox** or **Google Drive**, you can point UpNote's backup folder to one of their directories:

1. Go to **Settings → Backup**.
2. Click **Select backup folder**.
3. Choose a folder inside your Dropbox or Google Drive directory.

UpNote will automatically save all future backups to that location.

{% hint style="warning" %}
**Important:** The files in the backup folder are managed by UpNote. Please **do not edit or modify them**, as this may cause data loss.
{% endhint %}

***

### Manual Backup

You can perform a backup at any time:

* Click **Backup now** in **Settings → Backup**.

If you prefer to manage backups manually, you can turn off automatic backups by setting the **backup frequency** to **Off**.

***

### Restore a Backup

To restore data:

1. Go to **Restore Backup** in **Settings → Backup**.
2. Choose the **backup date** you want to restore from.

   <div align="left"><figure><img src="/files/z7y7oI8eyGpmLwdargJr" alt="" width="563"><figcaption></figcaption></figure></div>
3. Select one of the two restore modes:
   * **Overwrite all data**
     * Replaces your current notes with the backup data.
     * Notes not included in the backup are not affected.
     * Useful for restoring a previous version of your full note structure.
   * **Only restore deleted data**
     * Restores notes deleted from Trash or notes that failed to sync.
     * Helpful when you're missing certain notes and want to recover them without affecting your existing content.

***

### Delete Backup Data

When you sign out of UpNote, you’ll be asked whether to **keep** or **delete** the backup data stored on your current device.

You can also delete your backups manually anytime by deleting the **backup folder**.

***

#### 💡 Tips

* Automatic backup runs **locally**, so it does not rely on cloud servers.
* Using Dropbox or Google Drive as your backup location gives you cloud redundancy while keeping backups portable.
* Backups are device-specific; each desktop device maintains its own backup set.


# Import content to UpNote

UpNote makes it easy to bring your existing notes and content from other apps into one place. You may import your notes from Evernote, Simplenote, or other file types including Markdown, HTML, RTF/RTFD, Doc/Docx, and TXT\*.

{% hint style="info" %}
Importing RTF/RTFD and Doc/Docx files is only available on **Mac**.
{% endhint %}

{% hint style="info" %}
To ensure performance and fair use of server resources, bulk imports are limited if they would bring your account above 20,000 notes or 10 GB of attachments. In that case, you can import up to 50 notes at a time.
{% endhint %}

### Import Steps

* On **Mac**: Select **File** > **Import** from the menu bar.
* On **Windows** & **Linux**: Go to **Settings** > **General > Import & Export** and select an option to import your files.
* Select a file type you want to import to

### Import from specific sources

* [Import from Evernote](/import-and-export/import-content-to-upnote/import-from-evernote)
* [Import from Apple Notes](/import-and-export/import-content-to-upnote/import-from-apple-notes)
* [Import from Bear](/import-and-export/import-content-to-upnote/import-from-bear)
* [Import from Simplenote](/import-and-export/import-content-to-upnote/import-from-simplenote)
* [Import from Markdown](/import-and-export/import-content-to-upnote/import-from-markdown)
* [Import from Google Keep](/import-and-export/import-content-to-upnote/import-from-google-keep)
* [Import from HTML](/import-and-export/import-content-to-upnote/import-from-html)

### Import from other sources

You can try importing notes from a variety of apps into UpNote by first exporting them from the original app to HTML, Markdown or plain text and then importing the exported files. Whenever possible, please select the **top‑level folder** for import rather than individual files, so UpNote can access all the content without repeatedly asking for permissions.

<table><thead><tr><th width="182.2066650390625">Source App</th><th>Suggested Exported Format</th><th>How to Import into UpNote</th></tr></thead><tbody><tr><td><strong>Nimbus Notes</strong></td><td><strong>HTML</strong></td><td><a href="/pages/zj7IiBRLiyZ6dRgUalya">Import the HTML</a> files into UpNote</td></tr><tr><td><strong>Notion</strong></td><td><strong>Markdown</strong></td><td><a href="/pages/5blLffBkvmDflct5pp2Q">Import the Markdown</a> files into UpNote</td></tr><tr><td><strong>Obsidian</strong></td><td><strong>Markdown</strong></td><td><a href="/pages/5blLffBkvmDflct5pp2Q">Import the Markdown</a> files into UpNote</td></tr><tr><td><strong>Day One</strong></td><td><strong>Plain text</strong> (see Day One’s <a href="https://dayoneapp.com/guides/exporting-entries/">guide</a>)</td><td><a href="/pages/322byuqRaRYVdkRvWLBQ">Import the text</a> files into UpNote</td></tr><tr><td><strong>Zoho Notebook</strong></td><td><strong>HTML</strong> (see <a href="/users/uGxM4vIaJFZ4awILkfVYqFe9d9J3">Zoho’s guide</a>)</td><td><a href="/pages/zj7IiBRLiyZ6dRgUalya">Import the HTML</a> files into UpNote</td></tr><tr><td><strong>Paper</strong></td><td><strong>Markdown</strong> (see <a href="https://help.dropbox.com/view-edit/paper-export-docs">Paper’s guide</a>)</td><td><a href="/pages/5blLffBkvmDflct5pp2Q">Import the Markdown</a> files into UpNote</td></tr></tbody></table>

***

**Please note:** While we do our best to import data from other apps, we cannot guarantee that all formatting or elements will be preserved due to the variety of file sources. If you encounter any issues during import, contact us for assistance.


# Import from Evernote

You can transfer your existing notes from **Evernote** to **UpNote** by performing the following steps on **Mac, Windows** and **Linux** app:

1. Export your notes from Evernote to an **.enex** file following this [guide](https://help.evernote.com/hc/en-us/articles/209005557-How-to-back-u).&#x20;
2. Select the option to import from Evernote
   * On **Mac**:  Select **File** > **Import Notes** > **Evernote** from the menu bar.&#x20;
   * On **Windows**: Go to **Settings** > **General** > **Import from Evernote** <br>
3. You will see the pop up as below:\
   ![](/files/7wPJm2Q9BL8jJz40wfPo)<br>
4. Click the button **`Select .enex files`** and select one or multiple .enex files to import to UpNote.\
   ![](/files/Bbiiy9f7PAHE1JgSMcd6)<br>
5. If you want convert each .enex file into notebooks in UpNote, enable the option **Use file name as notebook** . This way you can quickly import multiple notebooks from Evernote to UpNote.\
   ![](/files/IZQg8O7IaN8DqhSCkcJR)<br>
6. You can select if you want to convert your tags in Evernote to hashtags or notebooks in UpNote. If you convert to hashtags, please note that special characters in Evernote's tags will be replaced with the dash character  **`-`** in hashtags since the hashtags in UpNote doesn't support special characters. \
   ![](/files/WxFHaEcjKKrHsjHV09fE)<br>
7. Select the notebook you want to add your notes to (optional).\
   ![](/files/73zfVh3Oijod79IUT0wu)
   * Please note that your imported notes will be added to this notebook if it's specified.
   * This notebook is not the parent notebook of your imported notebooks (if you had enabled the option #5 above). Nesting action needs to be done after you imported your notebooks to UpNote. Follow [this guide](https://help.getupnote.com/get-organized/organize-with-notebooks/create-nested-notebooks#nest-an-existing-notebook-under-another) to nest a notebook another another one.
8. Finally click the **Import Notes** button to import to UpNote

***

### Notes:

* **Large notes may fail to import**

  The following notes may fail to import:

  * Notes with attachments larger than 20 MB
  * Notes containing more than 300,000 characters

  If any notes cannot be imported, they will be listed in the debug log. You can save the log from: Settings → Feedback → Save Debug Log<br>
* **Evernote internal note links cannot be converted**
  * Evernote internal note links cannot be converted during import because they do not contain enough information for UpNote to identify the target notes.
  * These links will remain clickable and will continue to open in Evernote.<br>
* **Text colors and highlight colors are removed by default**
  * Text colors and highlight colors are removed by default during import.
  * UpNote uses dynamic text colors to ensure notes display properly in both light and dark modes. This helps maintain readability when switching between themes.
  * If you would like to preserve the original text colors, you can enable the option to retain text colors during import. Please note that retained colors remain static and may not display well in both light and dark modes.
* **Formatting may vary after import**\
  While UpNote strives to preserve your content as accurately as possible, some formatting may appear differently after import depending on how the content was originally structured in Evernote.
* **Bulk import limits apply**
  * To ensure performance and fair use of server resources, bulk imports are limited if the import would cause your account to exceed:
    * 20,000 notes, or
    * 10 GB of attachments
  * In this case, you can import up to 50 notes at a time.

#### **Tips: Retain Your Evernote Notebook Structure**

1. Export each Evernote notebook separately as its own `.enex` file.
2. Import all `.enex` files together in UpNote.
3. Enable **Use file name as notebook**.

This ensures your original notebook organization is preserved.


# Import from Apple Notes

You can transfer your existing notes from **Apple Notes** to **UpNote** by performing the following steps on **Mac**:

1. Export your notes from Apple Notes to **Markdown**
   * Apple Notes does not provide a built-in export to Markdown, so you will need to use a third-party tool such as [**Exporter**](mailto:undefined).
   * Exporter allows you to convert Apple Notes into Markdown files. However, some formatting may not be preserved, as Exporter does not support all text styles from Apple Notes.
   * Attachments (such as images or files) must be copied manually into UpNote after importing.

     Since Exporter is a third-party app, UpNote cannot control its performance—please review your exported files to ensure none failed during processing.
2. Select the option to import from Markdown files
   * On **Mac**:  Select **File > Import Notes > Markdown** from the menu bar.&#x20;
3. You will see the pop up as below:\
   ![](/files/Fop0tNl2F9dEiLF30Wes)
4. Click the button **Select .md files/Select folder** and select .md files/folder to import to UpNote.
5. Click the **Import Notes** button to import to UpNote.

Please note that:

* While we do our best to import data from other apps into UpNote, we cannot guarantee that your data format will be fully retained due to the variety of file sources and their elements.&#x20;
* To ensure performance and fair use of server resources, bulk imports are limited if they would bring your account above 20,000 notes or 10 GB of attachments. In that case, you can import up to 50 notes at a time.


# Import from Bear

You can transfer your existing notes from **Bear** to **UpNote** by performing the following steps on **Mac** and **Windows** app:

1. Export your notes from Bear to **Markdown** files.&#x20;
   * In Bear, select Notes in the sidebar, then select **Edit > Select All**, or use the shortcut **Cmd + A** to select all notes in your Bear app.&#x20;
   * Then select **File > Export Notes > Export as Markdown**. Check the box to Export attachments. Create a new folder to export your notes to.
2. Select the option to import from Markdown files
   * On **Mac**:  Select **File > Import Notes > Markdown** from the menu bar.&#x20;
   * On **Windows**: Go to **Settings > General > Import from Markdown**&#x20;
3. You will see the pop up as below:\
   ![](/files/Fop0tNl2F9dEiLF30Wes)
4. Click the button **Select .md files/Select folder** and select .md files/folder to import to UpNote.
5. Click the **Import Notes** button to import to UpNote

Please note that:

* While we do our best to import data from other apps into UpNote, we cannot guarantee that your data format will be fully retained due to the variety of file sources and their elements.&#x20;
* To ensure performance and fair use of server resources, bulk imports are limited if they would bring your account above 20,000 notes or 10 GB of attachments. In that case, you can import up to 50 notes at a time.


# Import from Simplenote

You can transfer your existing notes from **Simplenote** to **UpNote** by performing the following steps on **Mac** and **Windows** app:

1. Export your notes from Simplenote to a .**json** file following [this guide.](https://simplenote.com/help/#export)
2. Select the option to import from Evernote
   * On **Mac**:  Select **File > Import Notes > Simplenote** from the menu bar.&#x20;
   * On **Windows**: Go to **Settings > General > Import from Simplenote**&#x20;
3. You will see the pop up as below:\
   ![](/files/pSX4lhCCHhaAZ9y0Nqh5)
4. Click the button **Select .json files** and select json files to import to UpNote.
5. Select the notebook you want to add your notes to (optional).&#x20;
6. Click the **Import Notes** button to import to UpNote.

Please note that:

* While we do our best to import data from other apps into UpNote, we cannot guarantee that your data format will be fully retained due to the variety of file sources and their elements. If you encounter any problems while importing, please let us know so that we can assist you in troubleshooting.
* To ensure performance and fair use of server resources, bulk imports are limited if they would bring your account above 20,000 notes or 10 GB of attachments. In that case, you can import up to 50 notes at a time.


# Import from Markdown

Follow the steps below to import your Markdown files to UpNote:

1. Select the option to import from Markdown files
   * On **Mac**:  Select **File > Import Notes > Markdown** from the menu bar.&#x20;
   * On **Windows**: Go to **Settings > General > Import from Markdown.**&#x20;
2. You will see the pop up as below:\
   ![](/files/Fop0tNl2F9dEiLF30Wes)
3. Click **Select .md files/Select folder** and select .md files/folder to import to UpNote.
4. Click **Import Notes** button to import to UpNote.

Please note that:

* While we do our best to import data from other apps into UpNote, we cannot guarantee that your data format will be fully retained due to the variety of file sources and their elements. If you encounter any problems while importing, please let us know so that we can assist you in troubleshooting.
* To ensure performance and fair use of server resources, bulk imports are limited if they would bring your account above 20,000 notes or 10 GB of attachments. In that case, you can import up to 50 notes at a time.


# Import from Google Keep

You can transfer your existing notes from **Google Keep** to **UpNote** by performing the following steps on **Mac** and **Windows** app:

1. Export your notes from Keep to **HTML** files following [this guide.](https://www.thewindowsclub.com/how-to-download-notes-from-google-keep-in-html)
2. Select the option to import from Evernote
   * On **Mac**:  Select **File > Import Notes > HTML** from the menu bar.&#x20;
   * On **Windows**: Go to **Settings > General > Import from HTML**&#x20;
3. You will see the pop up as below:\
   ![](/files/5eiqMiD2dGJDYSRQmiyr)
4. Click  **Select .html files/Select folder** and select .html files/folder to import to UpNote.
5. Click  **Import Notes** button to import to UpNote.

Please note that:

* While we do our best to import data from other apps into UpNote, we cannot guarantee that your data format will be fully retained due to the variety of file sources and their elements. If you encounter any problems while importing, please let us know so that we can assist you in troubleshooting.
* To ensure performance and fair use of server resources, bulk imports are limited if they would bring your account above 20,000 notes or 10 GB of attachments. In that case, you can import up to 50 notes at a time.


# Import from HTML

Follow the steps below to import your HTML files to UPNote

1. Select the option to import from Evernote
   * On **Mac**:  Select **File > Import Notes > HTML** from the menu bar.&#x20;
   * On **Windows**: Go to **Settings > General > Import from HTML**&#x20;
2. You will see the pop up as below:\
   ![](/files/5eiqMiD2dGJDYSRQmiyr)
3. Click  **Select .html files/Select folder** and select .html files/folder to import to UpNote.
4. Click  **Import Notes** button to import to UpNote

Please note that:

* While we do our best to import data from other apps into UpNote, we cannot guarantee that your data format will be fully retained due to the variety of file sources and their elements. If you encounter any problems while importing, please let us know so that we can assist you in troubleshooting.
* To ensure performance and fair use of server resources, bulk imports are limited if they would bring your account above 20,000 notes or 10 GB of attachments. In that case, you can import up to 50 notes at a time.


# Export notes

UpNote allows you to export your notes in several formats, making it easy to back up your information or share it in a compatible document type. You can export individual notes, multiple notes, entire notebooks, or even your whole library.

***

### Supported Export Formats

You can export your notes to the following formats:

* **PDF**
* **Text (.txt)**
* **HTML**
* **Markdown (.md)**

These formats help you preserve formatting, move notes to other apps, or create offline archives.

***

### On Desktop (Windows, Linux & macOS)

#### **Export a Single Note**

1. Open the note.
2. Click the **More (⋯)** icon in the top bar.
3. Select **Export**.\
   ![](/files/Q1xI4Z7GqYKrp5o9VEyY)
4. Or use the shortcut **Cmd + E** (Mac) / **Ctrl + E** (Windows).

#### **Export Multiple Notes**

1. Select multiple notes in the note list.
2. In the right panel, click **Export**.\
   ![](/files/zQPRyoHdOU3xeLsuCDgi)
3. Choose whether to export:

   * **As a single document**, merging all selected notes, or
   * **As separate files**, exporting each note individually.

   <div align="left"><figure><img src="/files/Ul8TsOhmPVv1FFhJzYsf" alt="" width="375"><figcaption></figcaption></figure></div>

#### **Export All Notes**

* **On Mac:** Go to **File → Export all notes**.\
  ![](/files/XPiY5bYF9ARhs8jjMq5j)
* **On Windows:** Go to **Settings → General → Export all notes**.

This creates a backup of your entire UpNote library in the selected export format.

#### **Export a Notebook**

1. Select the notebook you want to export.
2. Click the **More (⋯)** icon next to the notebook title in the notes list.
3. Select **Export**.\
   ![](/files/sxtAqHPt7HOLk34EDOZ9)

***

### 📱 On Mobile (iOS & Android)

#### **Export a Note**

1. Open the note.
2. Tap the **More (⋯)** button in the upper-right corner.
3. Select **Export** and choose your desired format.\
   \
   ![](/files/thUuM4ckaUasdWm1EMMk)

***

#### 💡 Tips

* Exported PDF files maintain your note’s formatting, images, and layout.
* Exporting all notes can serve as an offline personal backup.
* When you export your notes to Markdown or HTML, an export folder will be created. Your attachments and images are stored in the “Files” folder inside that export folder.


# Share and publish notes

This is a Premium feature.

UpNote allows you to publish any note as a **web page**, making it easy to share your notes with friends, colleagues, or anyone online. Once published, you can copy the link and send it through email, messaging apps, or anywhere you like.

***

### 🖥 On Desktop (Windows & macOS)

#### **Share a Note**

1. Open the note you want to share.
2. Click the **Share** button in the top bar of the note editor.
3. Click **Copy Link** to copy the web link to your clipboard.

<div align="left"><figure><img src="/files/4CJThxxxHSUVY2mLeNpA" alt="" width="375"><figcaption></figcaption></figure></div>

You can now paste the link into an email, chat message, or your web browser to preview the published note.

#### **Stop Sharing a Note**

* Click **Stop sharing** to disable the link.
* The web link will immediately become invalid and no one will be able to access the note.

#### **Generate a New Link**

* Click **Generate a new link** to create a fresh URL.
* The old link will be permanently invalid.
* This is useful if you want to reset access or share the note with a new audience.

***

### 📱 On Mobile (iOS & Android)

#### **Share a Note**

1. Open the note.
2. Tap the **Share** button in the top bar.
3. Tap **Share Link** to send the link using your device’s share sheet.

#### **Stop Sharing**

* Tap **Stop sharing** to disable the published link.
* The link will no longer work once sharing is stopped.

#### **Generate a New Link**

* Tap **Generate a new link** to replace the existing URL with a new one.
* The previous link becomes invalid immediately.

***

### 🔎 View Shared Notes

You can easily identify and manage your shared notes:

* When a note is shared, the **Share icon** in the top bar is highlighted.
* You can view all shared notes by using the **Shared Notes** [filter](/organize-and-manage-notes/find-and-view-notes/filter-notes) in the **All Notes** section.

<figure><img src="/files/3t1vHHtfBYMaMTj0mFmk" alt=""><figcaption></figcaption></figure>

***

#### 💡 Tips

* Shared notes are read-only for viewers; they cannot edit your content.
* You can unshare links at any time for privacy and control.
* Linked notes can be shared together to create a seamless reading experience for your audience.


# Web clipper

UpNote provides a web clipping extension for **Chrome**, **Safari**, and **Firefox**, allowing you to quickly save web pages directly into UpNote. This is useful for research, reading later, collecting references, or archiving content from the web.

***

### Chrome Extension

1. Install the [UpNote Web Clipper for Chrome](https://chrome.google.com/webstore/detail/upnote-web-clipper/nloebbaneekjiakbhafchdlfjmildnni).
2. Open a web page in Chrome.
3. Click the **UpNote icon** in the upper-right corner of your browser.
4. The extension will clip the content and format it for UpNote.
5. Click **Open UpNote** to view your clipped note in the app.

<figure><img src="/files/ZaitOafLqZwSFkZyKeXy" alt=""><figcaption></figcaption></figure>

***

### Firefox Extension

1. Install the [UpNote Web Clipper for Firefox](https://addons.mozilla.org/en-US/firefox/addon/upnote-web-clipper/).
2. Open the web page you want to save.
3. Click the **UpNote icon** in the Firefox toolbar.
4. Click **Open Link** to open the clipped content in UpNote.

***

### Safari Extension

1. Install the [UpNote Web Clipper for Safari](https://apps.apple.com/us/app/upnote-web-clipper/id1566998257?mt=12).
2. Open Safari and navigate to the web page you want to clip.
3. Click the **UpNote icon** in the top toolbar.
4. Choose your clipping preferences
5. The content will be sent to UpNote as a new note.

***

**FAQ: When using the Web Clipper, why do I see a warning that it requests access to my web activity?**\
This warning appears because the UpNote Web Clipper needs permission to read the content of the web page you’re clipping. It uses this access to extract the main article, remove ads and navigation elements, and then send the cleaned content to your UpNote app.

The process is entirely local and offline — no data is sent to any external server, and you can even use the Web Clipper without signing in to an UpNote account.

The browser displays this warning because some web pages may contain sensitive information, but **UpNote never collects, stores, or accesses any personal or private data**.


# Share extension on iOS

UpNote supports the iOS **Share Extension**, allowing you to quickly send web pages, images, or selected text directly to UpNote from other apps. This makes it easy to capture content on the go and keep everything organized in your notes.

***

### Share a Web Page

1. Open a web page in **Safari**.
2. Tap the **Share** button in the bottom bar.
3. Select **UpNote** from the app list.

<div align="left"><figure><img src="/files/abbypB1S8ZQWF8xQFu3N" alt="" width="375"><figcaption></figcaption></figure></div>

**If UpNote does not appear in the app list:**

1. Swipe to the **far right** of the app list.
2. Tap **More**.
3. Tap **Edit** in the upper-right corner.
4. Enable **UpNote** to add it to your share options.

You can add extra details to your note (optional), then tap **Post** to send it to UpNote.

The web page will be clipped to UpNote. Open the UpNote app to view it and sync it across your devices.

***

### Share Selected Text

1. Select the text you want to share.
2. Tap the **Share** button that appears in the pop-up menu.
3. Choose **UpNote** from the app list.

<div align="left"><figure><img src="/files/dzrja8j4dLGYZYuWWc9B" alt="" width="375"><figcaption></figcaption></figure></div>

**If UpNote does not appear:**

1. Swipe to the **right end** of the app list.
2. Tap **More**.
3. Tap **Edit** and enable **UpNote** to add it.

Add optional details if needed, then tap **Post** to share your text into UpNote.

The selected text will appear as a new note in UpNote. You can then open the app to view it and sync it to other devices.

***

#### 💡 Tips

* You can share **images**, **text**, and **web links** from any app that supports the iOS Share Sheet.
* Shared content is saved as a **new note**, which you can move, tag, or edit once inside UpNote.

<br>


# Share extension on Android

UpNote supports the Android **Share Extension**, allowing you to quickly send images, web links, or selected text directly to UpNote from other apps. This makes it easy to capture information and save it to your notes with just a few taps.

> **Note:** On Android, you can share **web links only**—sharing the **full web page content** is not currently supported.

***

### Share a Web Link

1. Open a web page in **Chrome**.
2. Tap the **More (⋮)** button in the upper-right corner.
3. Tap **Share** from the dropdown list.
4. If you see the **UpNote icon** in the share row, tap it to share directly.
5. If not, tap **More** and select **UpNote** from the full app list.
6. Add optional details to your note, then tap **Done** to share it to UpNote.

***

### Share Selected Text

1. Select the text you want to share.
2. Tap the **Share** button in the pop-up menu.
3. Choose **UpNote** from the app list.
   * If UpNote doesn’t appear, tap **More** and select **UpNote** from the list.
4. Add optional details to your note, then tap **Done** to complete the sharing process.


---

[Next Page](/llms-full.txt/1)