> For the complete documentation index, see [llms.txt](https://help.getupnote.com/llms.txt). Markdown versions of documentation pages are available by appending `.md` to page URLs; this page is available as [Markdown](https://help.getupnote.com/ko/write-and-edit/add-content-to-your-notes/tables.md).
# Tables
UpNote Premium allows you to create tables to organize your note content. You can insert various content into tables: text, image, attachments, quotes, checkboxes, code blocks, checklists, dividers...
Tables is a great tool if you want to organize your images and text in your note, for example:

### Create a table
#### On **desktop**
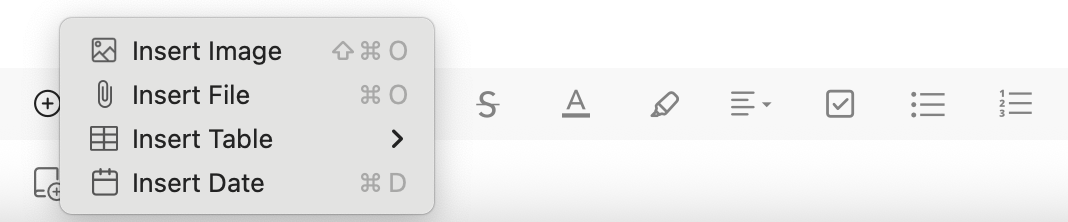
1. Click the button in the [formatting bar](broken://pages/HW5x1P4soOaSshDTmAup) at the bottom of the note editor and select **`Insert Table`,** or use the shortcut **`Cmd/Ctrl`** + **`T`**
2. Select the number of rows and columns
You can also use the slash menu to quickly insert the table in your note:\

#### On **mobile**
1. Tap the button in the formatting bar
2. Select **`Insert Table`**\
\

### Insert/delete rows or columns
#### On **desktop**
1. Select a cell and click the the button at its right side.
2. Select an option to insert/delete columns or row\

3. **Tip**: If you want to insert/delete **multiple** rows/columns at once, you can highlight multiple rows or columns before selecting the options\

4. You can also use the shortcuts below to quickly insert rows/columns:
* Insert row above: **`Cmd/Ctrl`** + **`Shift`** + **`Enter`**
* Insert row below: **`Cmd/Ctrl`** + **`Enter`**
* Insert column (to the left): **`Cmd/Ctrl`** + **`Shift`** + **`Alt`** + **`Enter`**
* Insert column (to the right): **`Cmd/Ctrl`** + **`Alt`** + **`Enter`**
#### On mobile
1. Tap the table option button in the formatting bar
2. Select the option to insert/delete rows or columns\

If you want to resize the column width of the table, long tap the column divider and drag it to resize.
### Copy/delete tables
#### On **desktop**
1. Select a cell and click the the button at its right side.
2. Select an option to copy/delete table\

#### On **mobile**
1. Tap the table option button in the formatting bar
2. Select the option to copy/delete table. \
\

### **Set background color**
#### On **desktop**
1. Select a cell and click the the button at its right side.
2. Select **`Cell Background`** and set a desired color
#### On **mobile**
1. Tap the table option button in the formatting bar
2. Select **`Cell Background`** and set a desired color
### **Merge cells**
This feature is only available on **desktop** app. Follow the steps below to merge cells:
1. Highlight adjacent cells you want to merge
2. Select a cell and click the the button at its right side.
3. Select **`Merge Cells`**\

 button in the [formatting bar](broken://pages/HW5x1P4soOaSshDTmAup) at the bottom of the note editor and select **`Insert Table`,** or use the shortcut **`Cmd/Ctrl`** + **`T`**
  button in the formatting bar
2. Select **`Insert Table`**\
\

### Insert/delete rows or columns
#### On **desktop**
1. Select a cell and click the the
button in the formatting bar
2. Select **`Insert Table`**\
\

### Insert/delete rows or columns
#### On **desktop**
1. Select a cell and click the the  button at its right side.
2. Select an option to insert/delete columns or row\

3. **Tip**: If you want to insert/delete **multiple** rows/columns at once, you can highlight multiple rows or columns before selecting the options\

4. You can also use the shortcuts below to quickly insert rows/columns:
* Insert row above: **`Cmd/Ctrl`** + **`Shift`** + **`Enter`**
* Insert row below: **`Cmd/Ctrl`** + **`Enter`**
* Insert column (to the left): **`Cmd/Ctrl`** + **`Shift`** + **`Alt`** + **`Enter`**
* Insert column (to the right): **`Cmd/Ctrl`** + **`Alt`** + **`Enter`**
#### On mobile
1. Tap the table option
button at its right side.
2. Select an option to insert/delete columns or row\

3. **Tip**: If you want to insert/delete **multiple** rows/columns at once, you can highlight multiple rows or columns before selecting the options\

4. You can also use the shortcuts below to quickly insert rows/columns:
* Insert row above: **`Cmd/Ctrl`** + **`Shift`** + **`Enter`**
* Insert row below: **`Cmd/Ctrl`** + **`Enter`**
* Insert column (to the left): **`Cmd/Ctrl`** + **`Shift`** + **`Alt`** + **`Enter`**
* Insert column (to the right): **`Cmd/Ctrl`** + **`Alt`** + **`Enter`**
#### On mobile
1. Tap the table option  button in the formatting bar
2. Select the option to insert/delete rows or columns\

If you want to resize the column width of the table, long tap the column divider and drag it to resize.
### Copy/delete tables
#### On **desktop**
1. Select a cell and click the the
button in the formatting bar
2. Select the option to insert/delete rows or columns\

If you want to resize the column width of the table, long tap the column divider and drag it to resize.
### Copy/delete tables
#### On **desktop**
1. Select a cell and click the the