> For the complete documentation index, see [llms.txt](https://help.getupnote.com/llms.txt). Markdown versions of documentation pages are available by appending `.md` to page URLs; this page is available as [Markdown](https://help.getupnote.com/ko/organize-and-manage-notes/organize-with-notebooks/move-notes-across-notebooks.md).
# 노트를 다른 노트북으로 이동하기
UpNote에서는 노트를 **다른 노트북으로 손쉽게 이동**할 수 있어,\
프로젝트나 아이디어가 발전함에 따라 내용을 깔끔하게 정리할 수 있습니다.\
한 번에 하나의 노트를 이동할 수도 있고, 여러 노트를 동시에 이동할 수도 있습니다.
***
#### **데스크톱(Desktop)**
UpNote에서는 다양한 방법으로 노트를 노트북 간에 이동할 수 있습니다.\
가장 편한 방식을 선택해 빠르고 효율적으로 정리해 보세요.
**🖱️드래그 앤 드롭 (Drag and Drop)**
노트 목록에서 노트를 사이드바의 노트북으로 **드래그 앤 드롭**하여 이동할 수 있습니다.
* 기본 설정에서는 노트를 드래그하면 해당 노트북에 **추가(Add)** 됩니다.
* 노트를 **이동(Move)** 하고 싶다면 다음 경로에서 설정을 변경하세요:\
**설정(Settings) → 일반(General) → 기타(Others) → 노트를 노트북으로 드래그 → 노트북으로 이동(Move to notebook)**
***
**📘 노트북 아이콘 사용하기 (Use the Notebook Icon)**
노트 편집기(Editor)에서도 노트를 다른 노트북으로 이동할 수 있습니다.
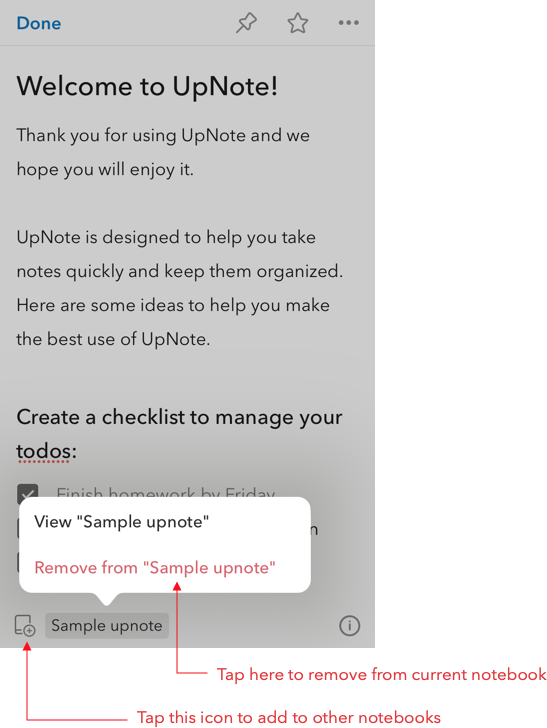
1. 노트 편집기 왼쪽 하단의 **노트북 아이콘(Notebook icon)** 을 클릭합니다.
2. 노트를 추가할 노트북을 하나 이상 선택합니다.
3. **Cmd/Ctrl + Shift + B** 단축키로도 이 창을 열 수 있습니다.
노트를 노트북에서 제거하려면:
* 팝업창에서 해당 노트북의 체크를 해제하거나,
* 노트에 표시된 노트북 라벨의 **× 버튼**을 클릭합니다.
 > 💡 **팁(Tip):**\
> ‘노트북에 추가(Add to Notebooks)’ 팝업에서 노트북 이름의 앞 몇 글자를 입력하면 빠르게 찾을 수 있습니다.
>
> * ↑ / ↓ 화살표 키로 노트북 간 이동
> * **Enter** 키로 선택 또는 선택 해제
***
**여러 노트를 한 번에 이동하기 (Move multiple notes at once)**
여러 노트를 동시에 이동하거나 추가하여 작업 공간을 빠르게 정리할 수 있습니다.
* 노트 목록에서 **Shift** 또는 **Cmd/Ctrl** 키를 누른 상태로 여러 노트를 선택합니다.
* 선택한 후에는 다음과 같은 방법을 사용할 수 있습니다:
* 노트를 사이드바의 노트북으로 **드래그 앤 드롭**
* 또는 오른쪽 패널의 옵션을 이용:
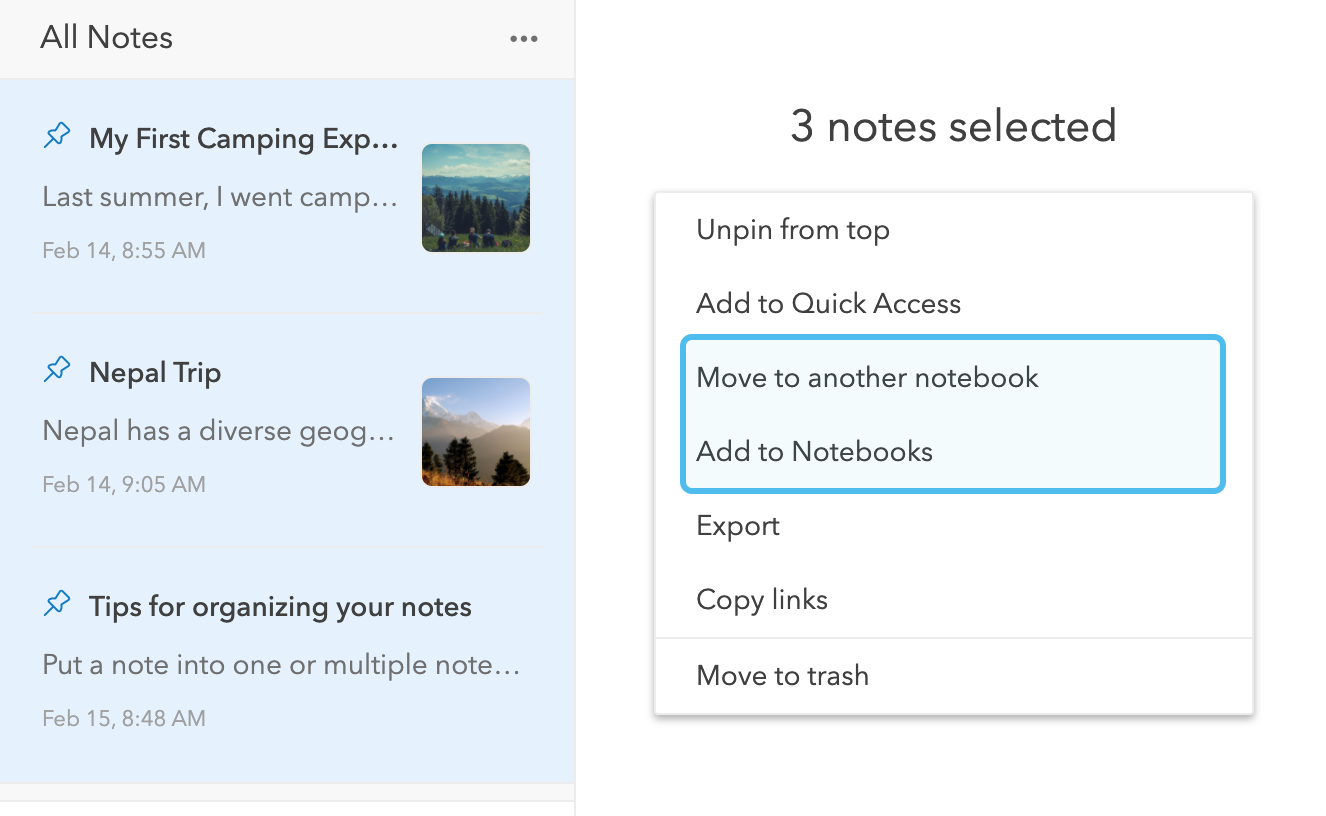
* **다른 노트북으로 이동(Move to another notebook)** — 선택한 모든 노트를 지정한 노트북으로 이동합니다.
* **노트북에 추가(Add to notebooks)** — 선택한 노트를 여러 노트북에 동시에 추가할 수 있습니다.
> 💡 **팁(Tip):**\
> ‘노트북에 추가(Add to Notebooks)’ 팝업에서 노트북 이름의 앞 몇 글자를 입력하면 빠르게 찾을 수 있습니다.
>
> * ↑ / ↓ 화살표 키로 노트북 간 이동
> * **Enter** 키로 선택 또는 선택 해제
***
**여러 노트를 한 번에 이동하기 (Move multiple notes at once)**
여러 노트를 동시에 이동하거나 추가하여 작업 공간을 빠르게 정리할 수 있습니다.
* 노트 목록에서 **Shift** 또는 **Cmd/Ctrl** 키를 누른 상태로 여러 노트를 선택합니다.
* 선택한 후에는 다음과 같은 방법을 사용할 수 있습니다:
* 노트를 사이드바의 노트북으로 **드래그 앤 드롭**
* 또는 오른쪽 패널의 옵션을 이용:
* **다른 노트북으로 이동(Move to another notebook)** — 선택한 모든 노트를 지정한 노트북으로 이동합니다.
* **노트북에 추가(Add to notebooks)** — 선택한 노트를 여러 노트북에 동시에 추가할 수 있습니다.
 ***
#### **모바일(Mobile)**
모바일에서도 같은 방식으로 노트를 이동할 수 있습니다.\
노트 편집기 하단의 **노트북 아이콘(Notebook icon)** 을 탭하여\
노트를 추가하거나 다른 노트북으로 이동하세요.
***
#### **모바일(Mobile)**
모바일에서도 같은 방식으로 노트를 이동할 수 있습니다.\
노트 편집기 하단의 **노트북 아이콘(Notebook icon)** 을 탭하여\
노트를 추가하거나 다른 노트북으로 이동하세요.
 **여러 노트를 한 번에 이동하기**
1. **노트 목록(Note list)** 화면으로 이동합니다.
2. 오른쪽 하단의 **`...`** 버튼을 탭하여 **다중 선택 모드(Multi-select mode)** 로 전환합니다.
3. 이동할 노트를 선택합니다.
4. 하단의 **노트북(Notebook)** 버튼을 탭하고 이동할 노트북을 선택합니다.

**여러 노트를 한 번에 이동하기**
1. **노트 목록(Note list)** 화면으로 이동합니다.
2. 오른쪽 하단의 **`...`** 버튼을 탭하여 **다중 선택 모드(Multi-select mode)** 로 전환합니다.
3. 이동할 노트를 선택합니다.
4. 하단의 **노트북(Notebook)** 버튼을 탭하고 이동할 노트북을 선택합니다.
